You’re Awesome Layout | Cocoa Vanilla.

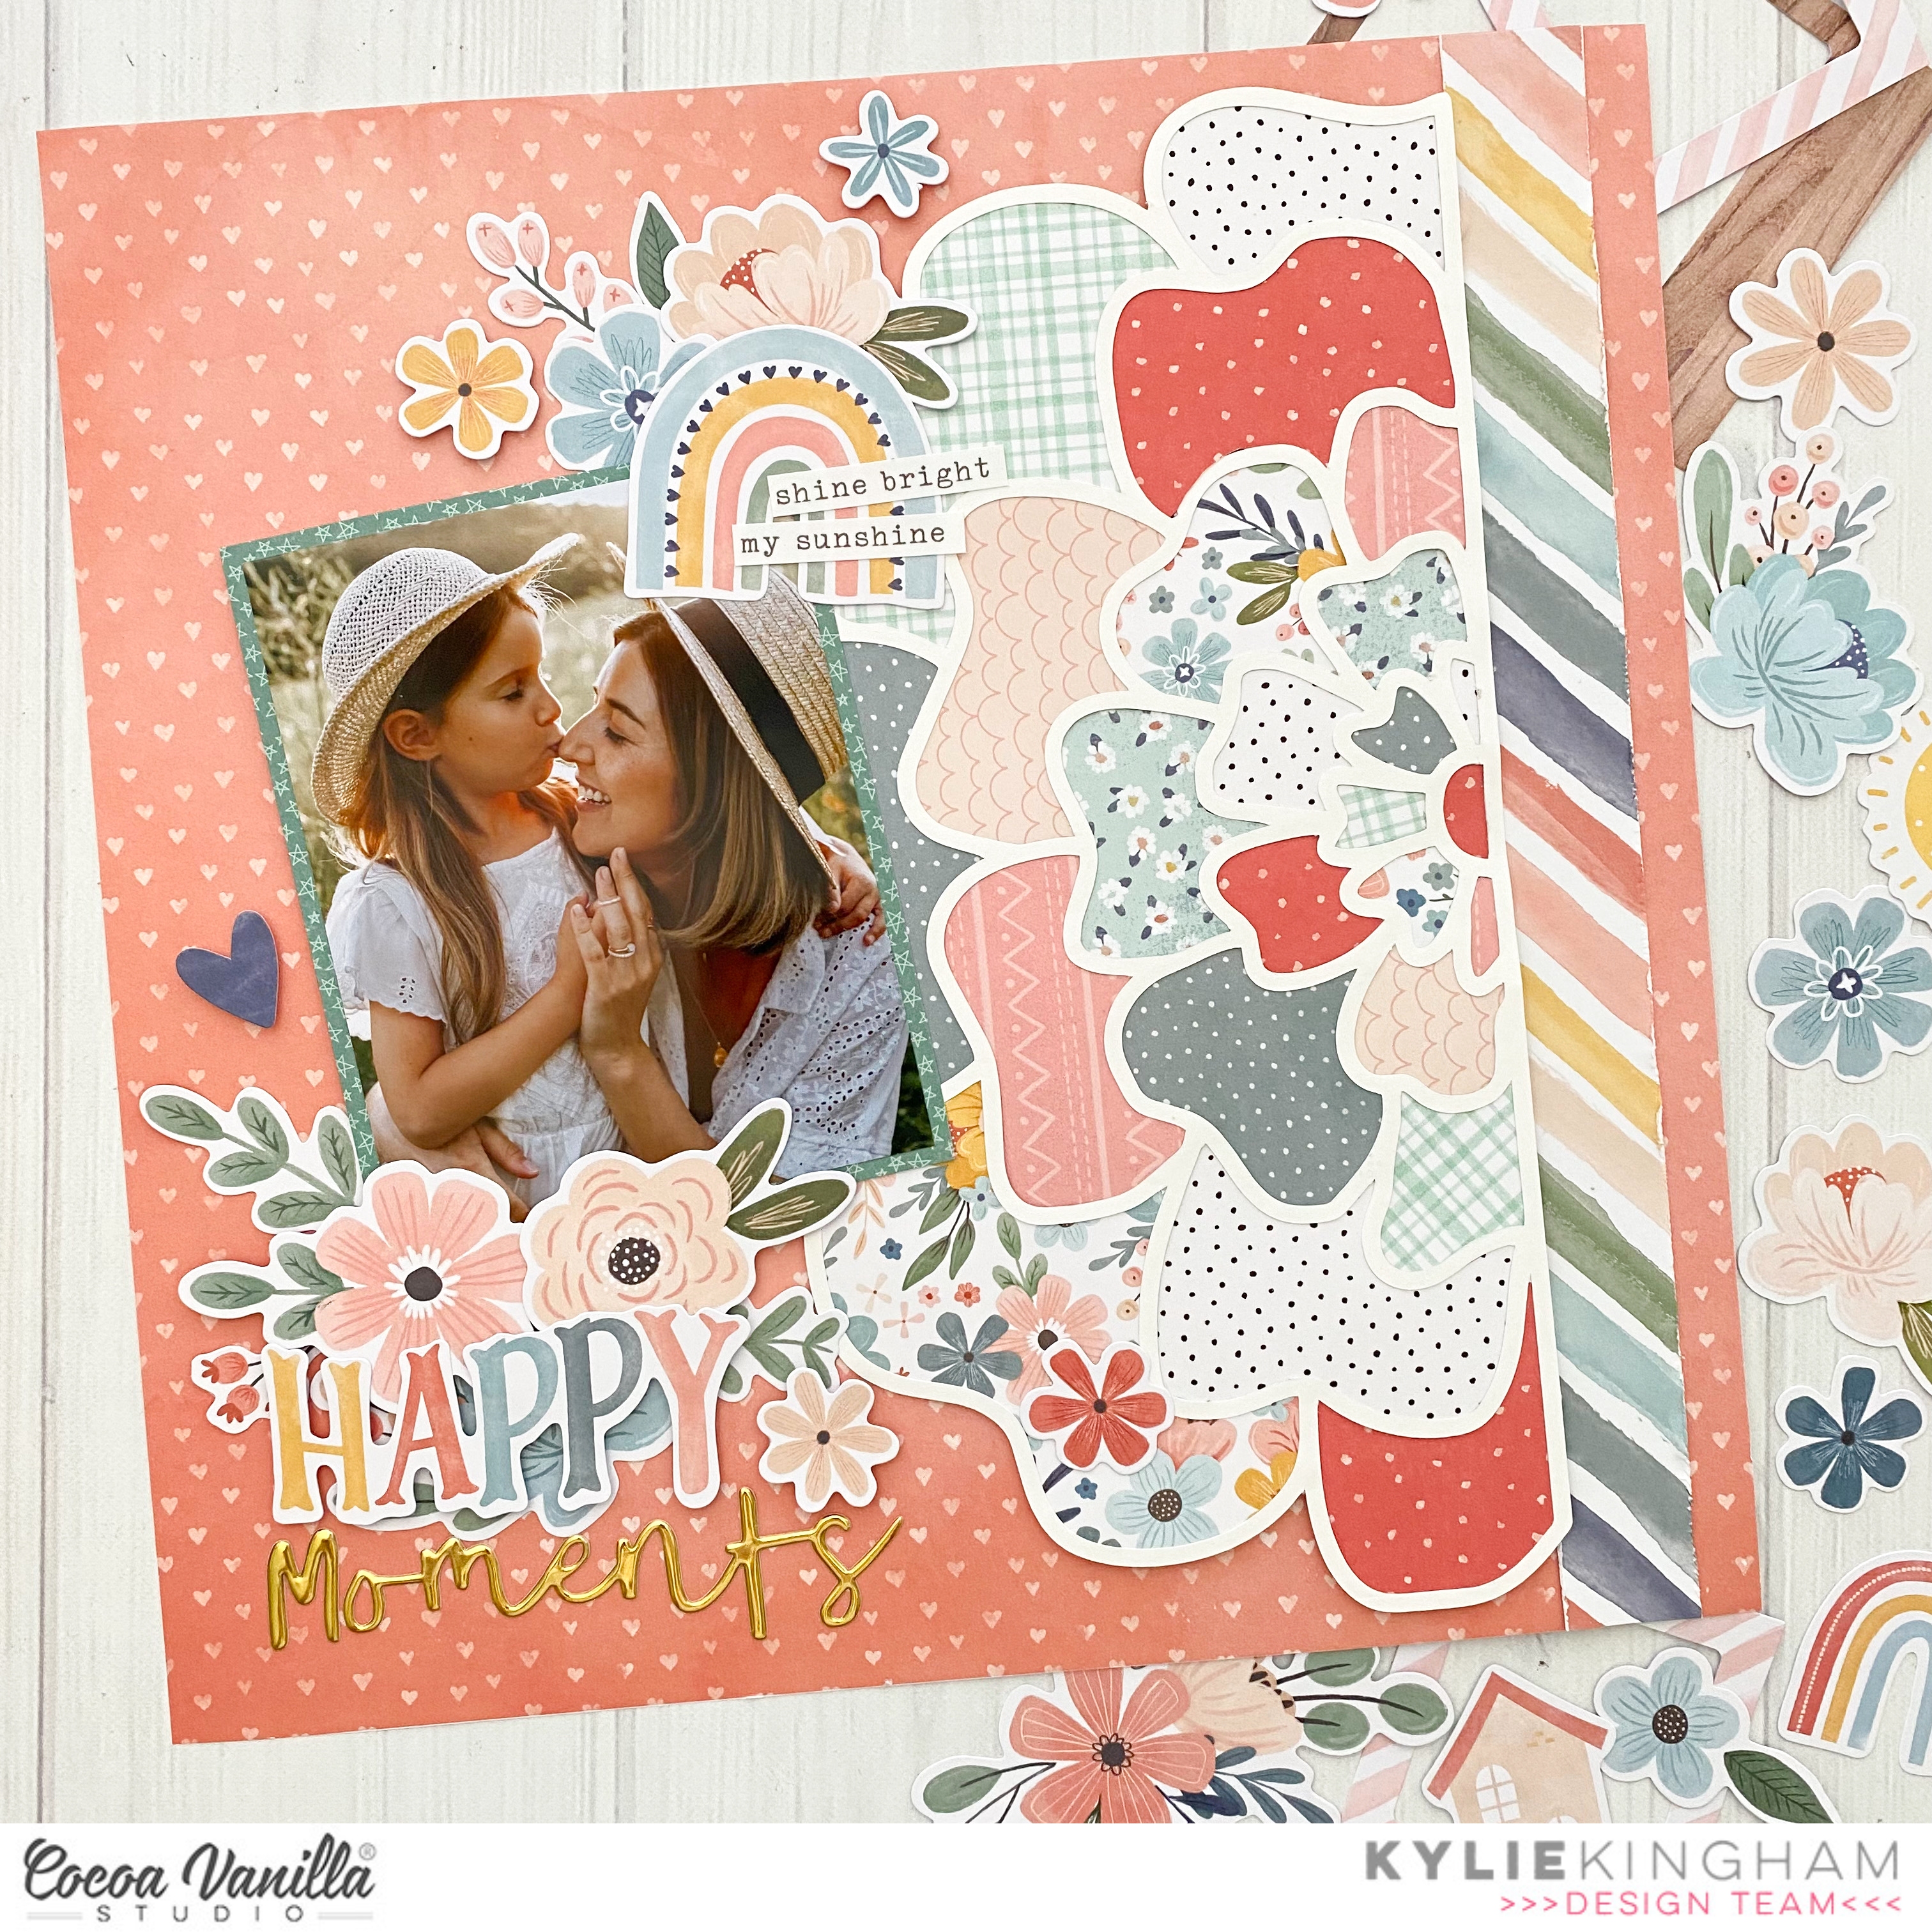
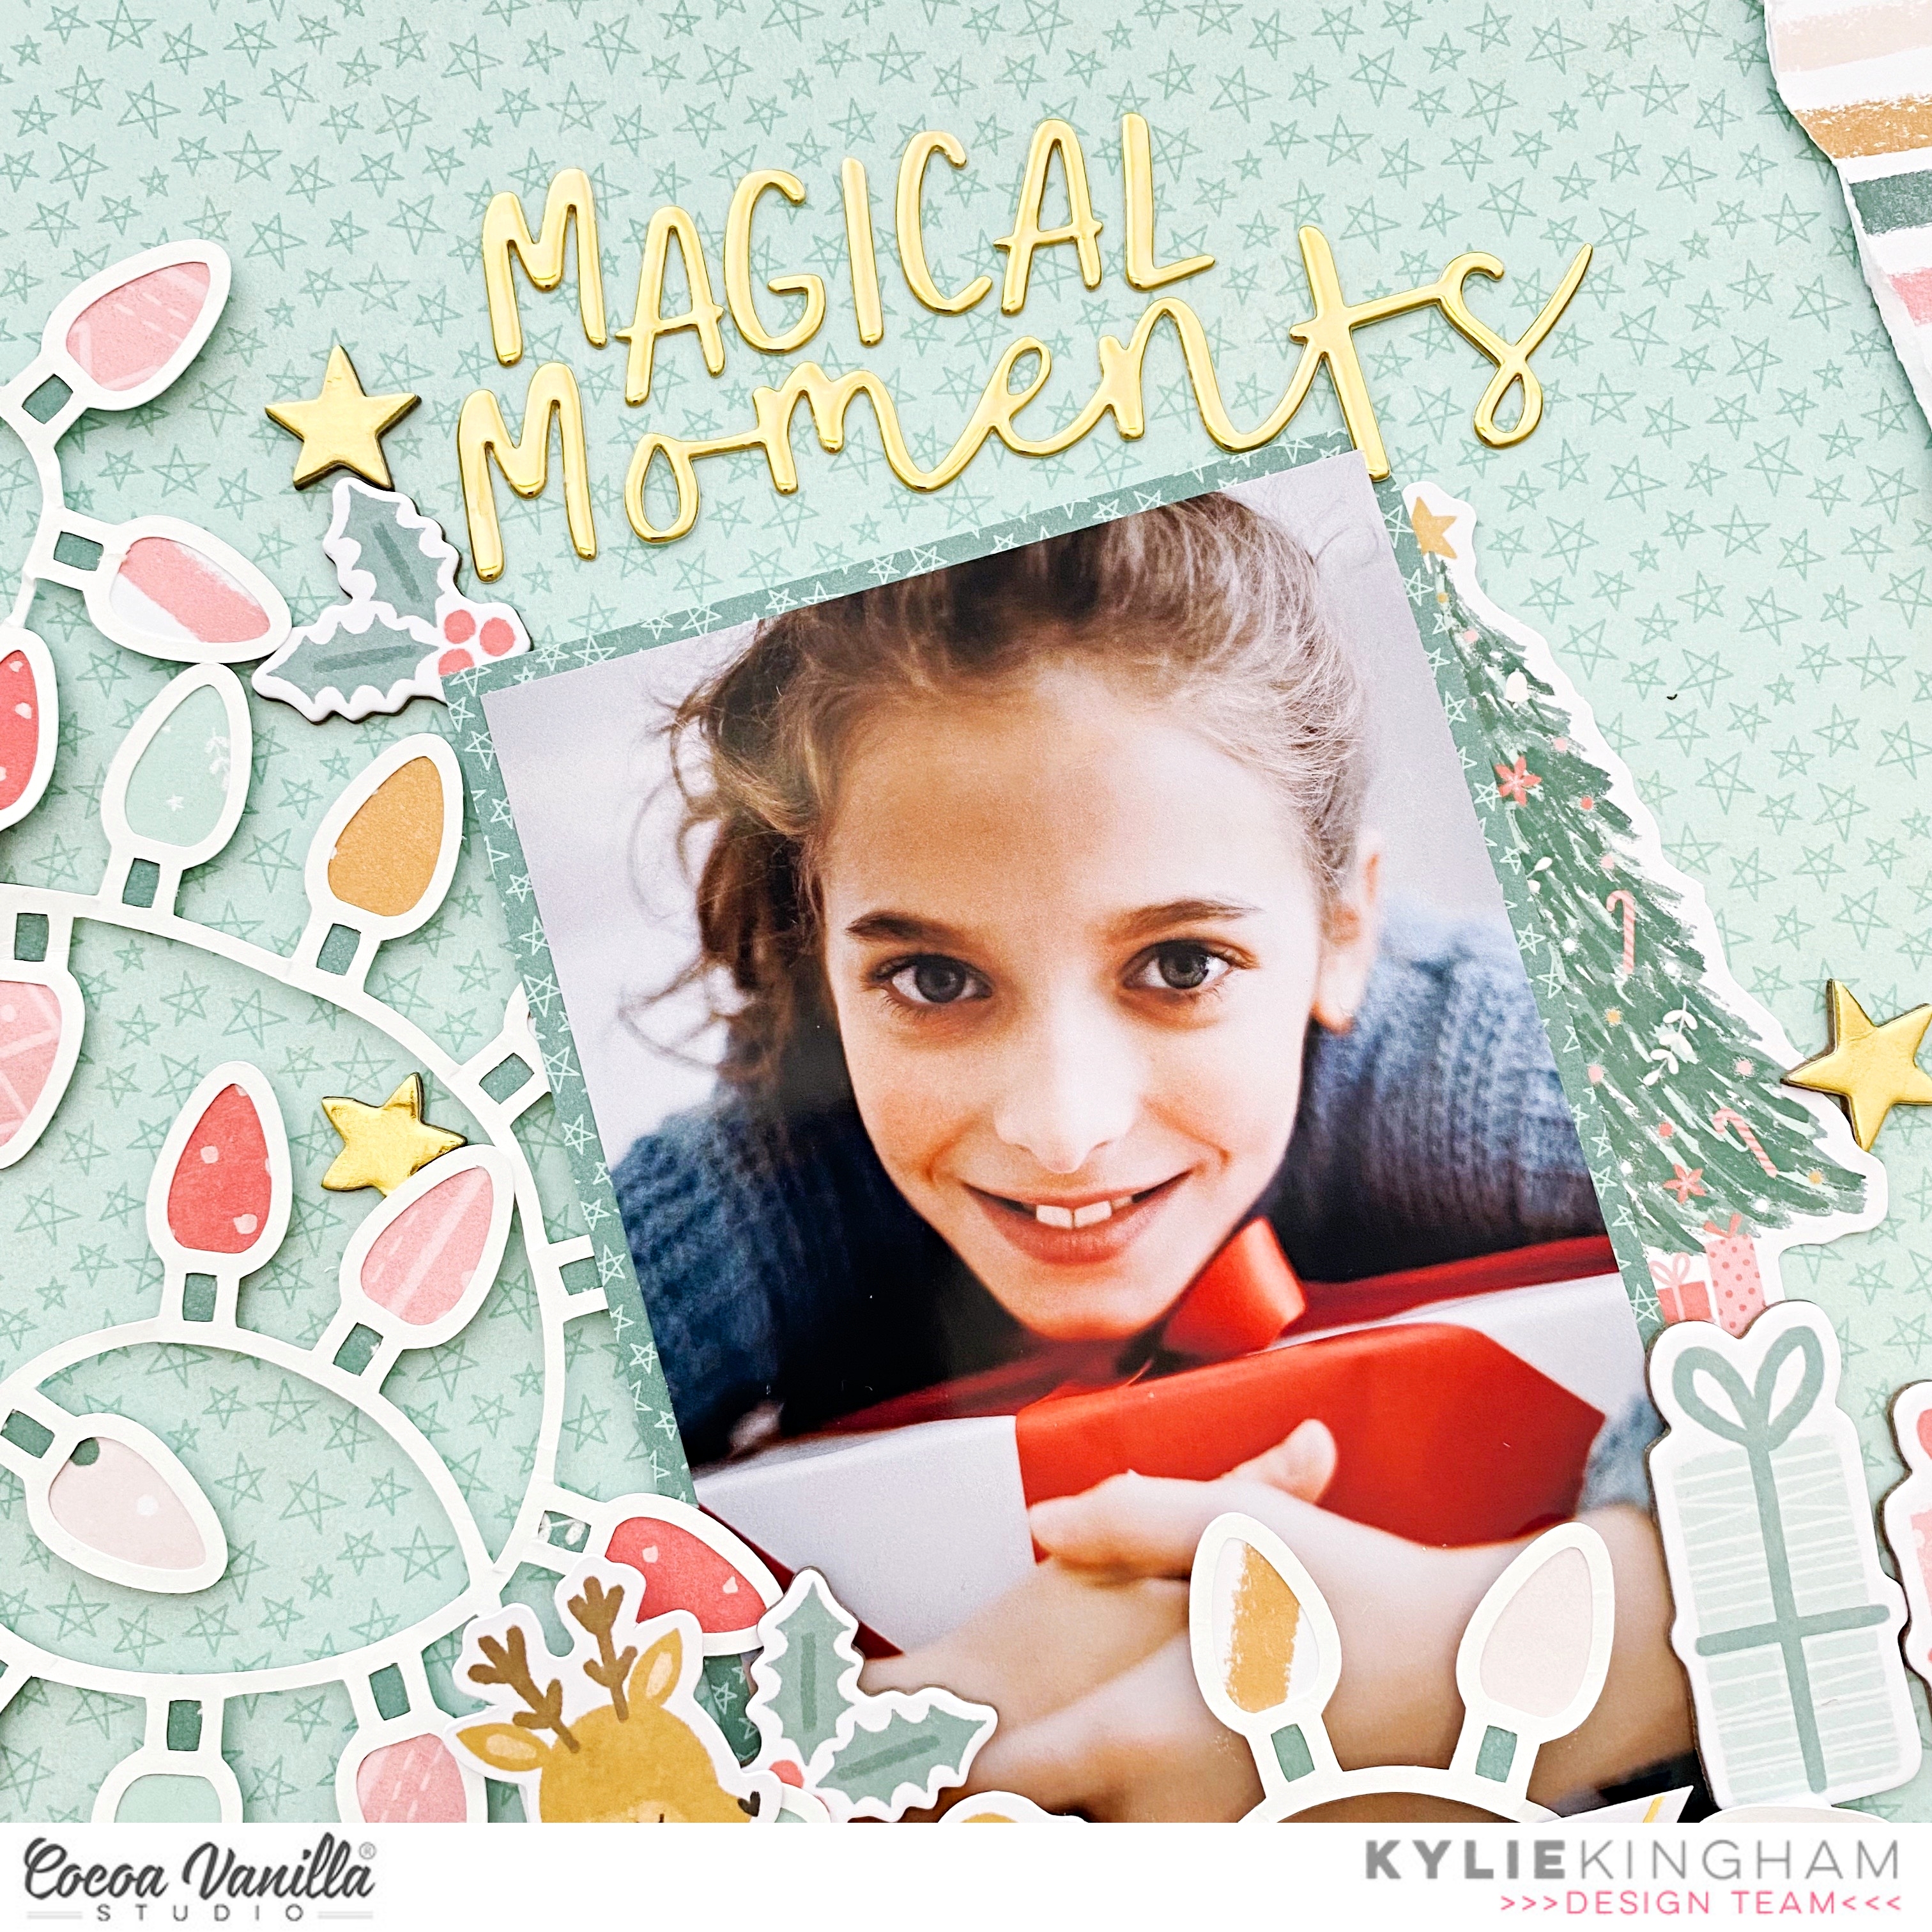
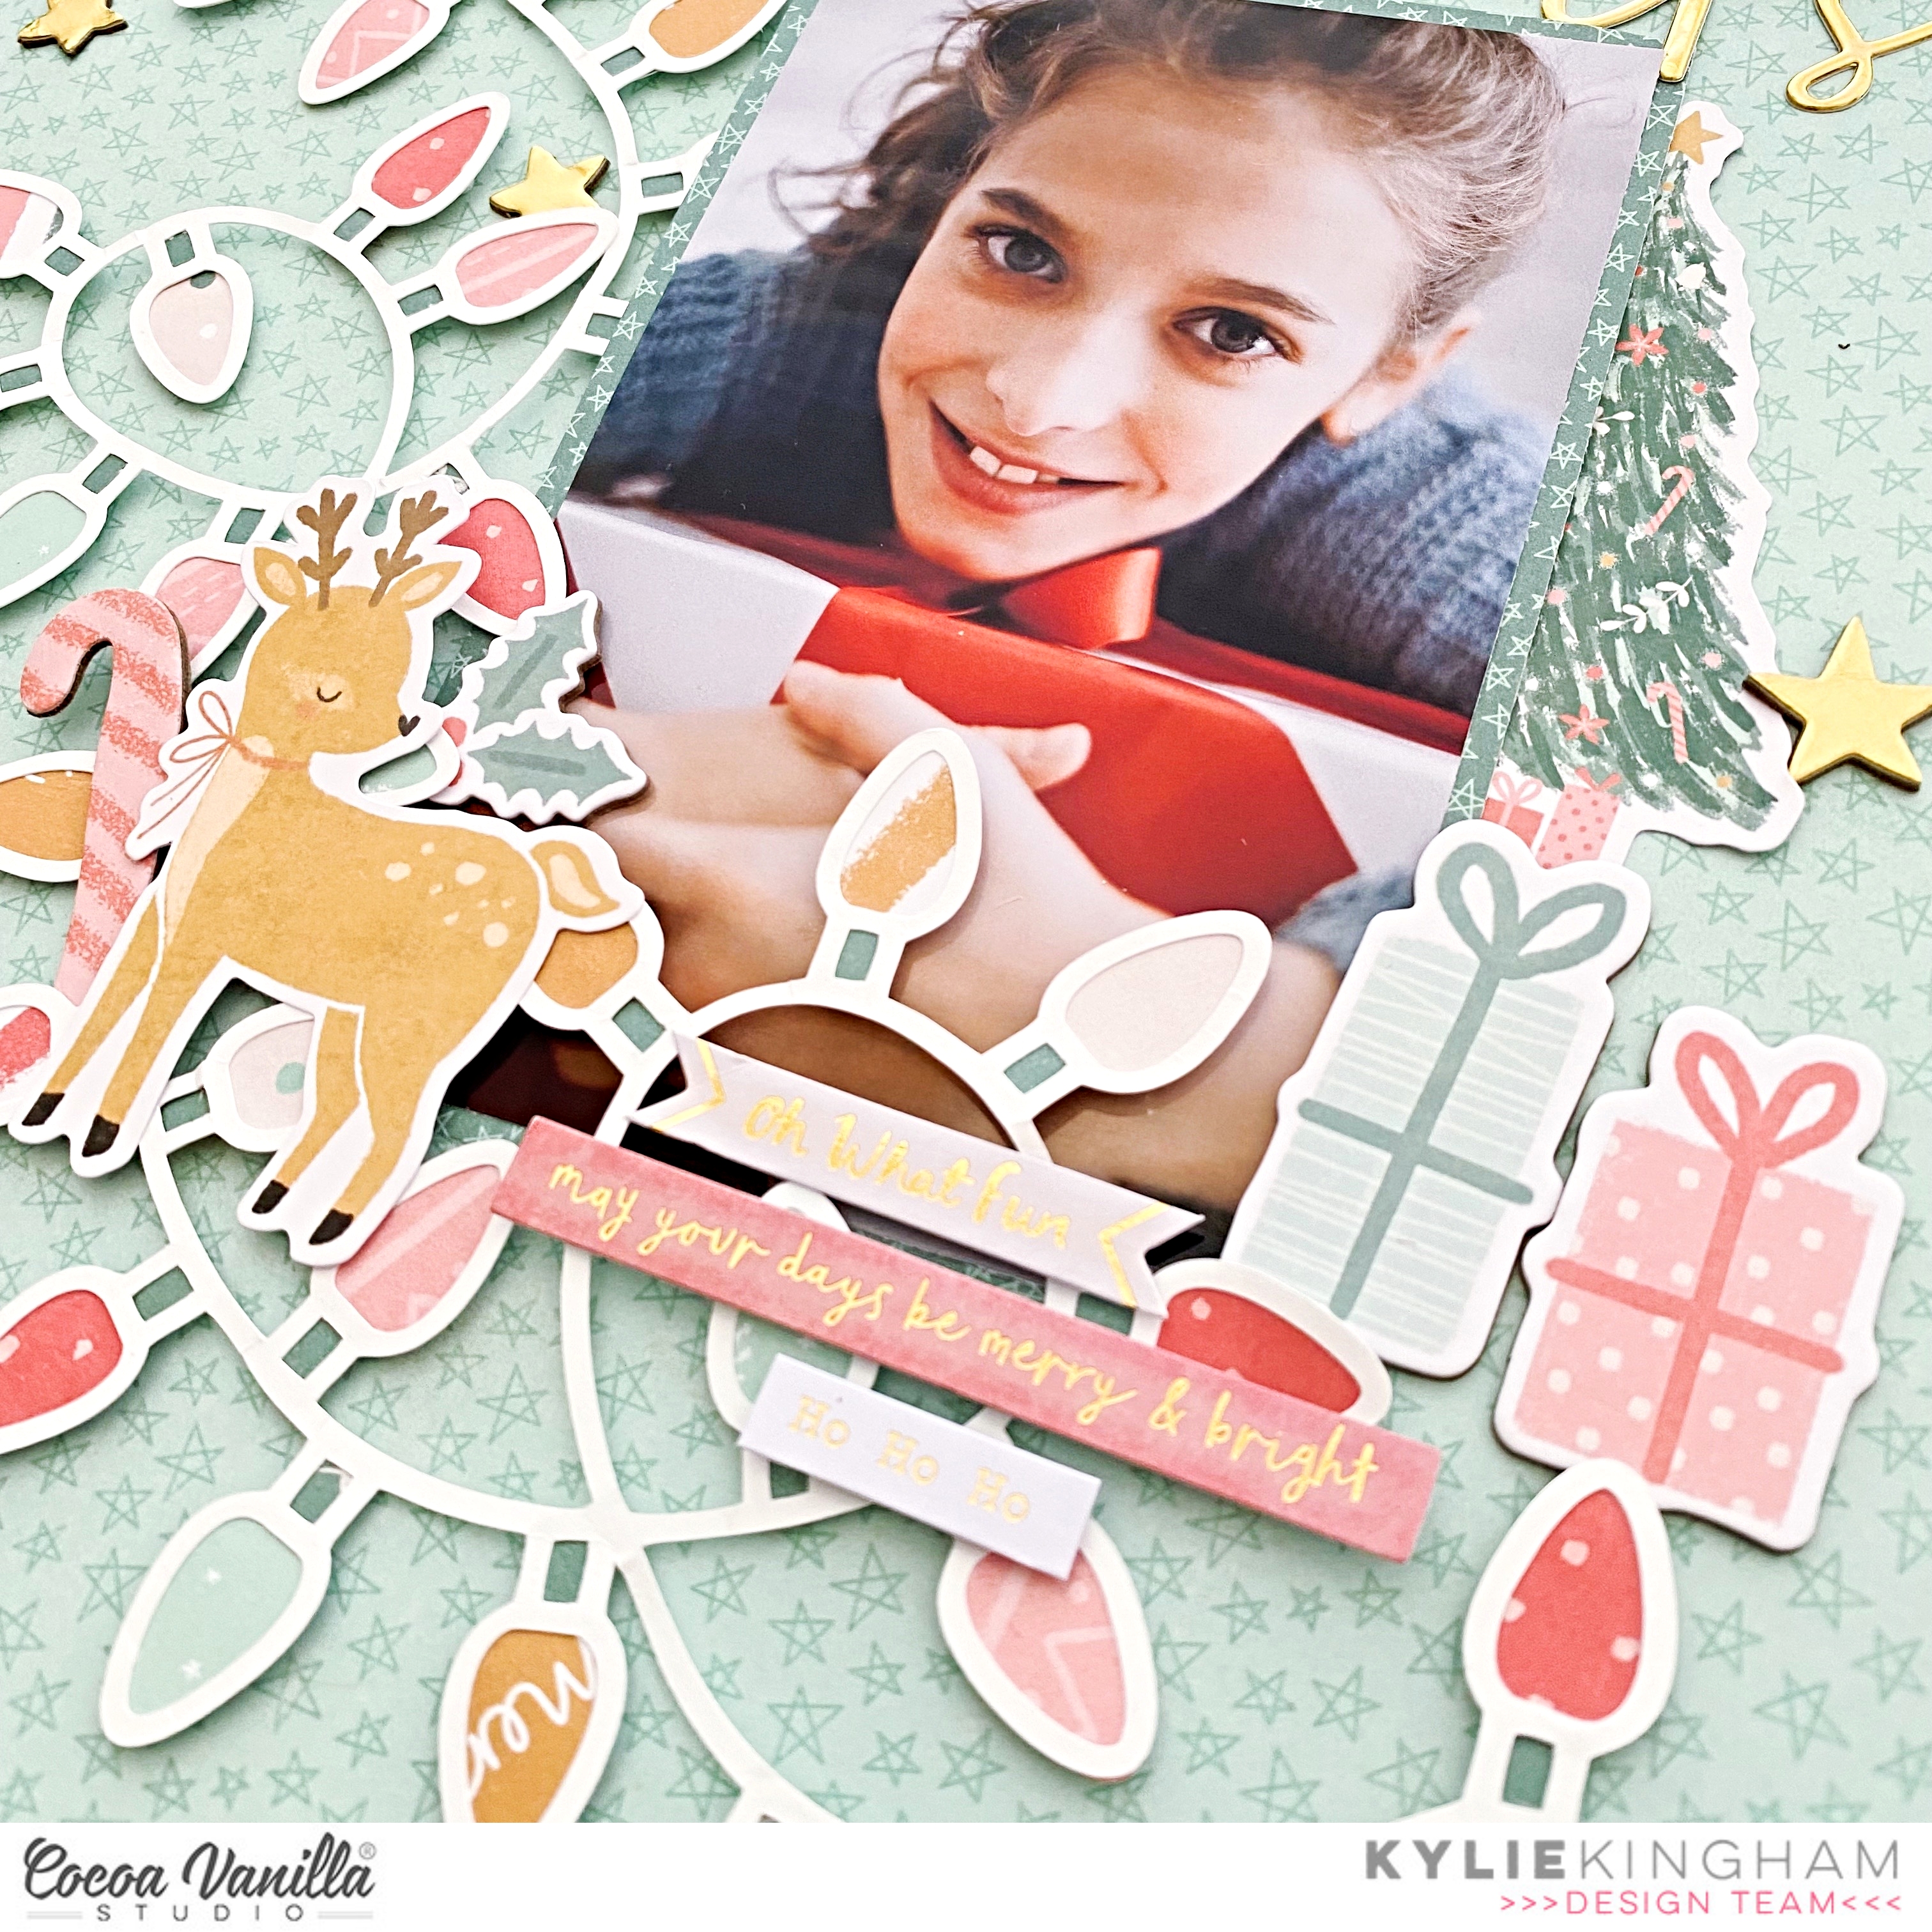
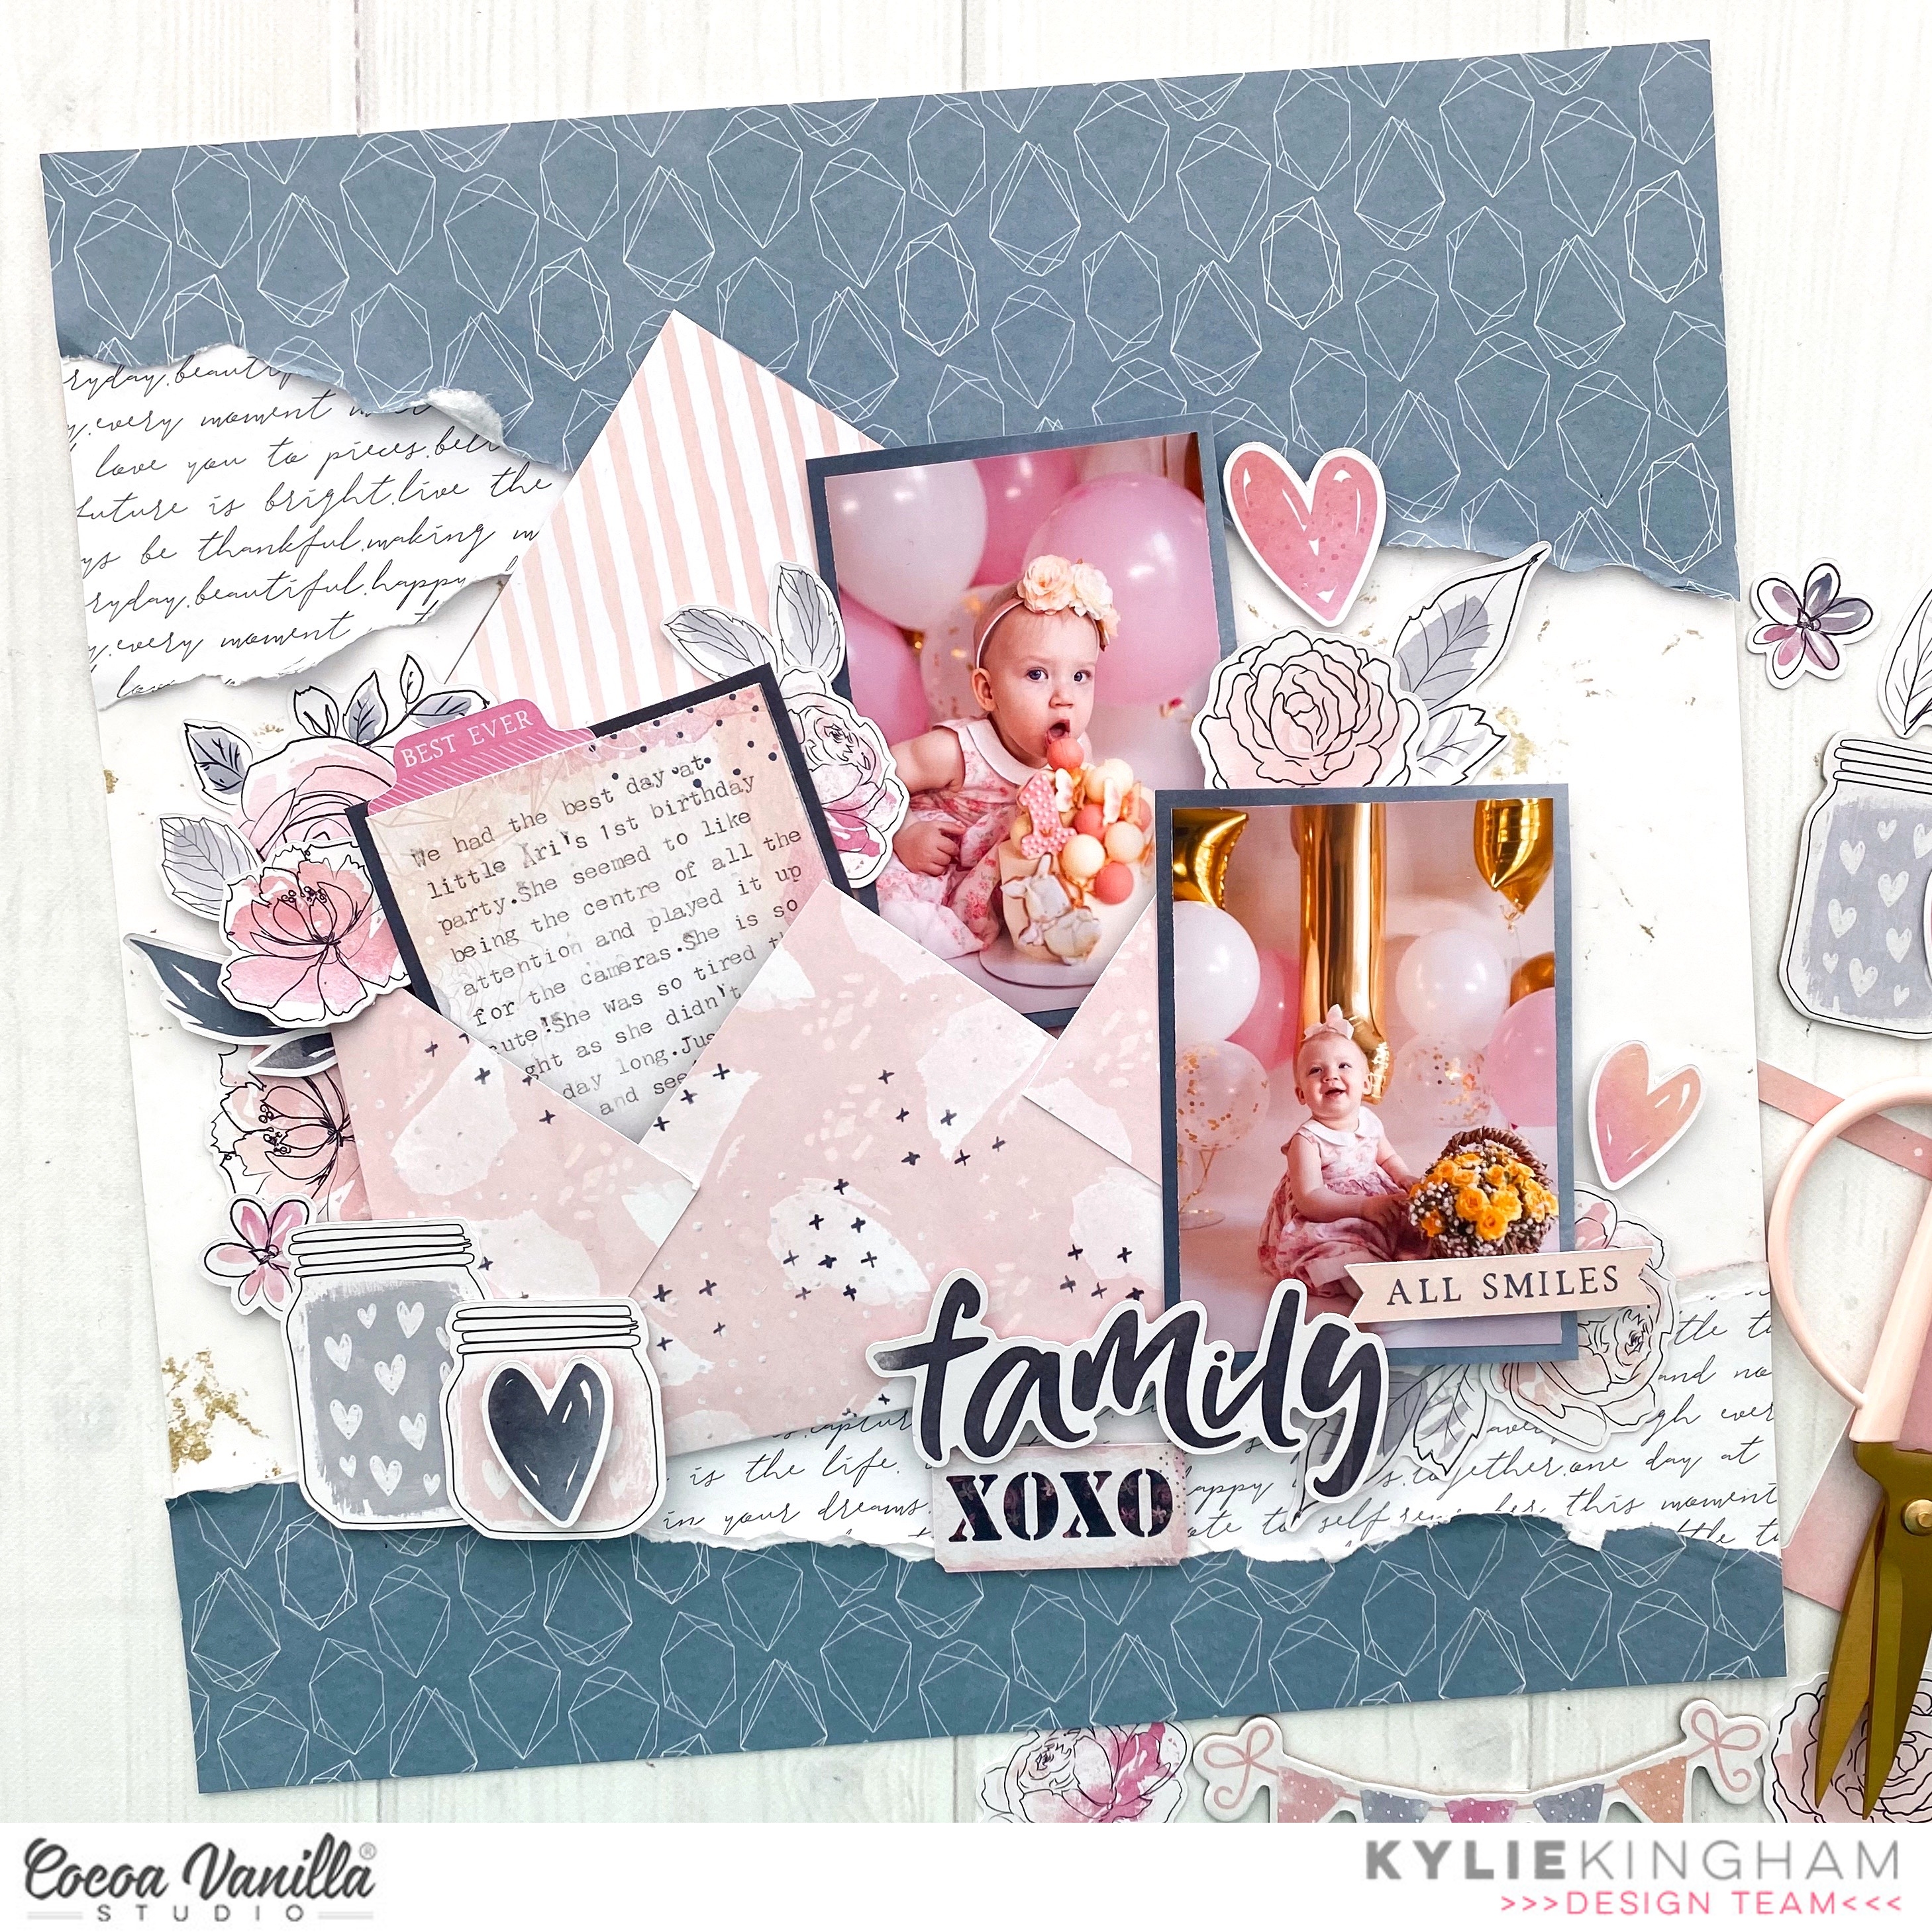
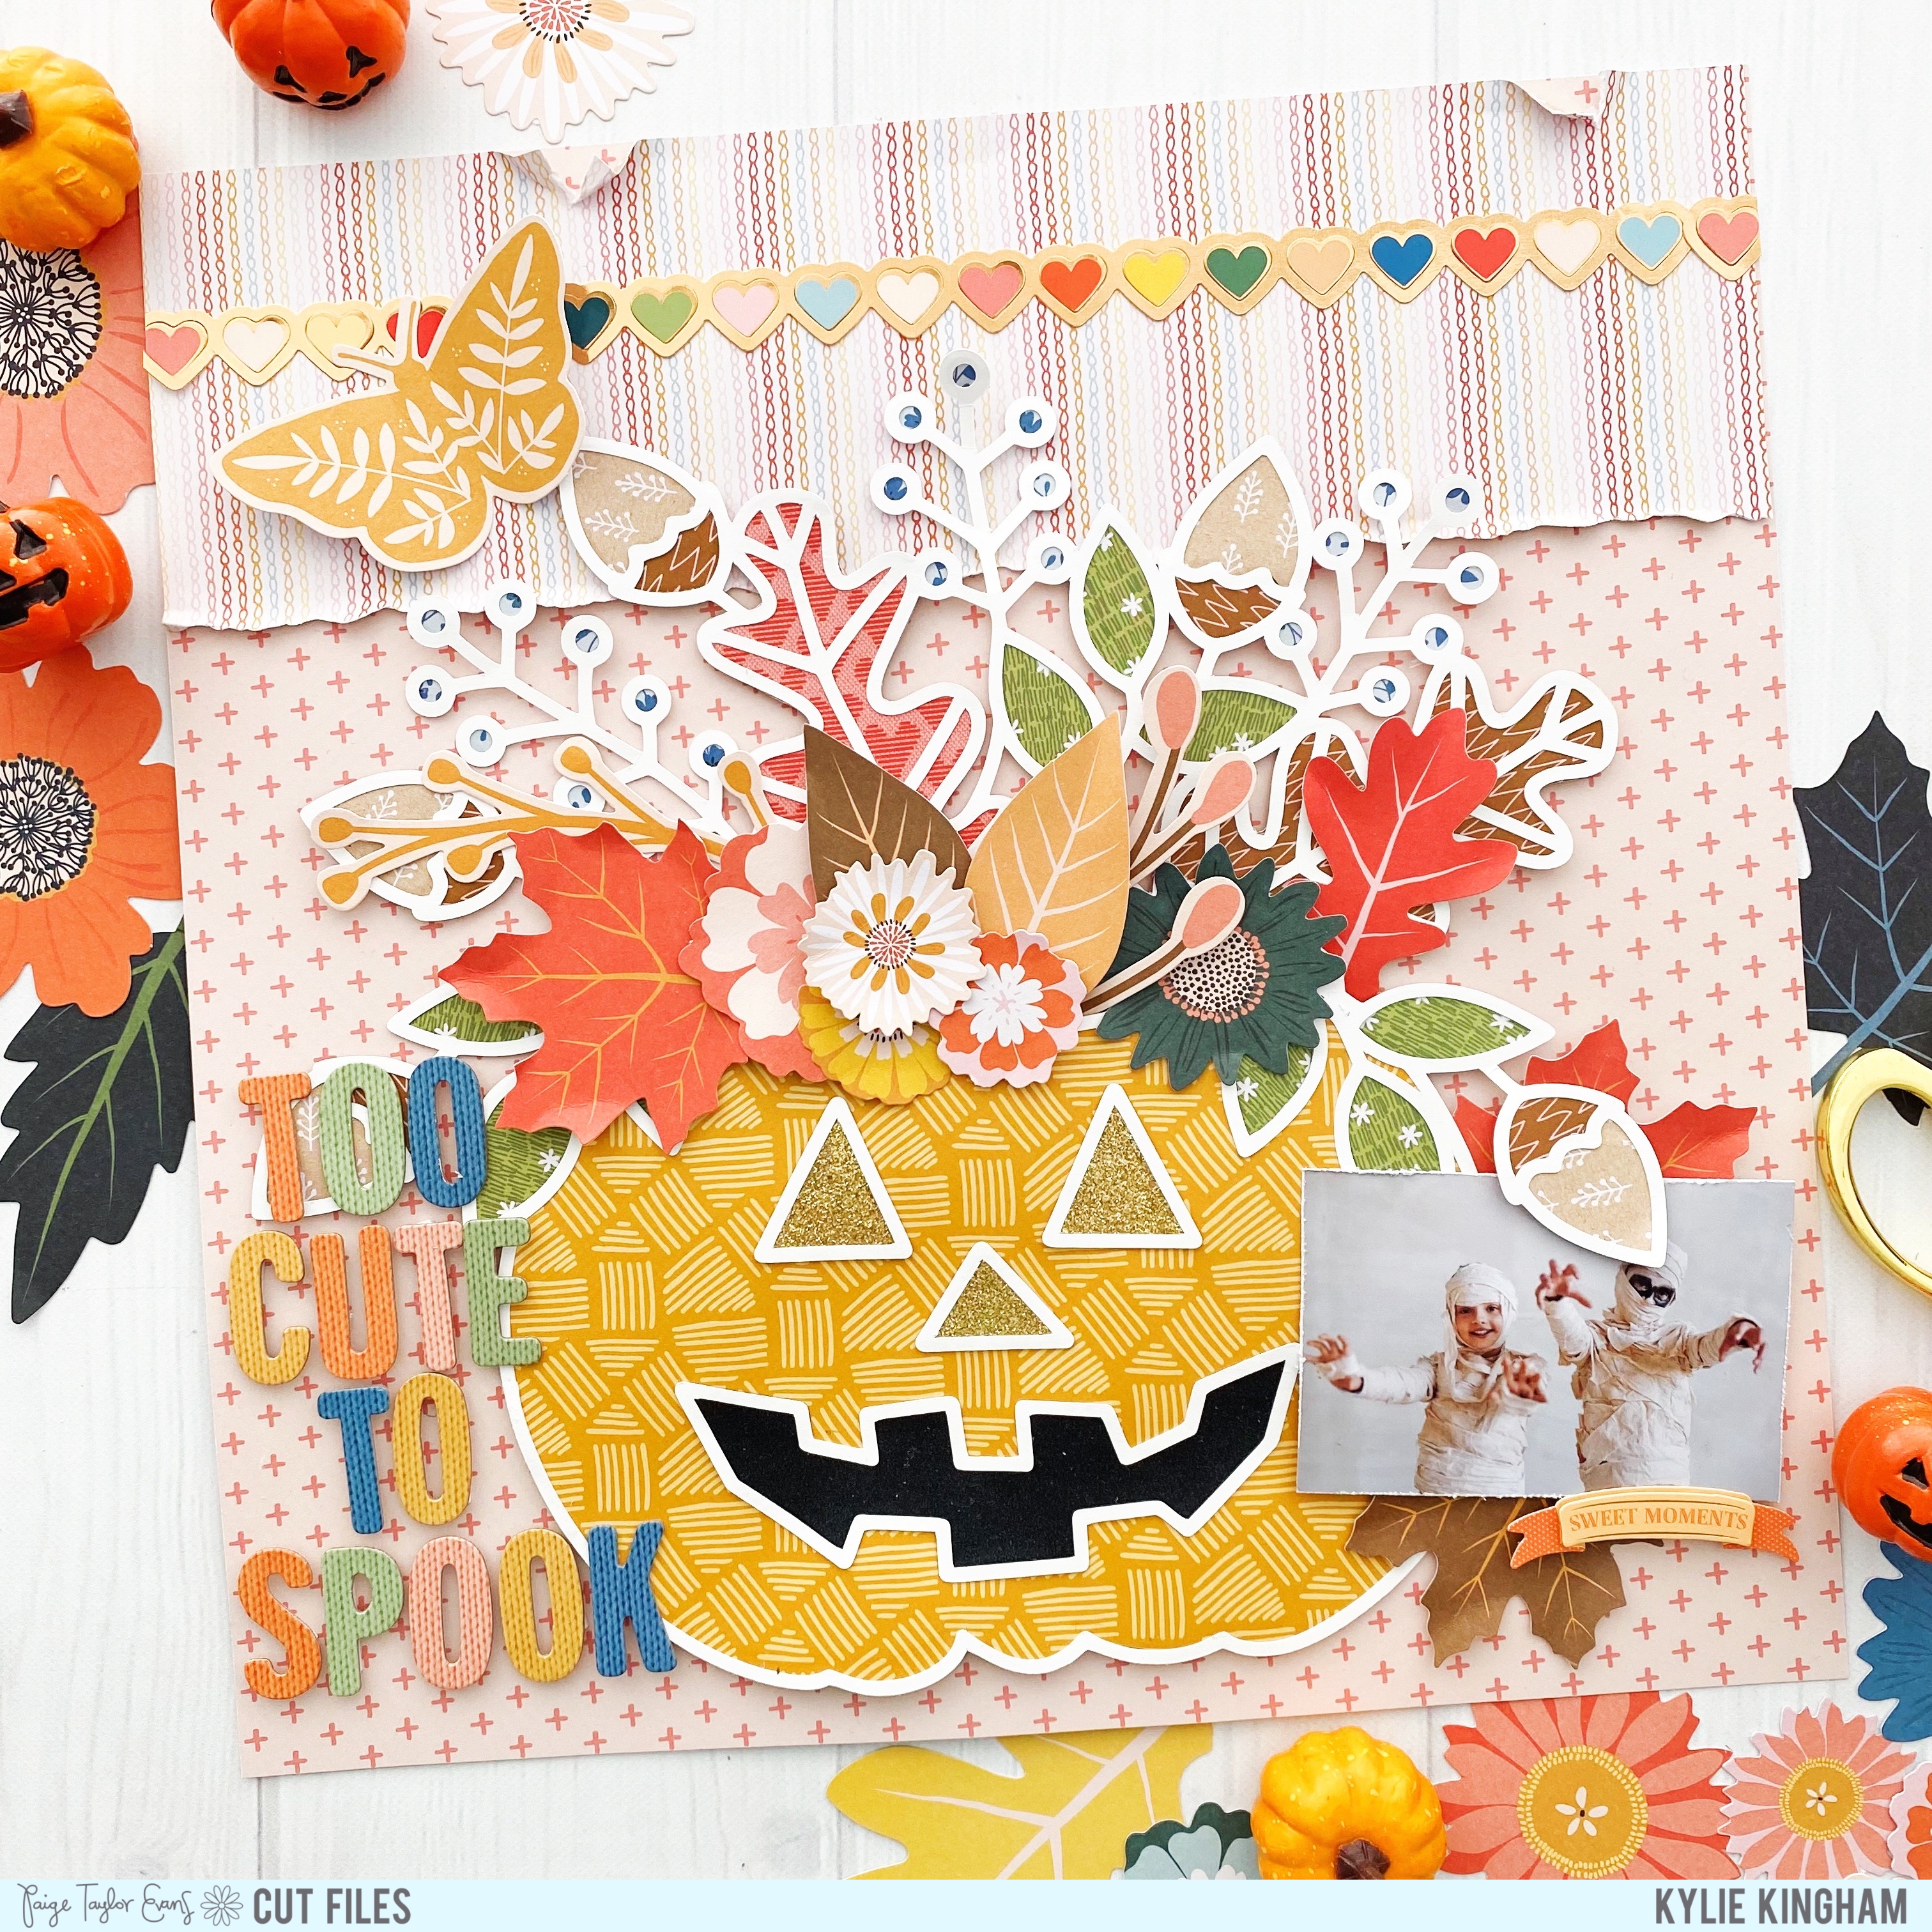
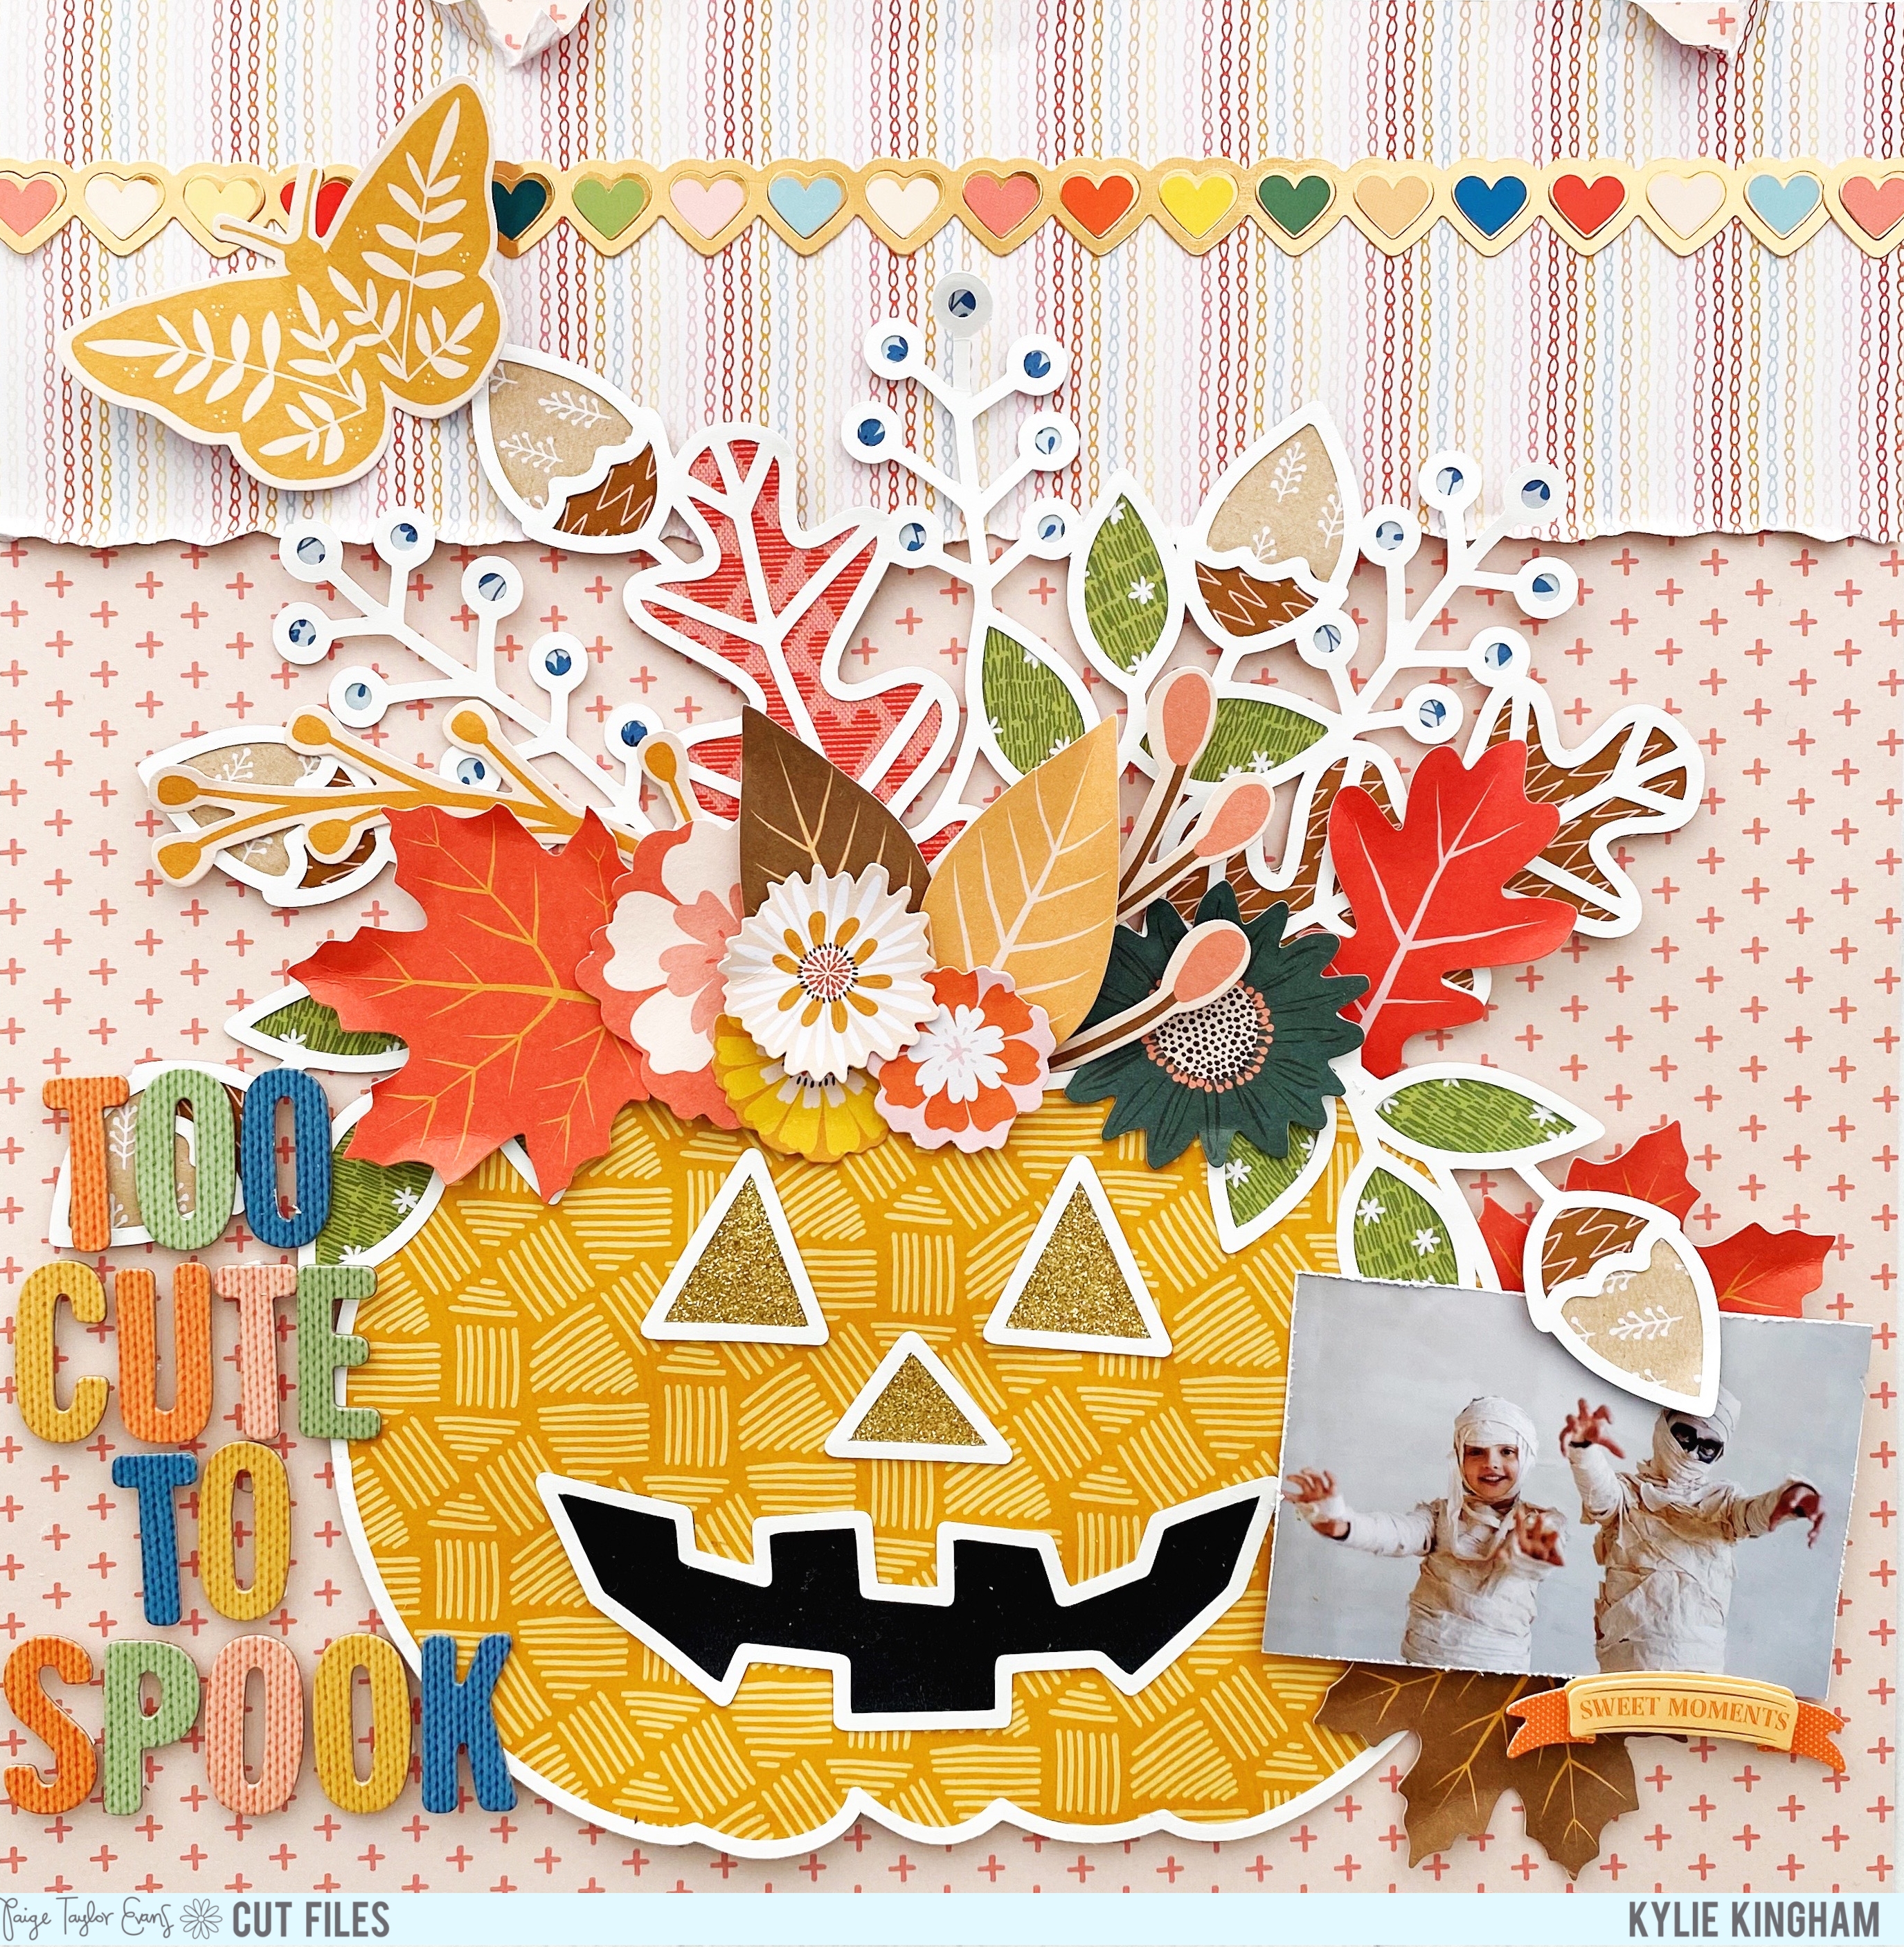
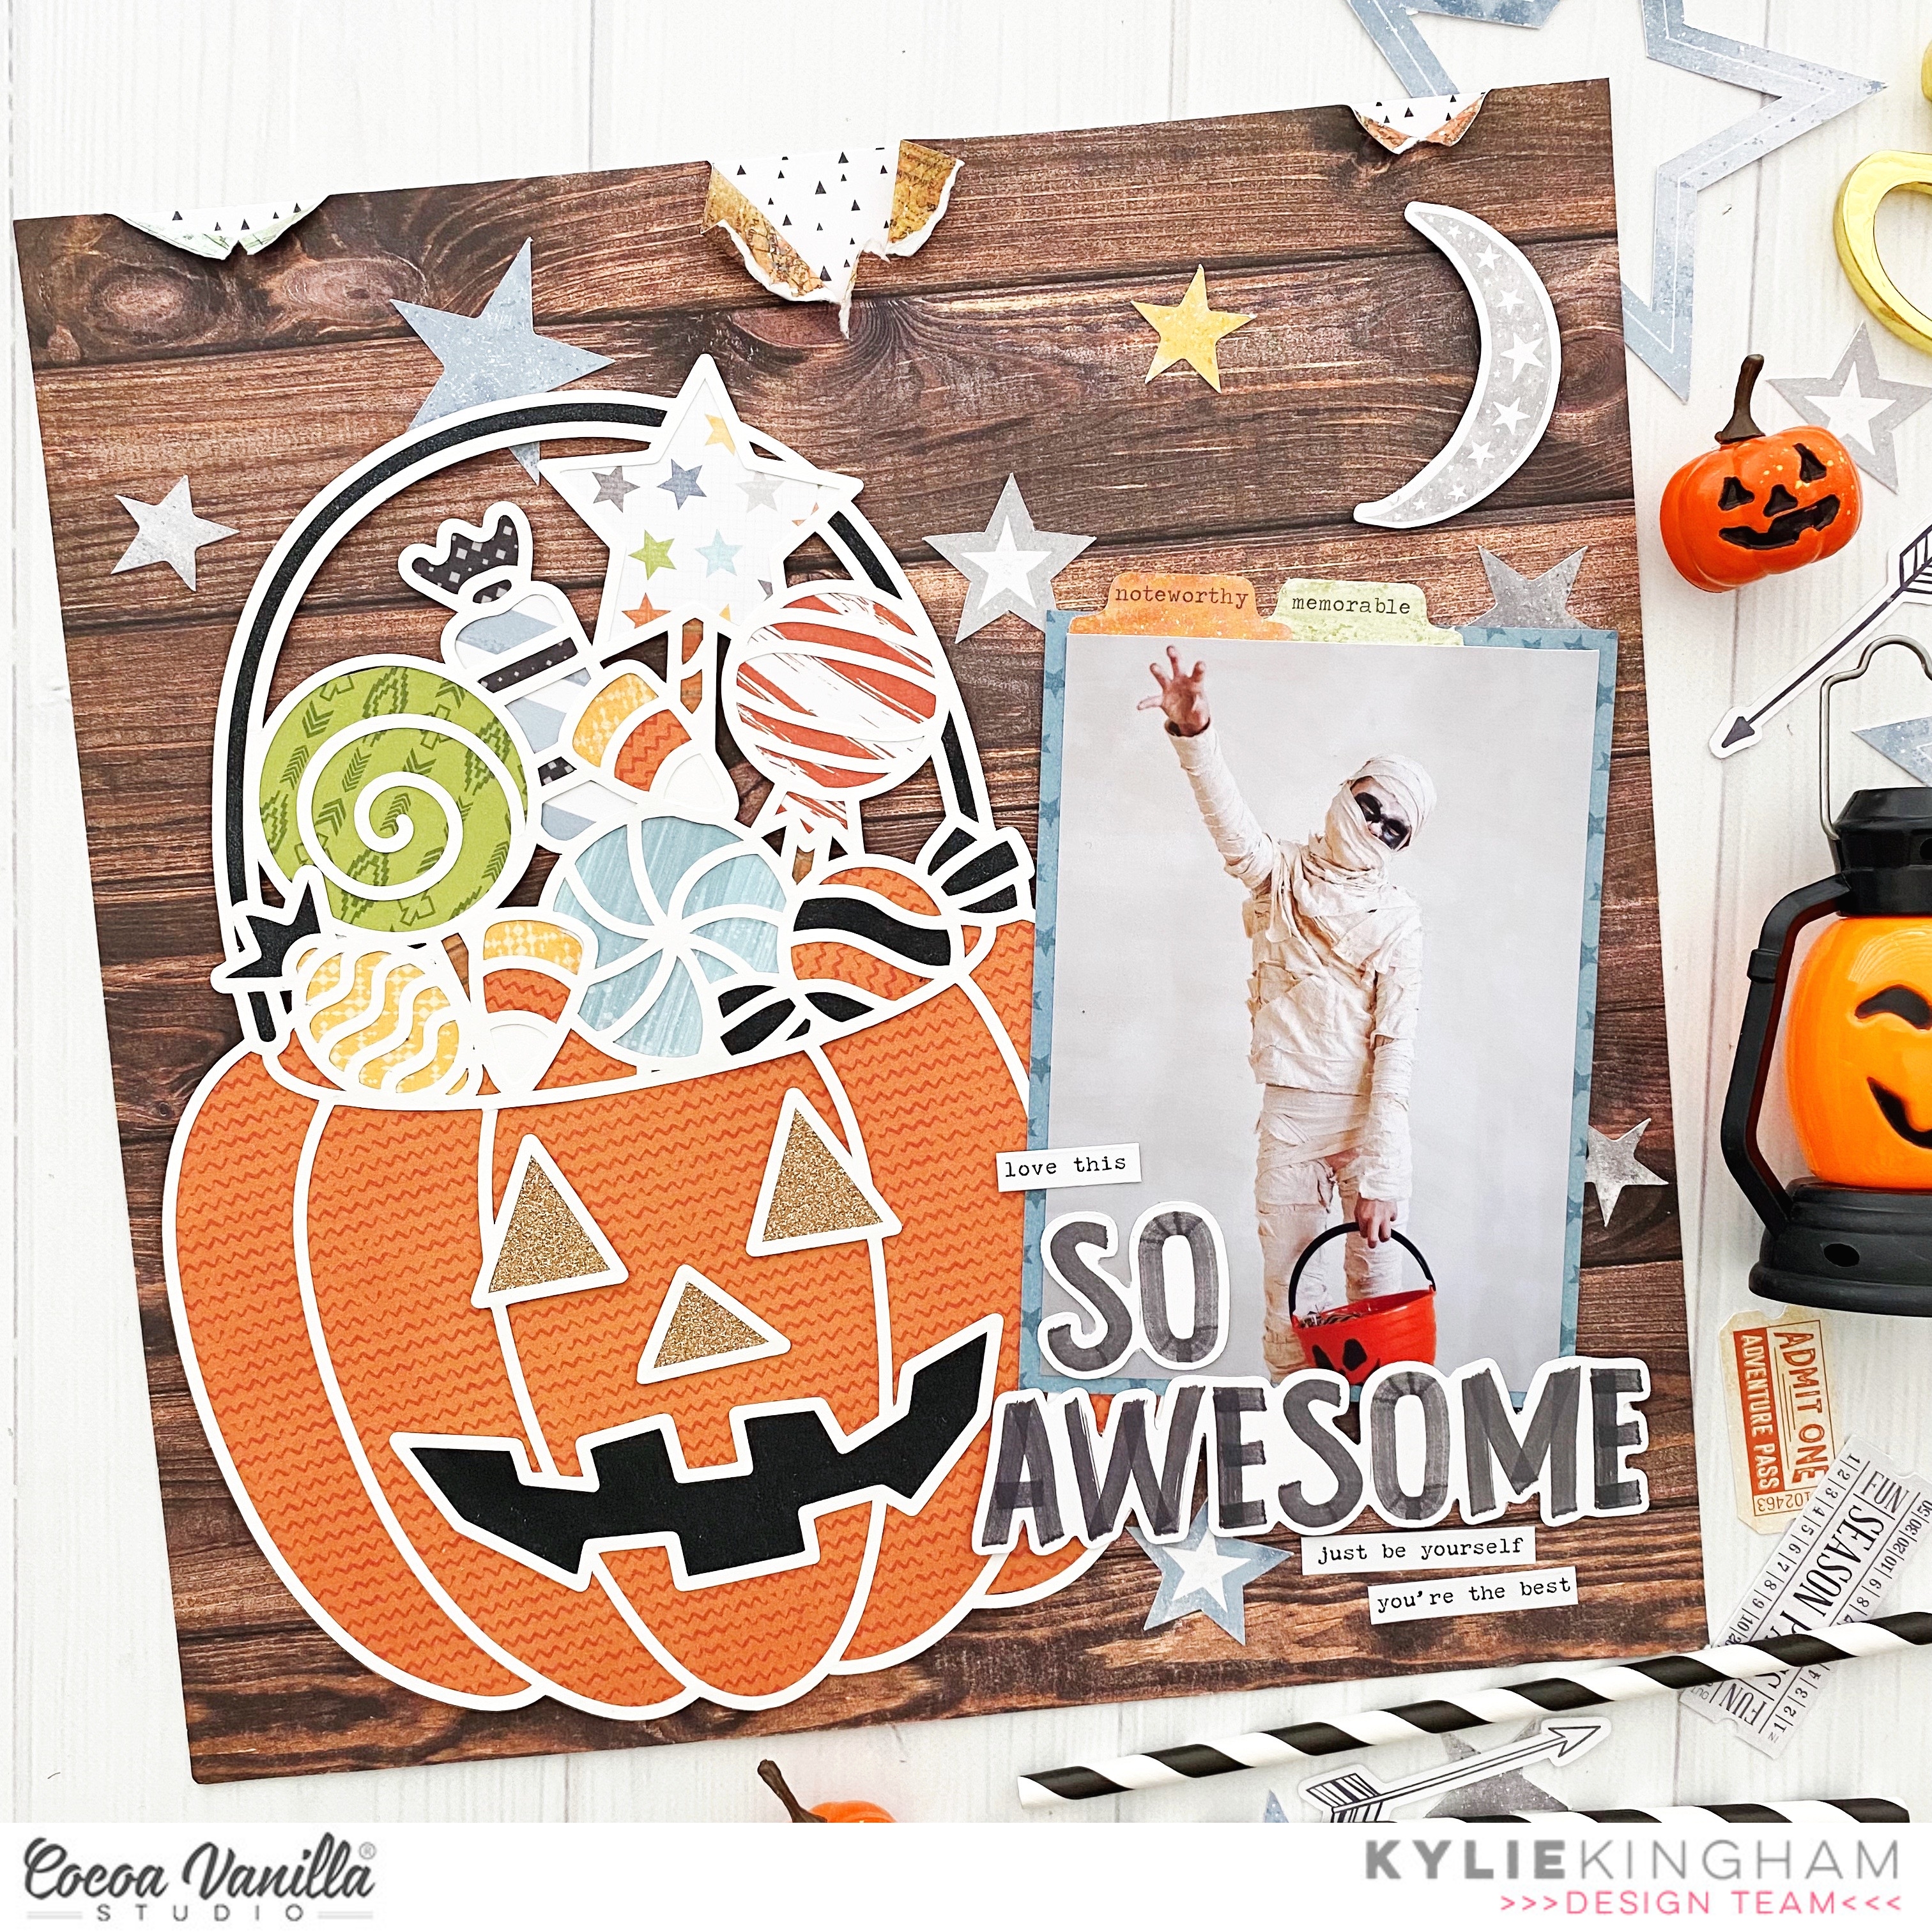
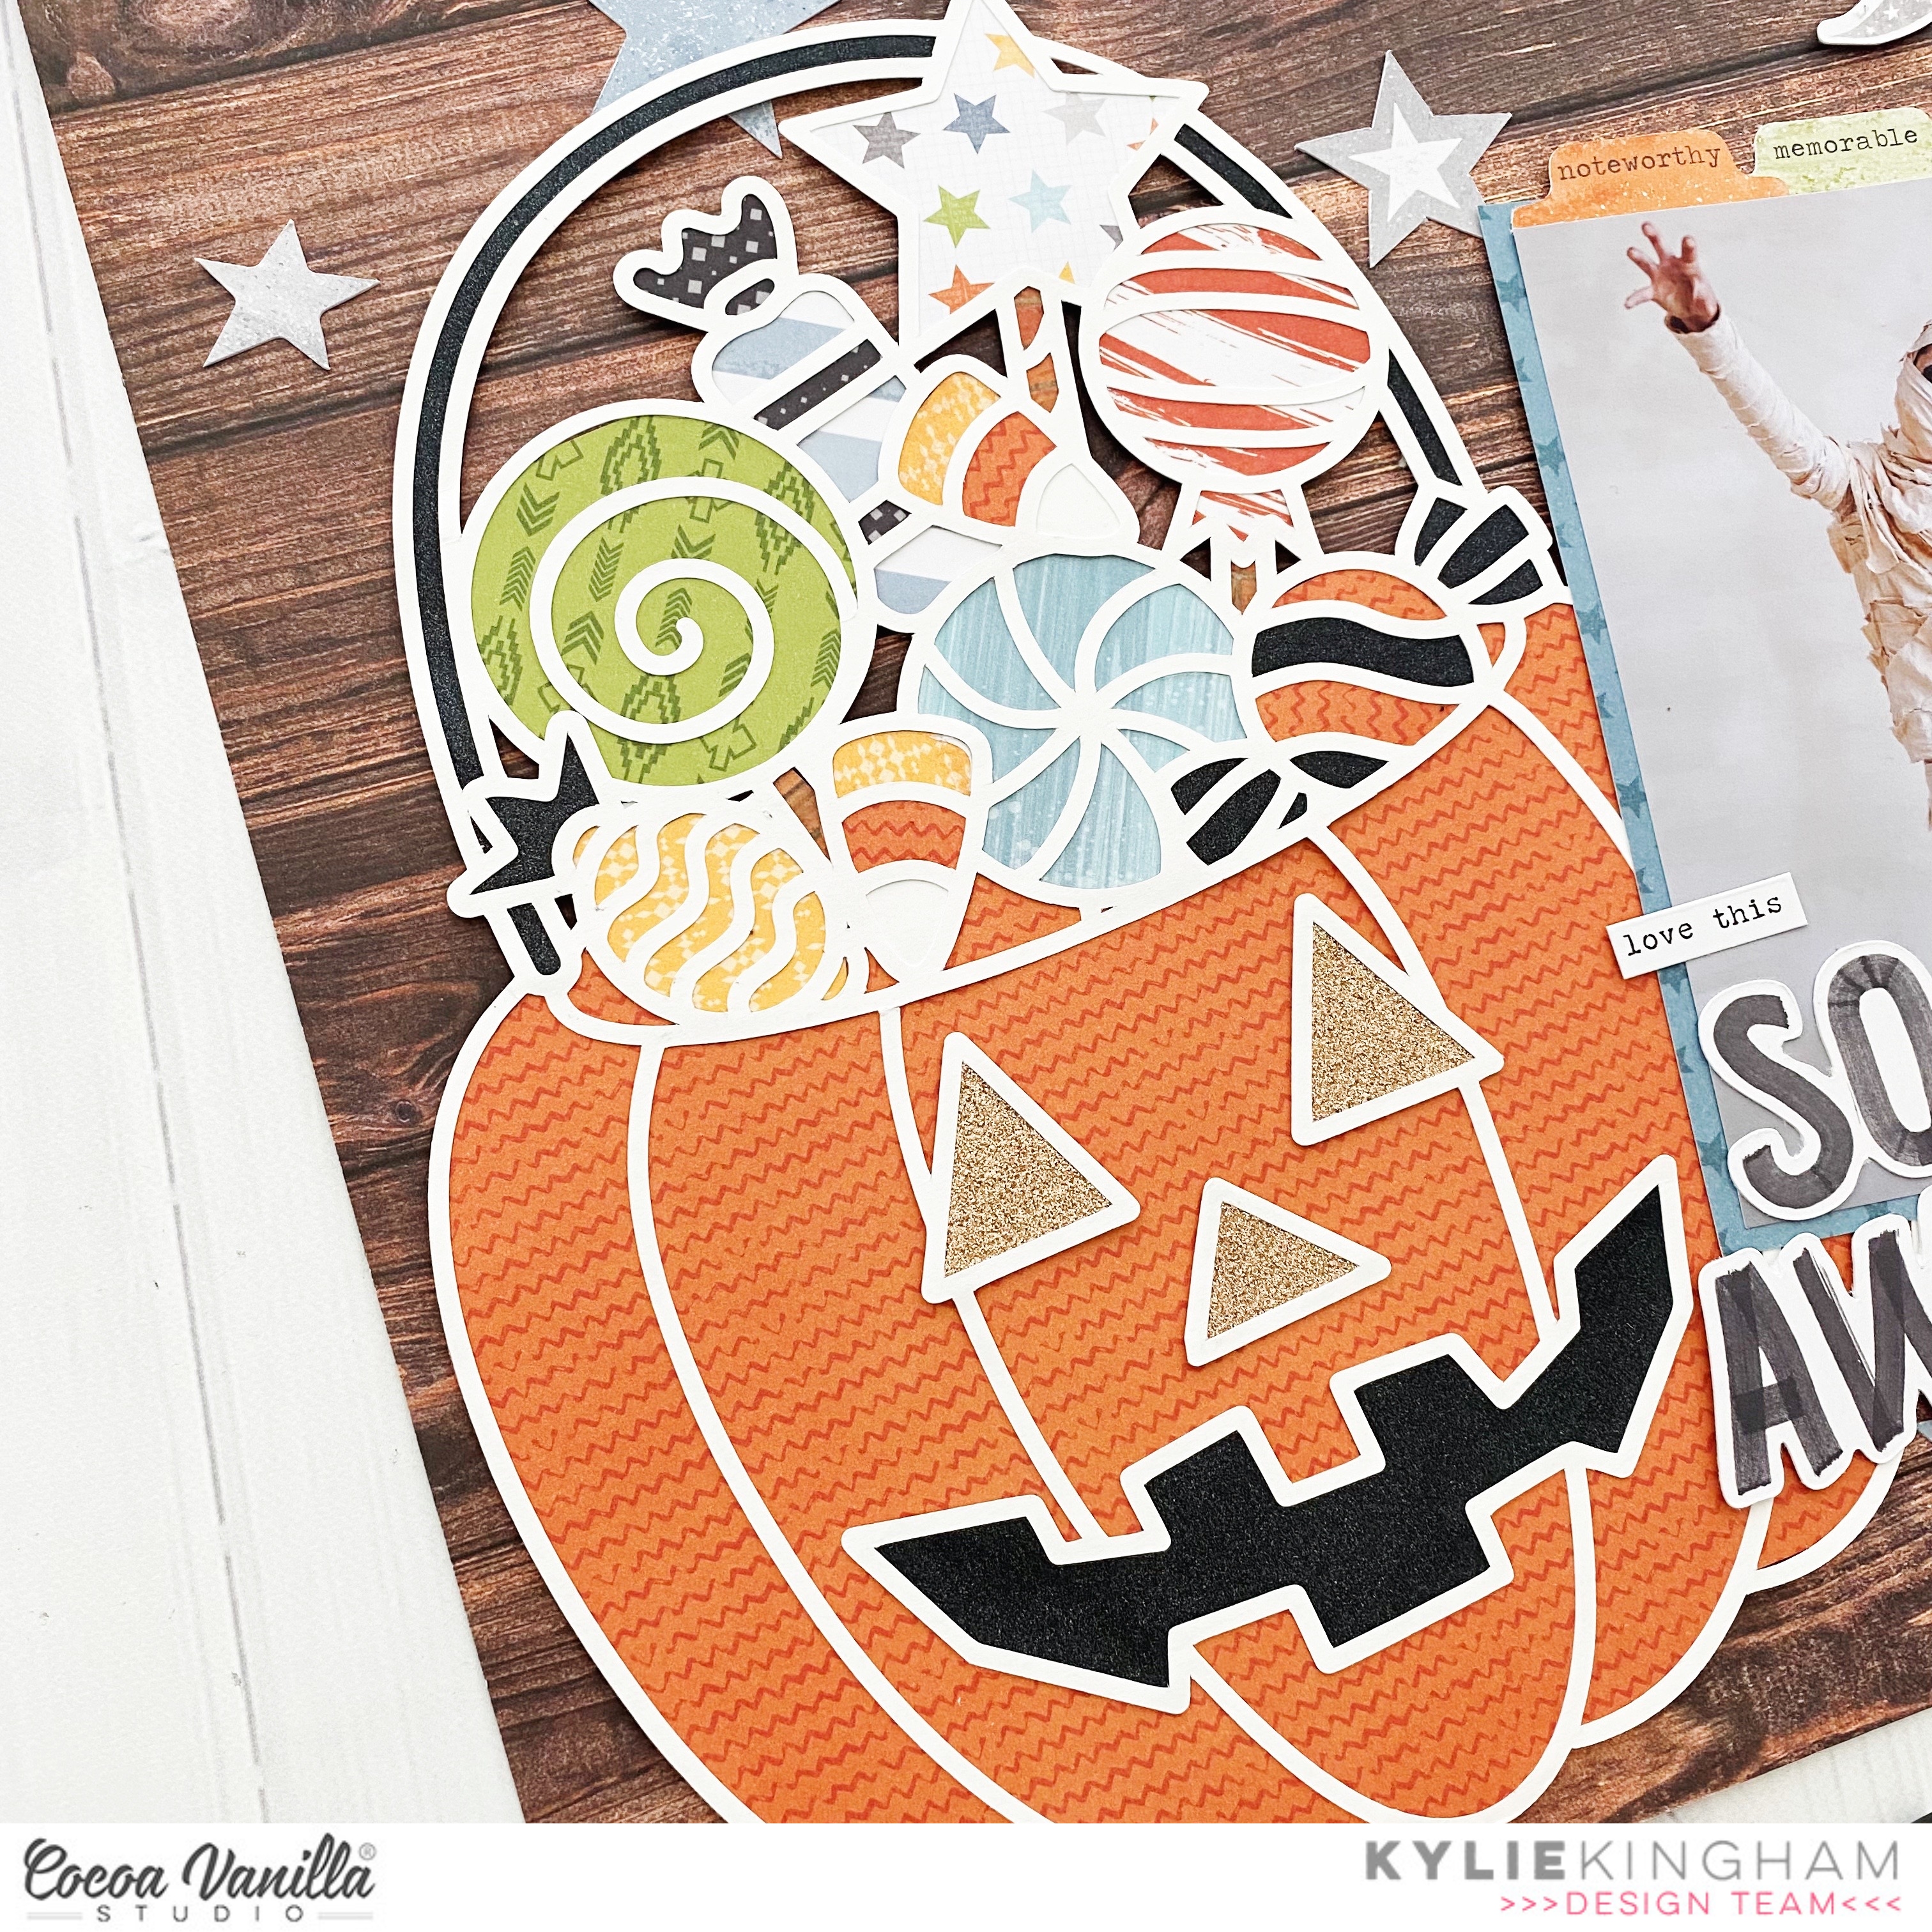
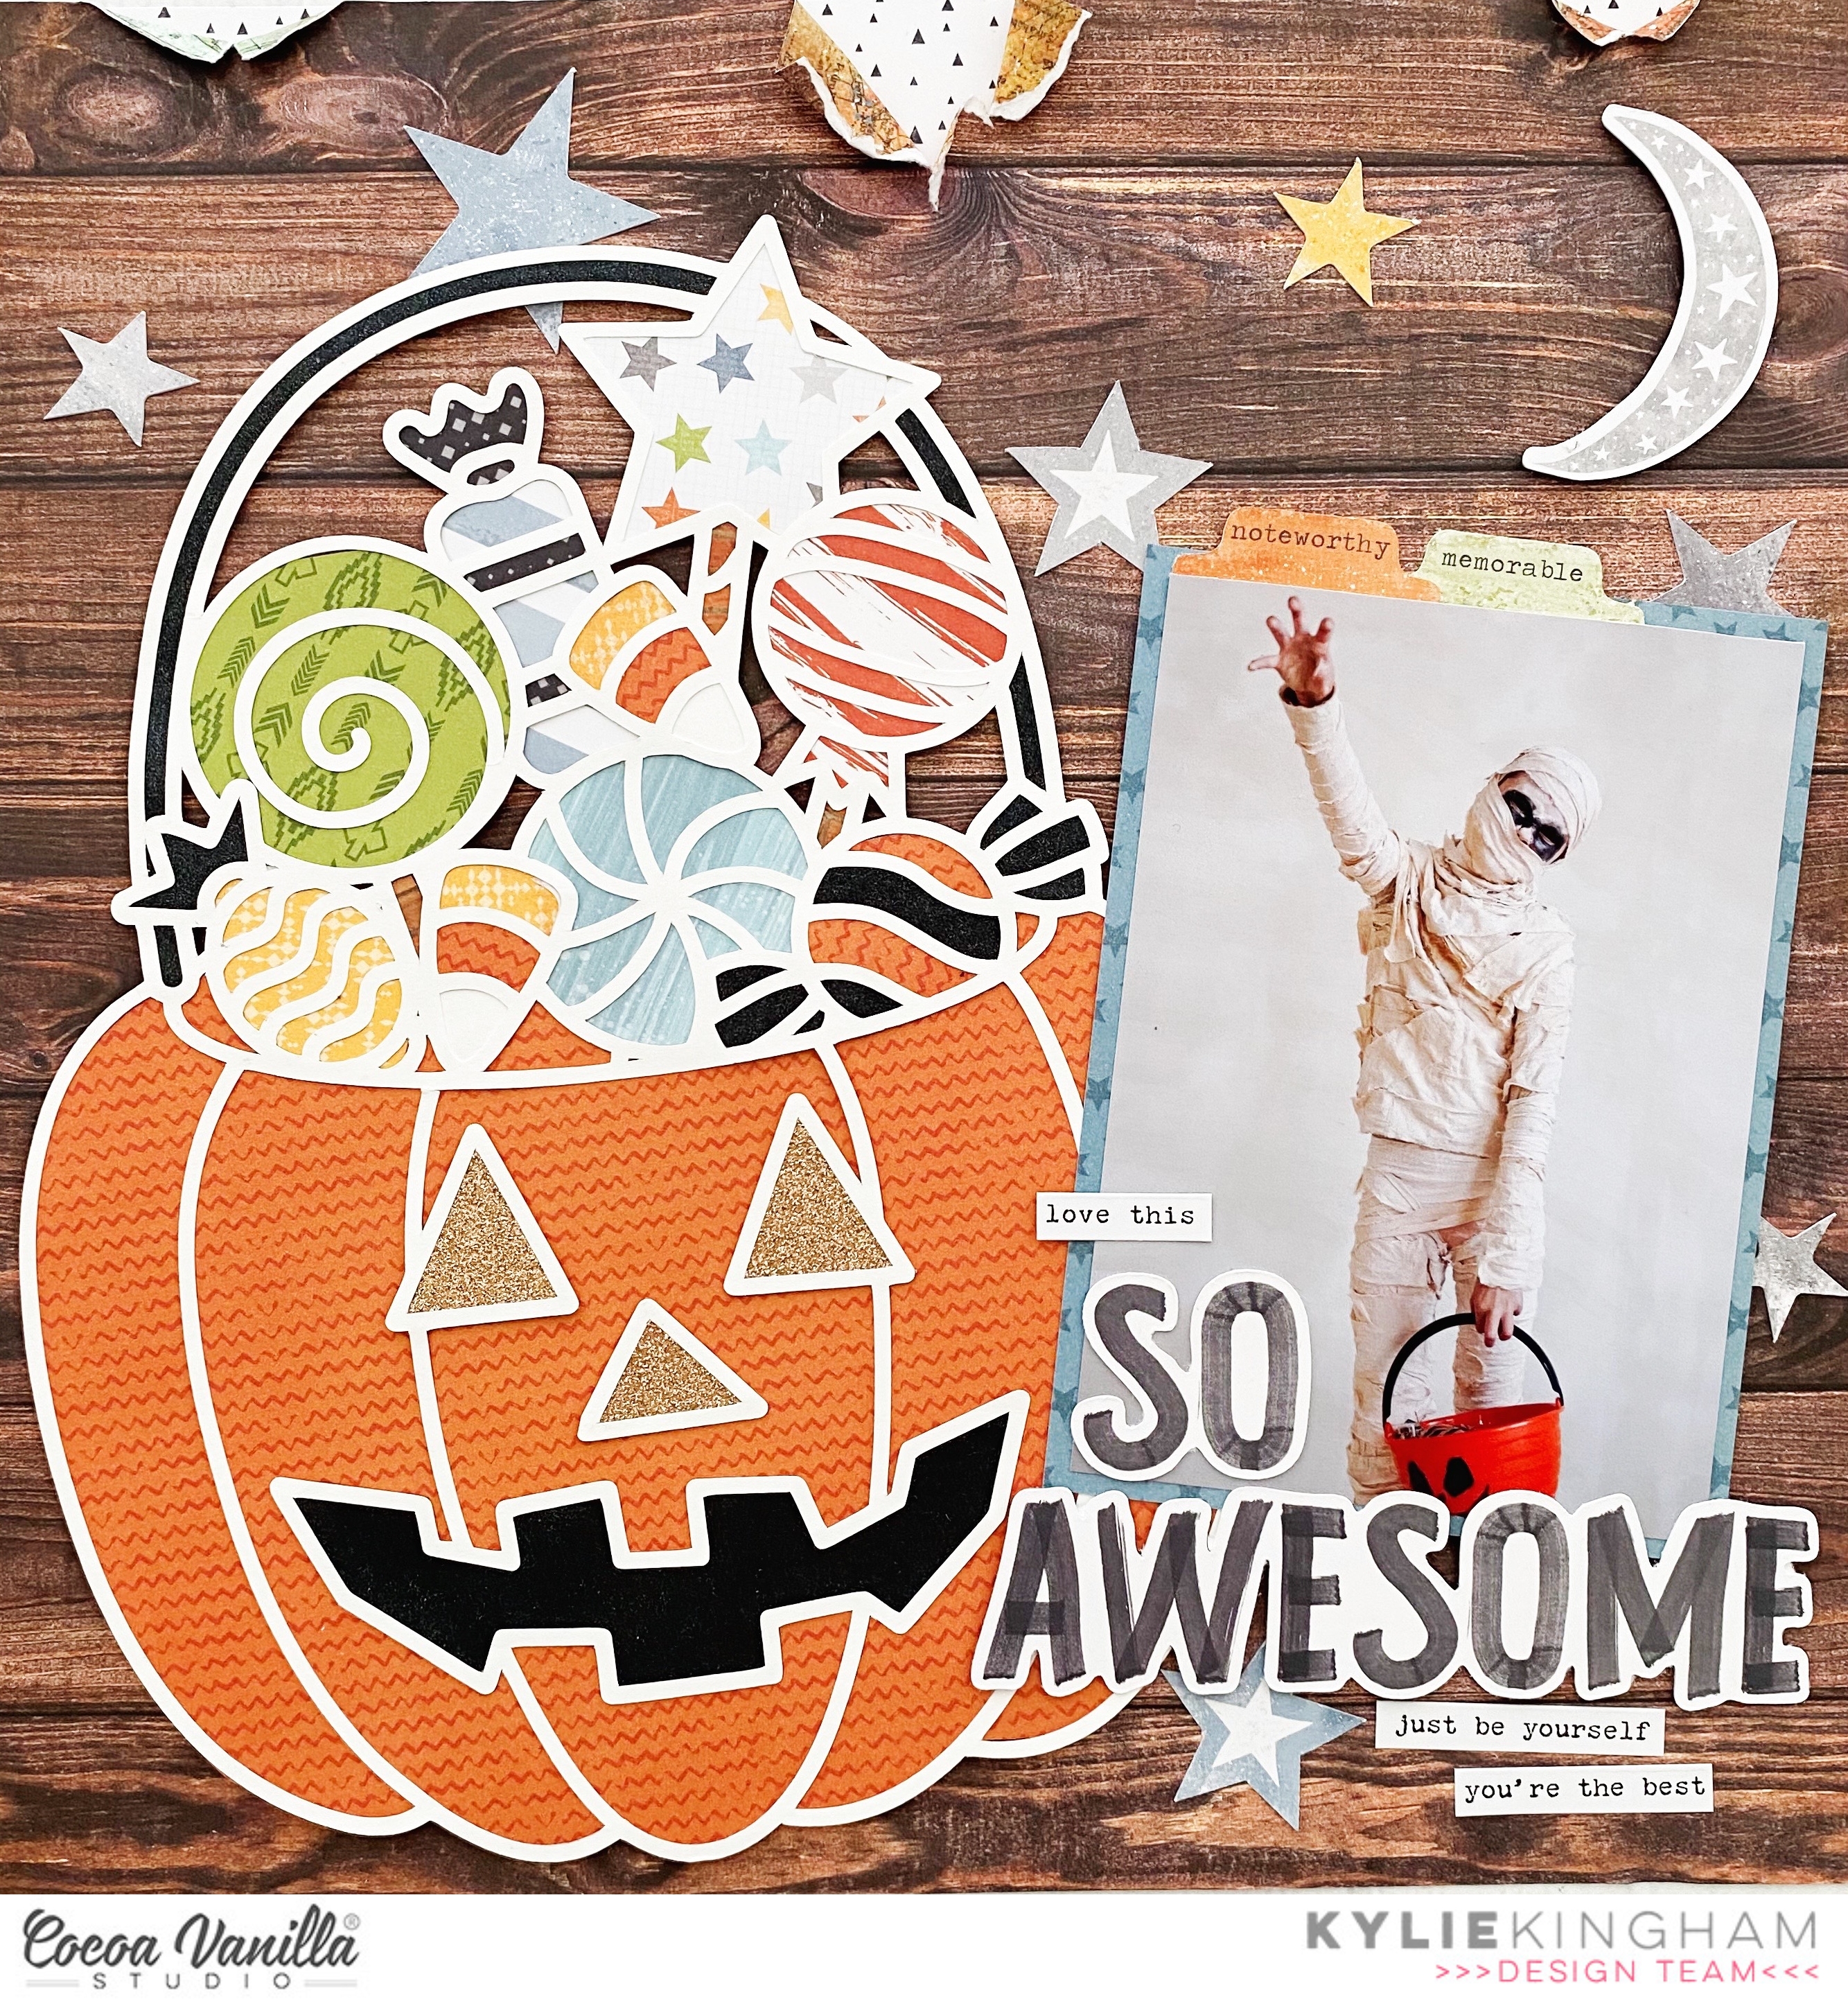
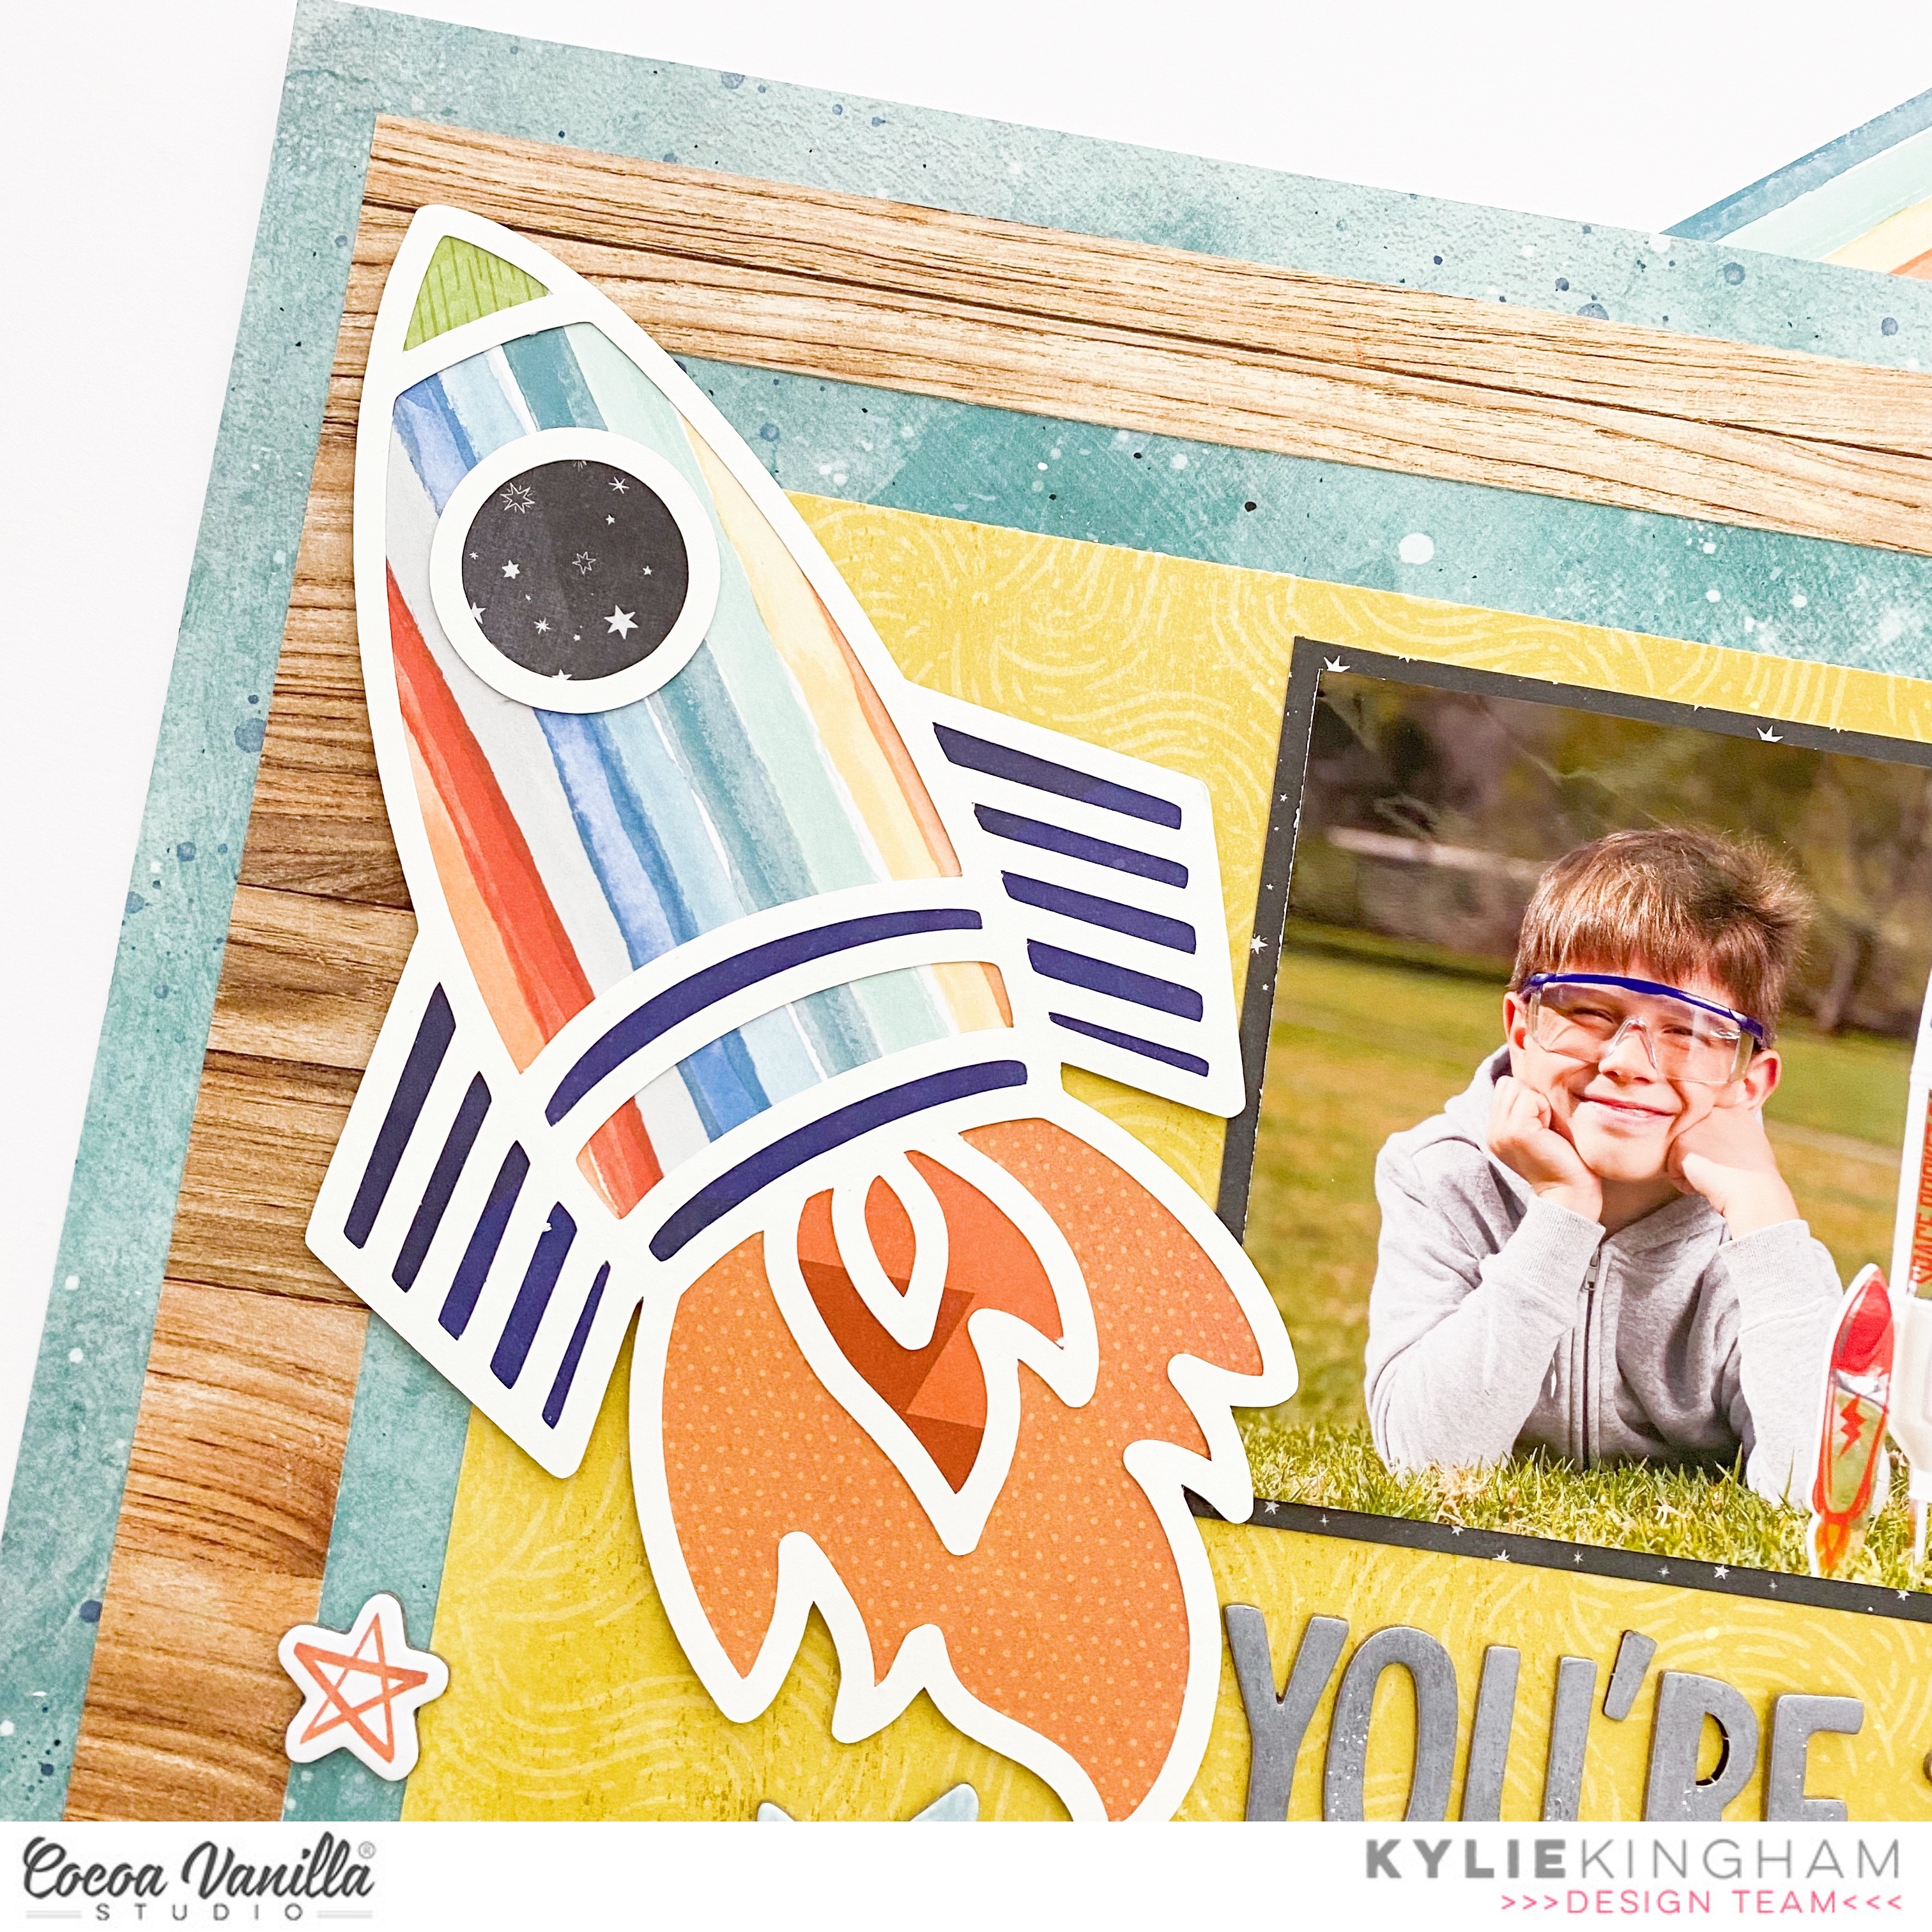
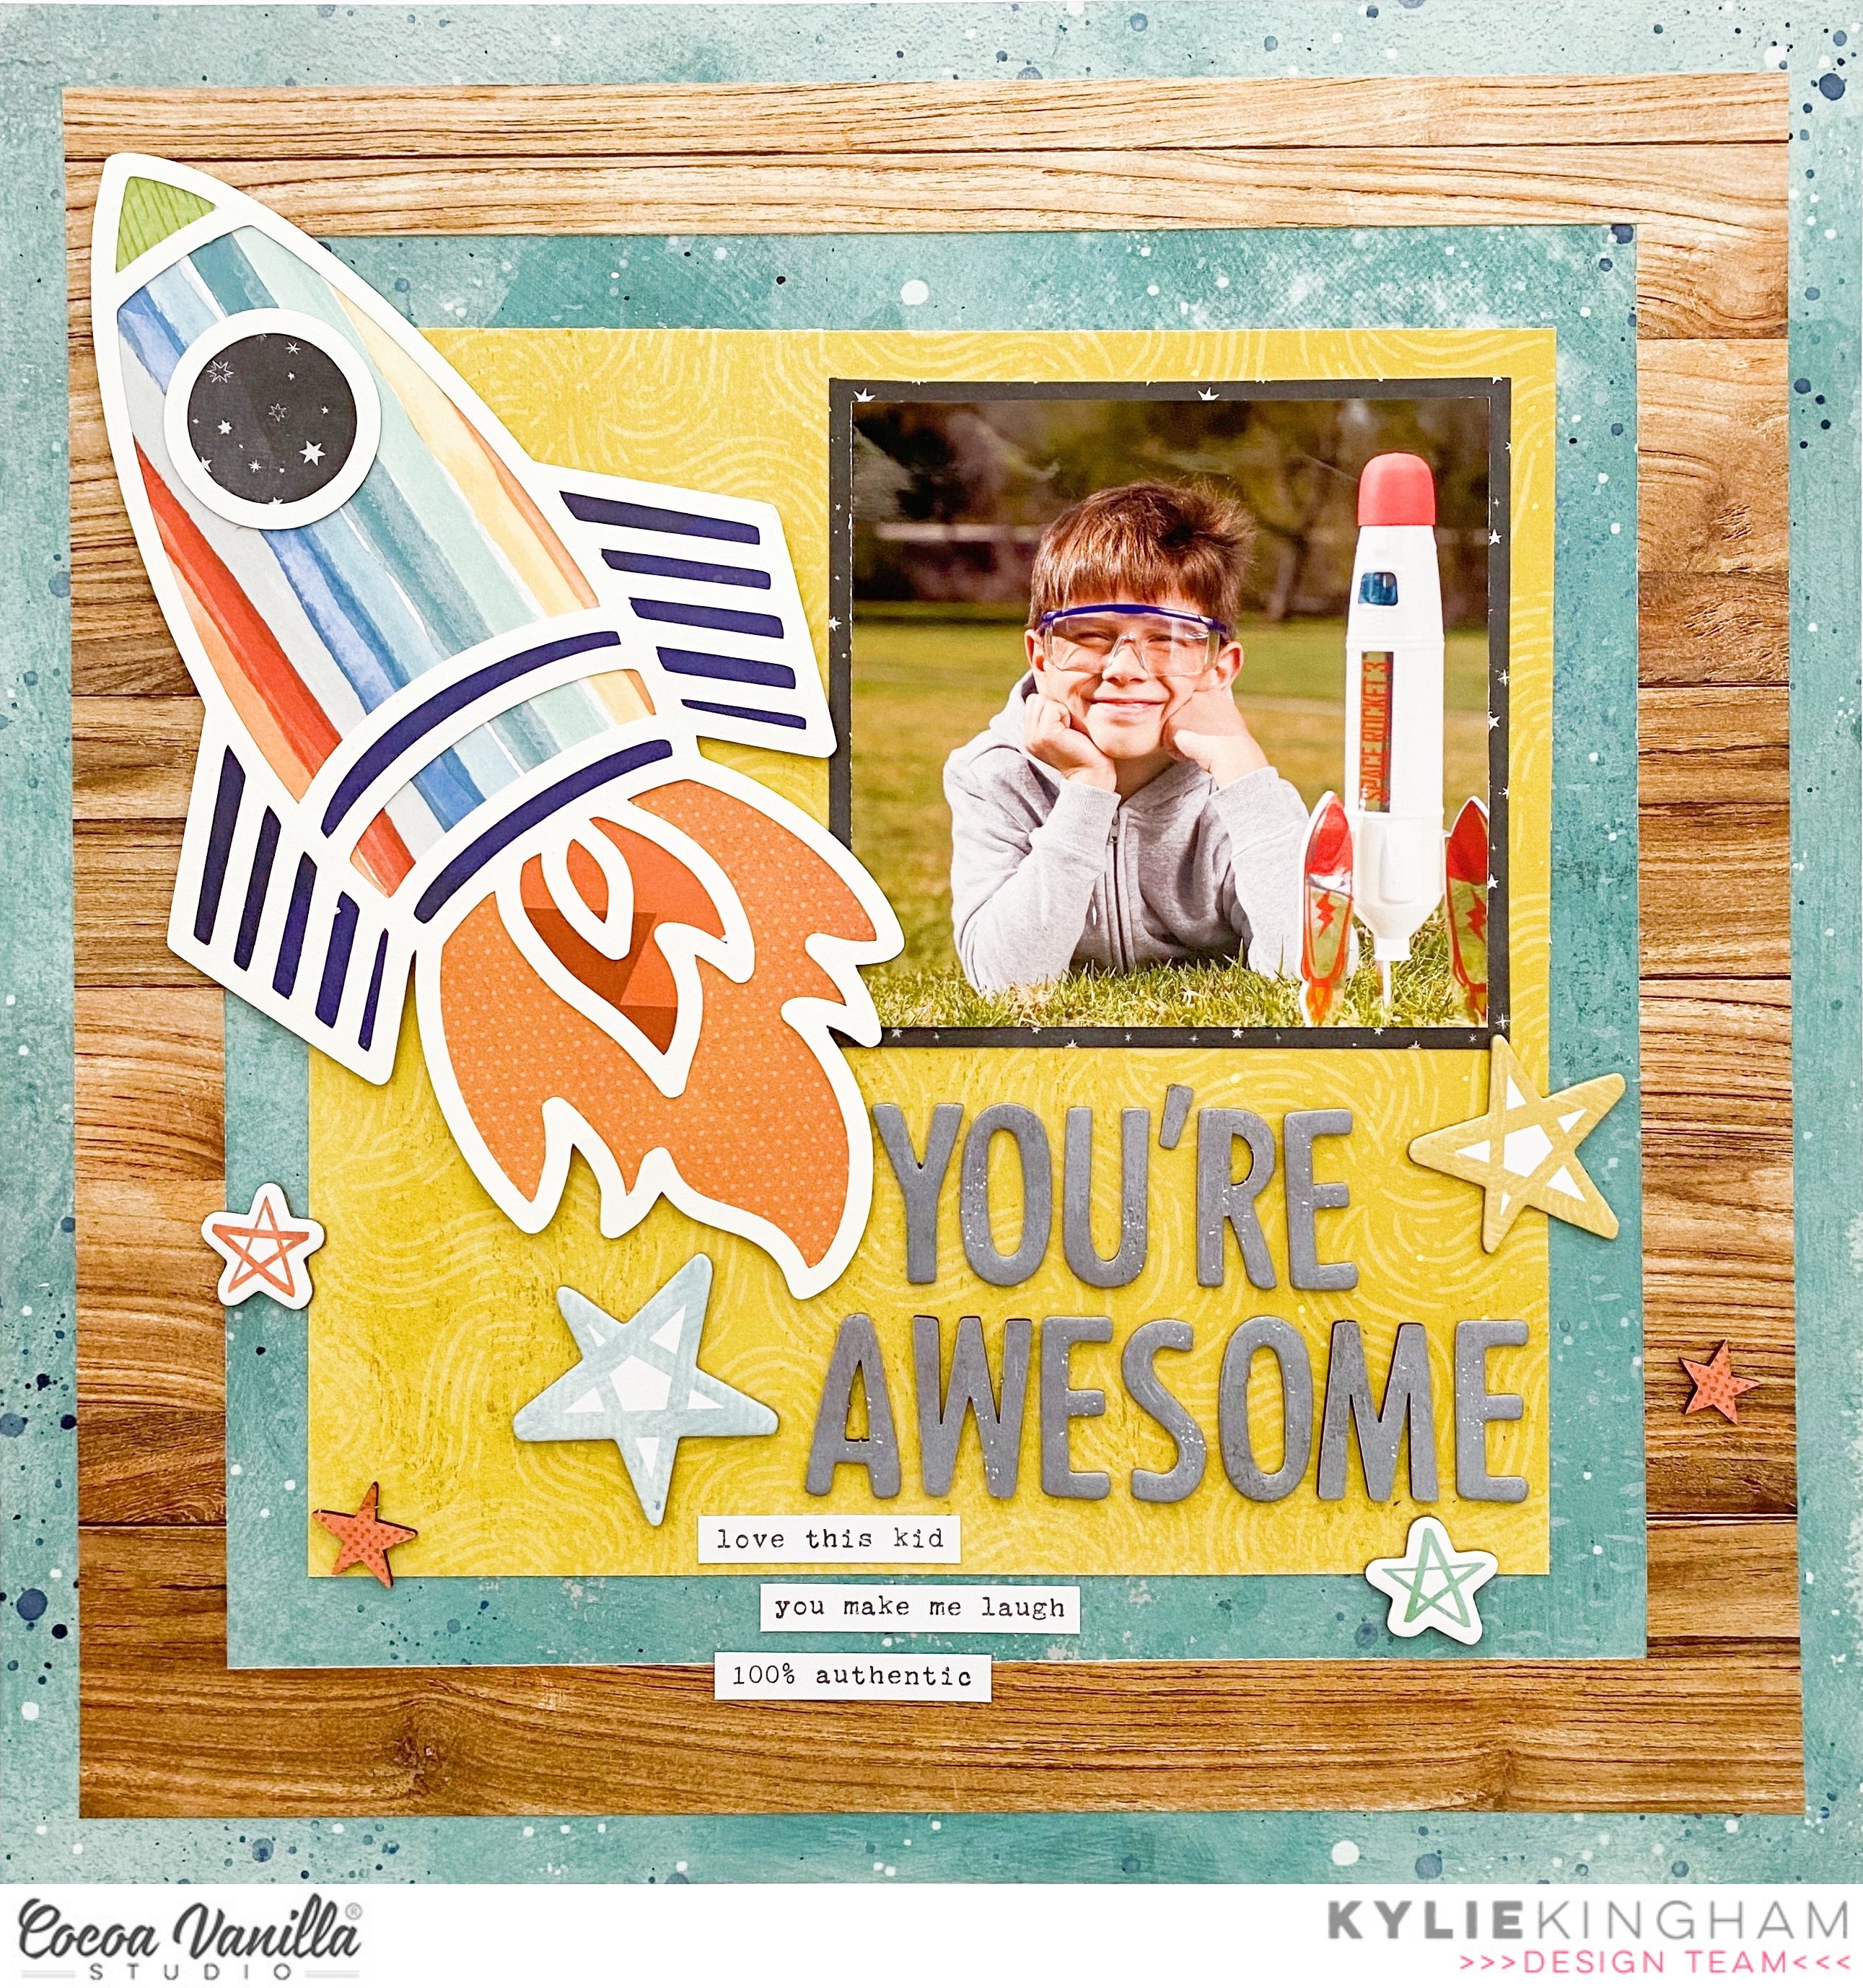
Hello scrappy friends! It’s Kylie with you today and I am SO excited because I am sharing my very first layout created with the new ‘NO LIMITS” collection by Cocoa Vanilla. I have always been a HUGE fan of all of Zoe’s boy themed collections and this one is of no exception! Love it. I was really inspired by the cute rocket ships in the ephemera pack which reminded me that I had a perfect photo I could scrap with this theme. A fun Rocket cut file by Cut To You was my centrepiece and I wanted to combine lots of colour.

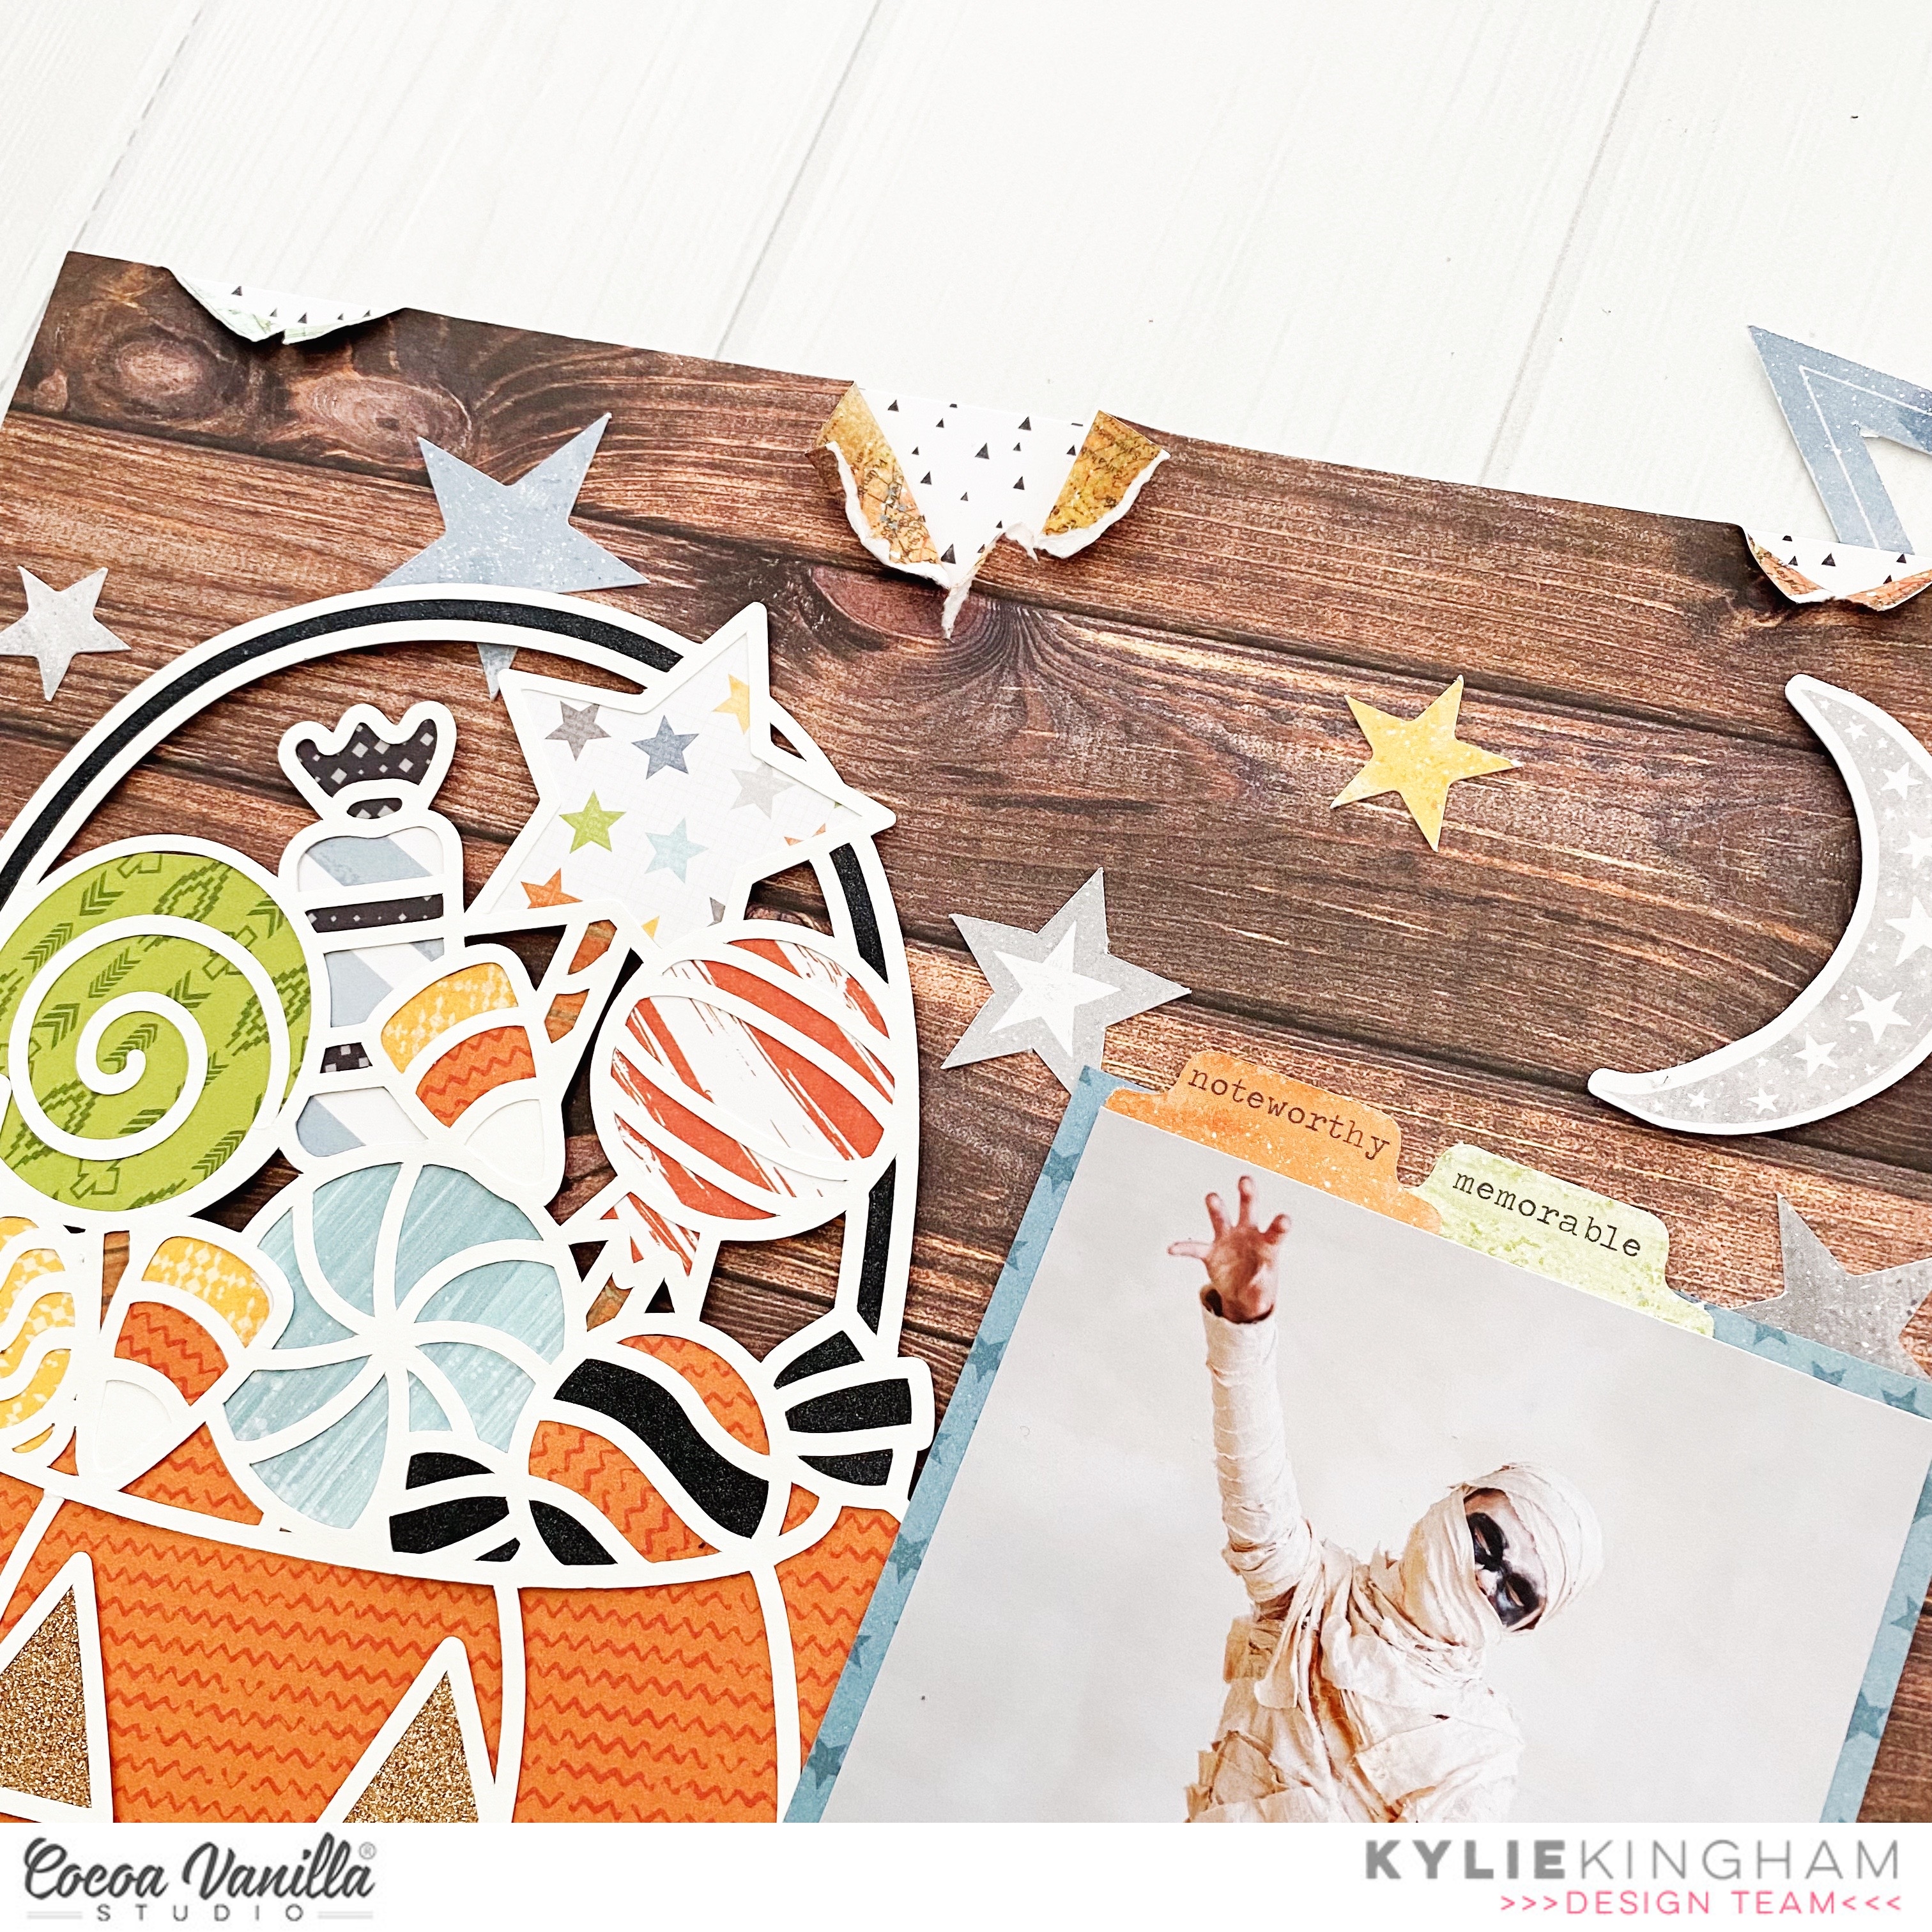
The STARDUST paper was selected as my main background page and since I’m always obsessed with wood grain papers, I chose the BIG BANG paper to create a frame. This was done by cutting it down to 11″x 11″ and removing the centre with my trimming board, leaving a 1″ wide border. It was adhered centred on my page and I then added a 8″x 8″ square of LATITUDE paper.

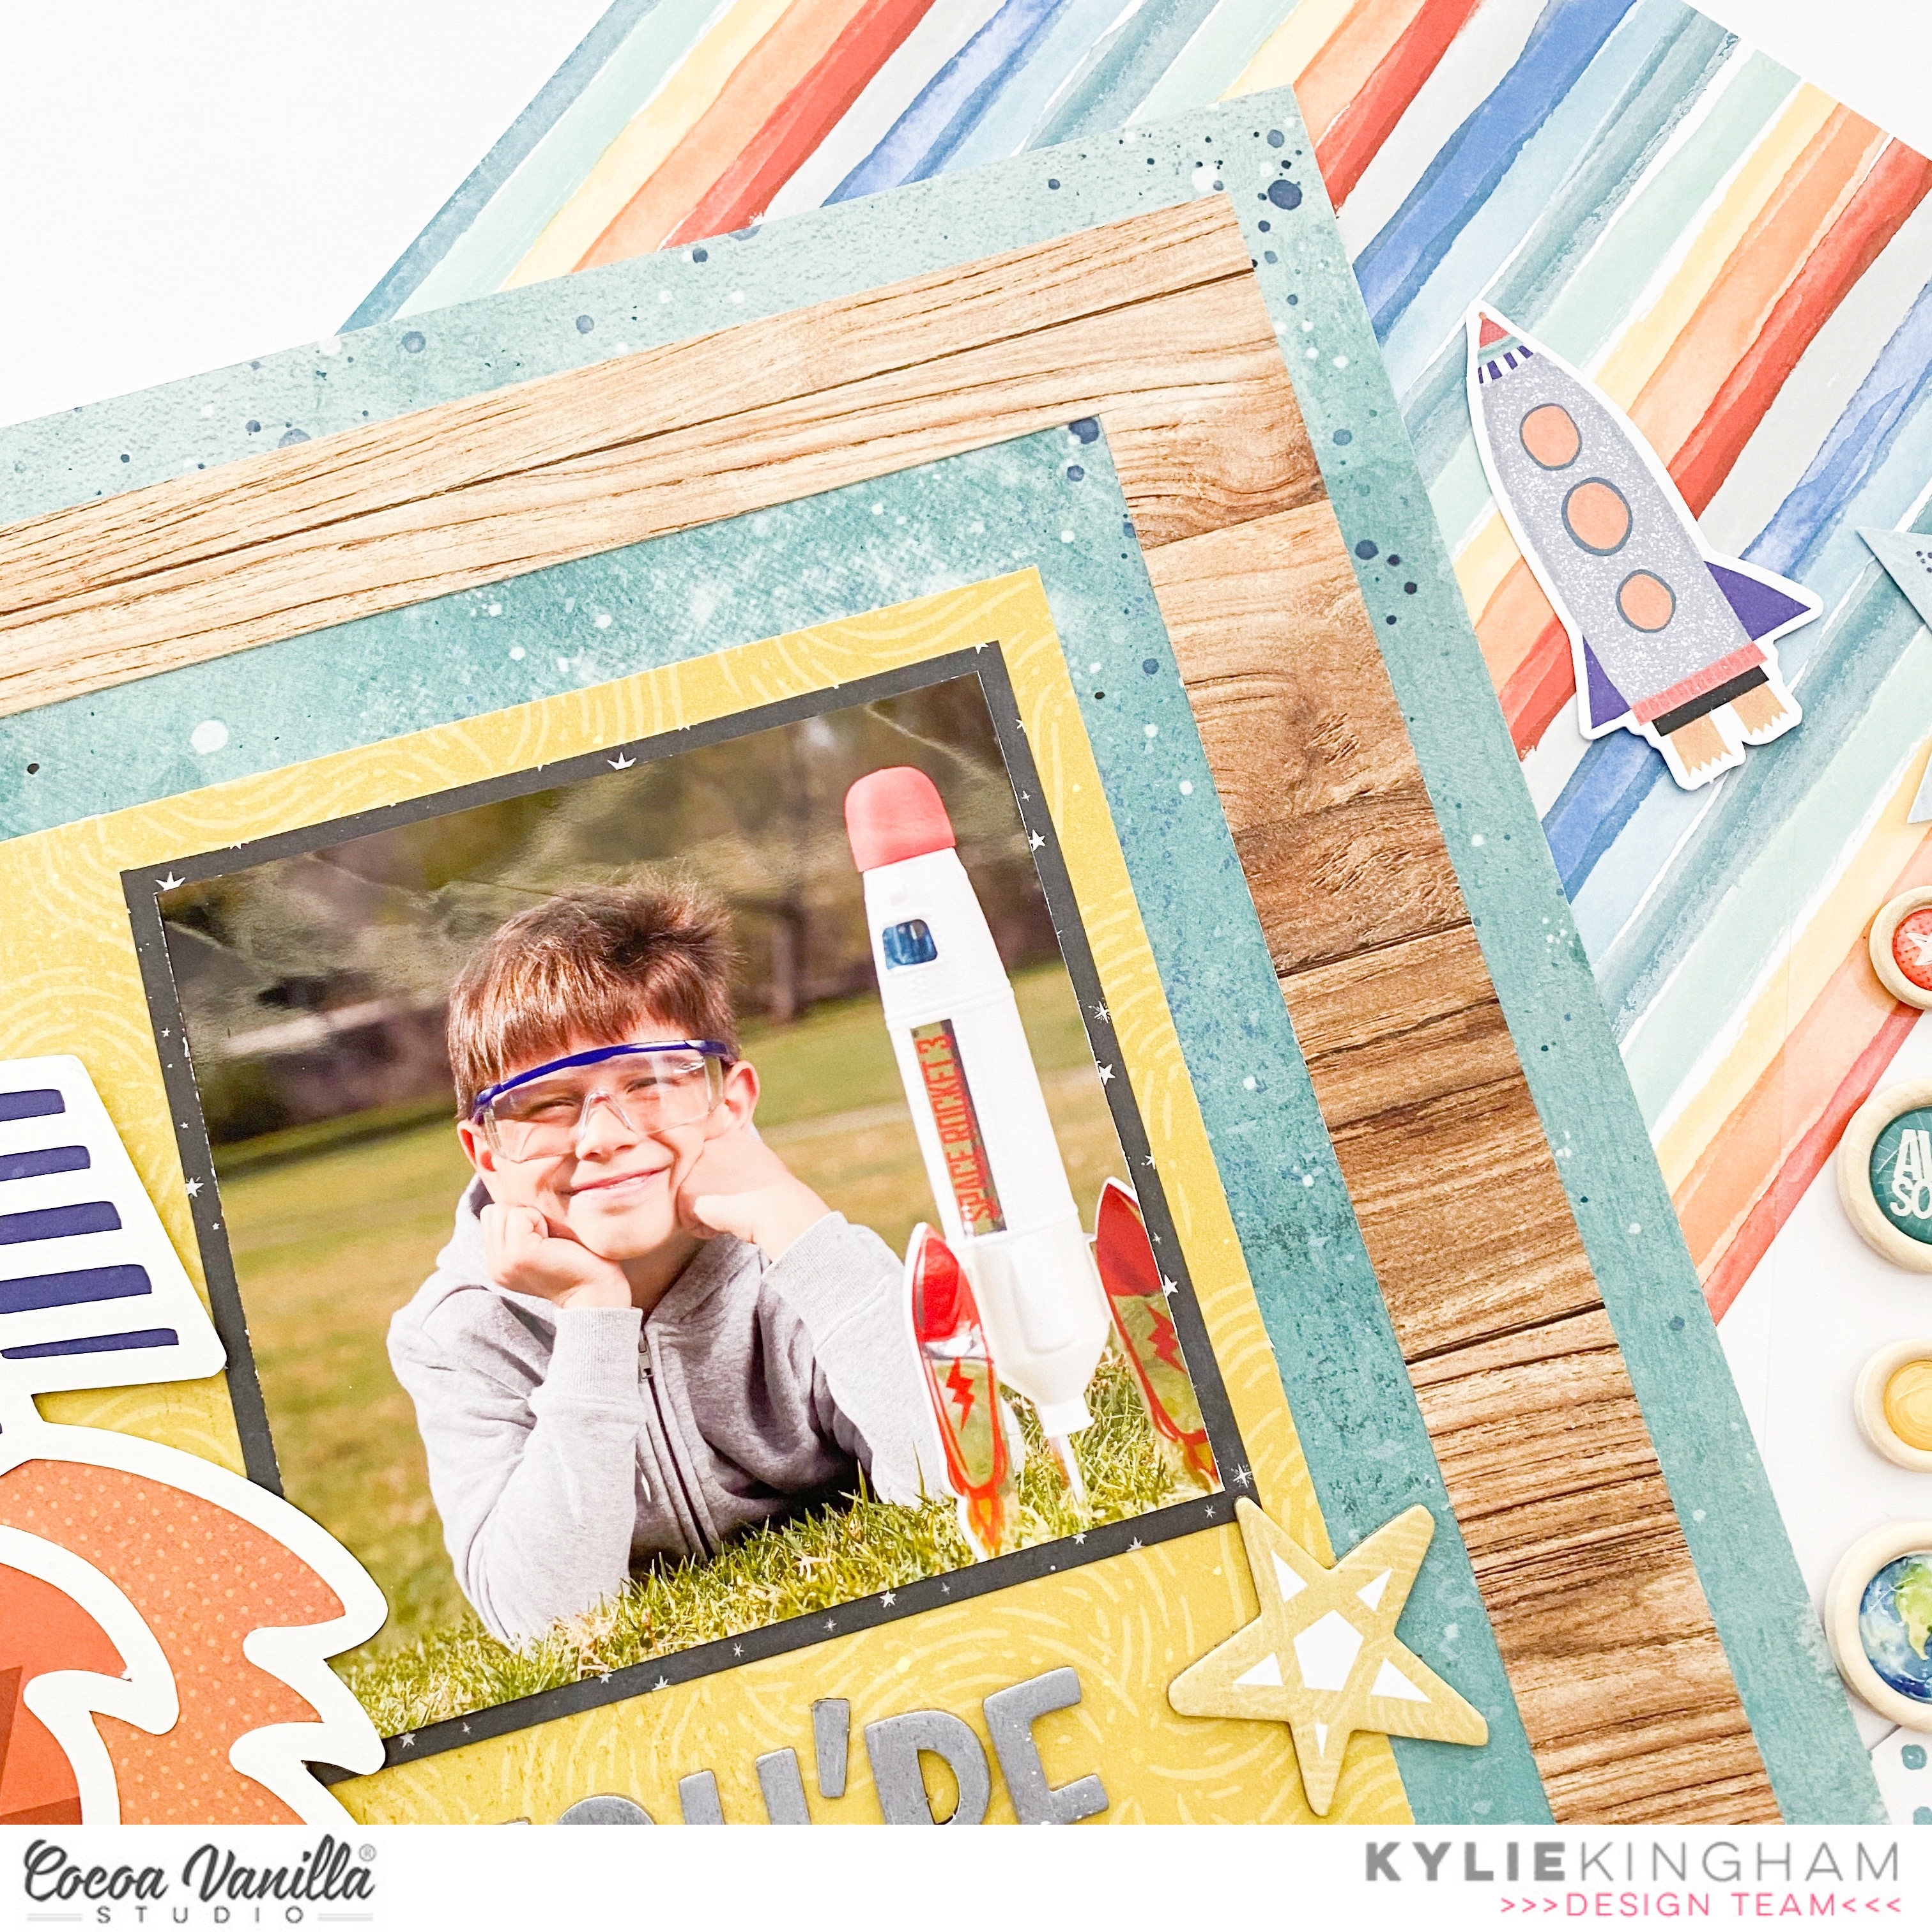
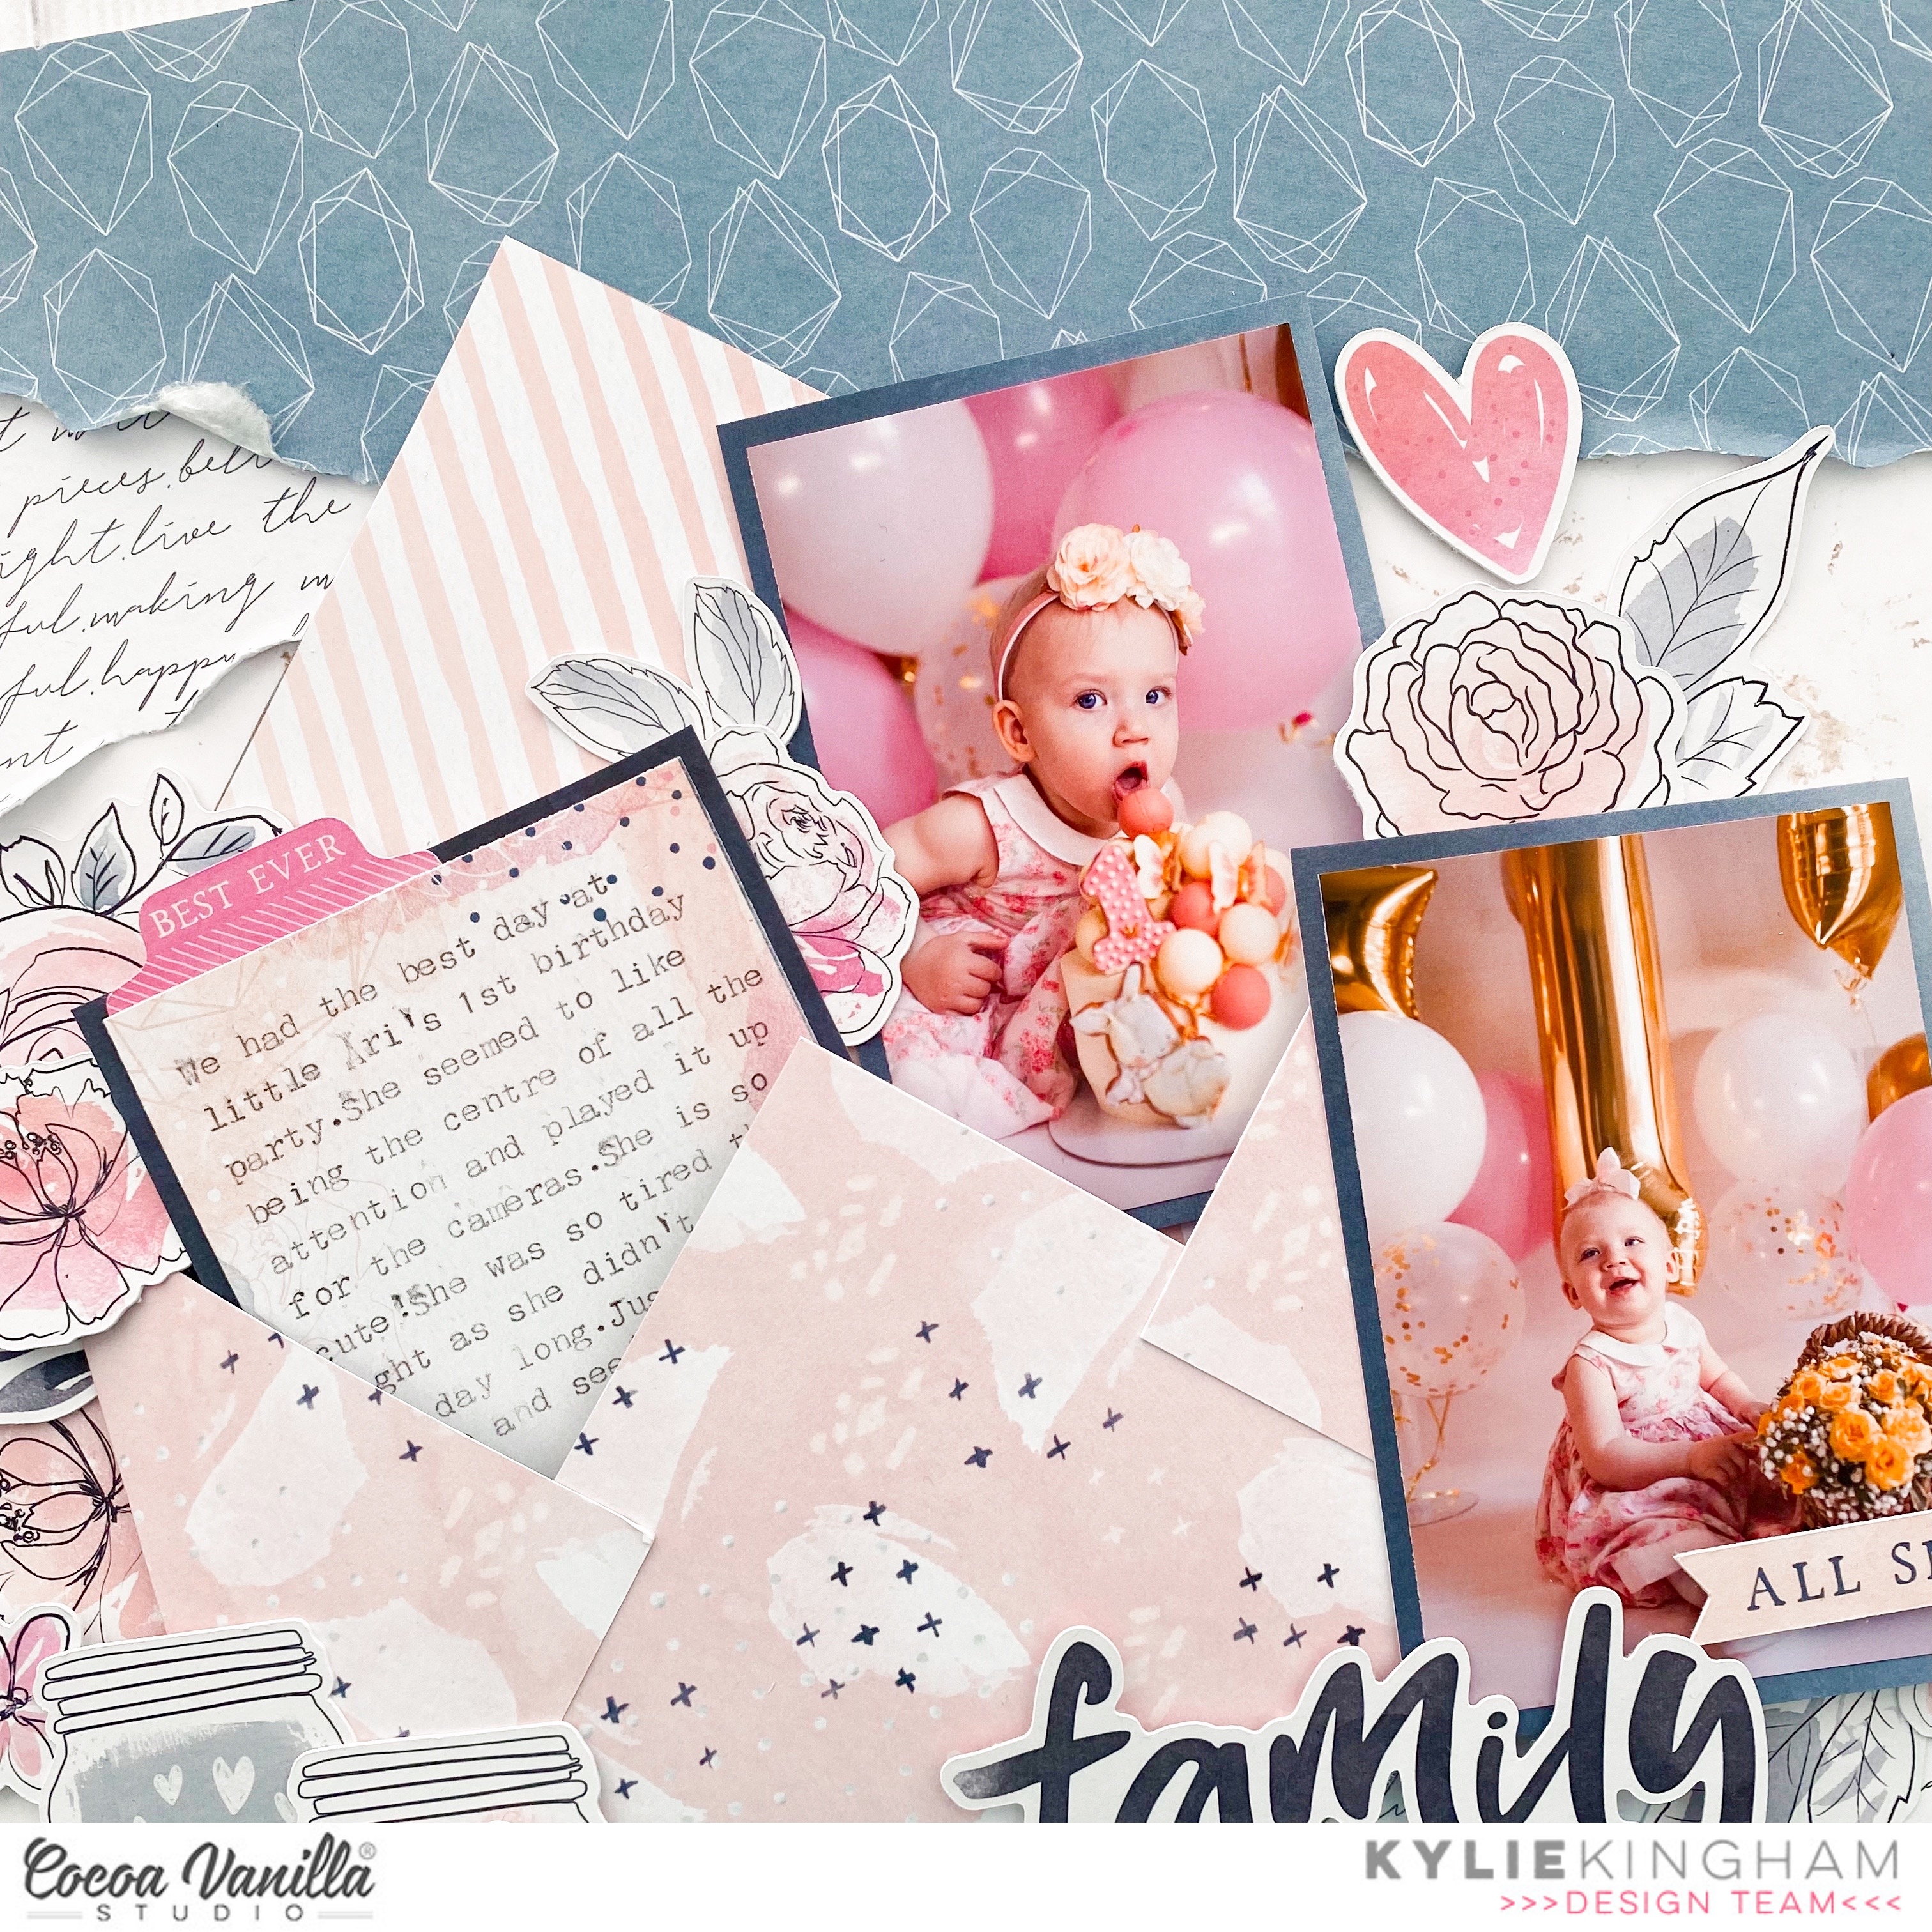
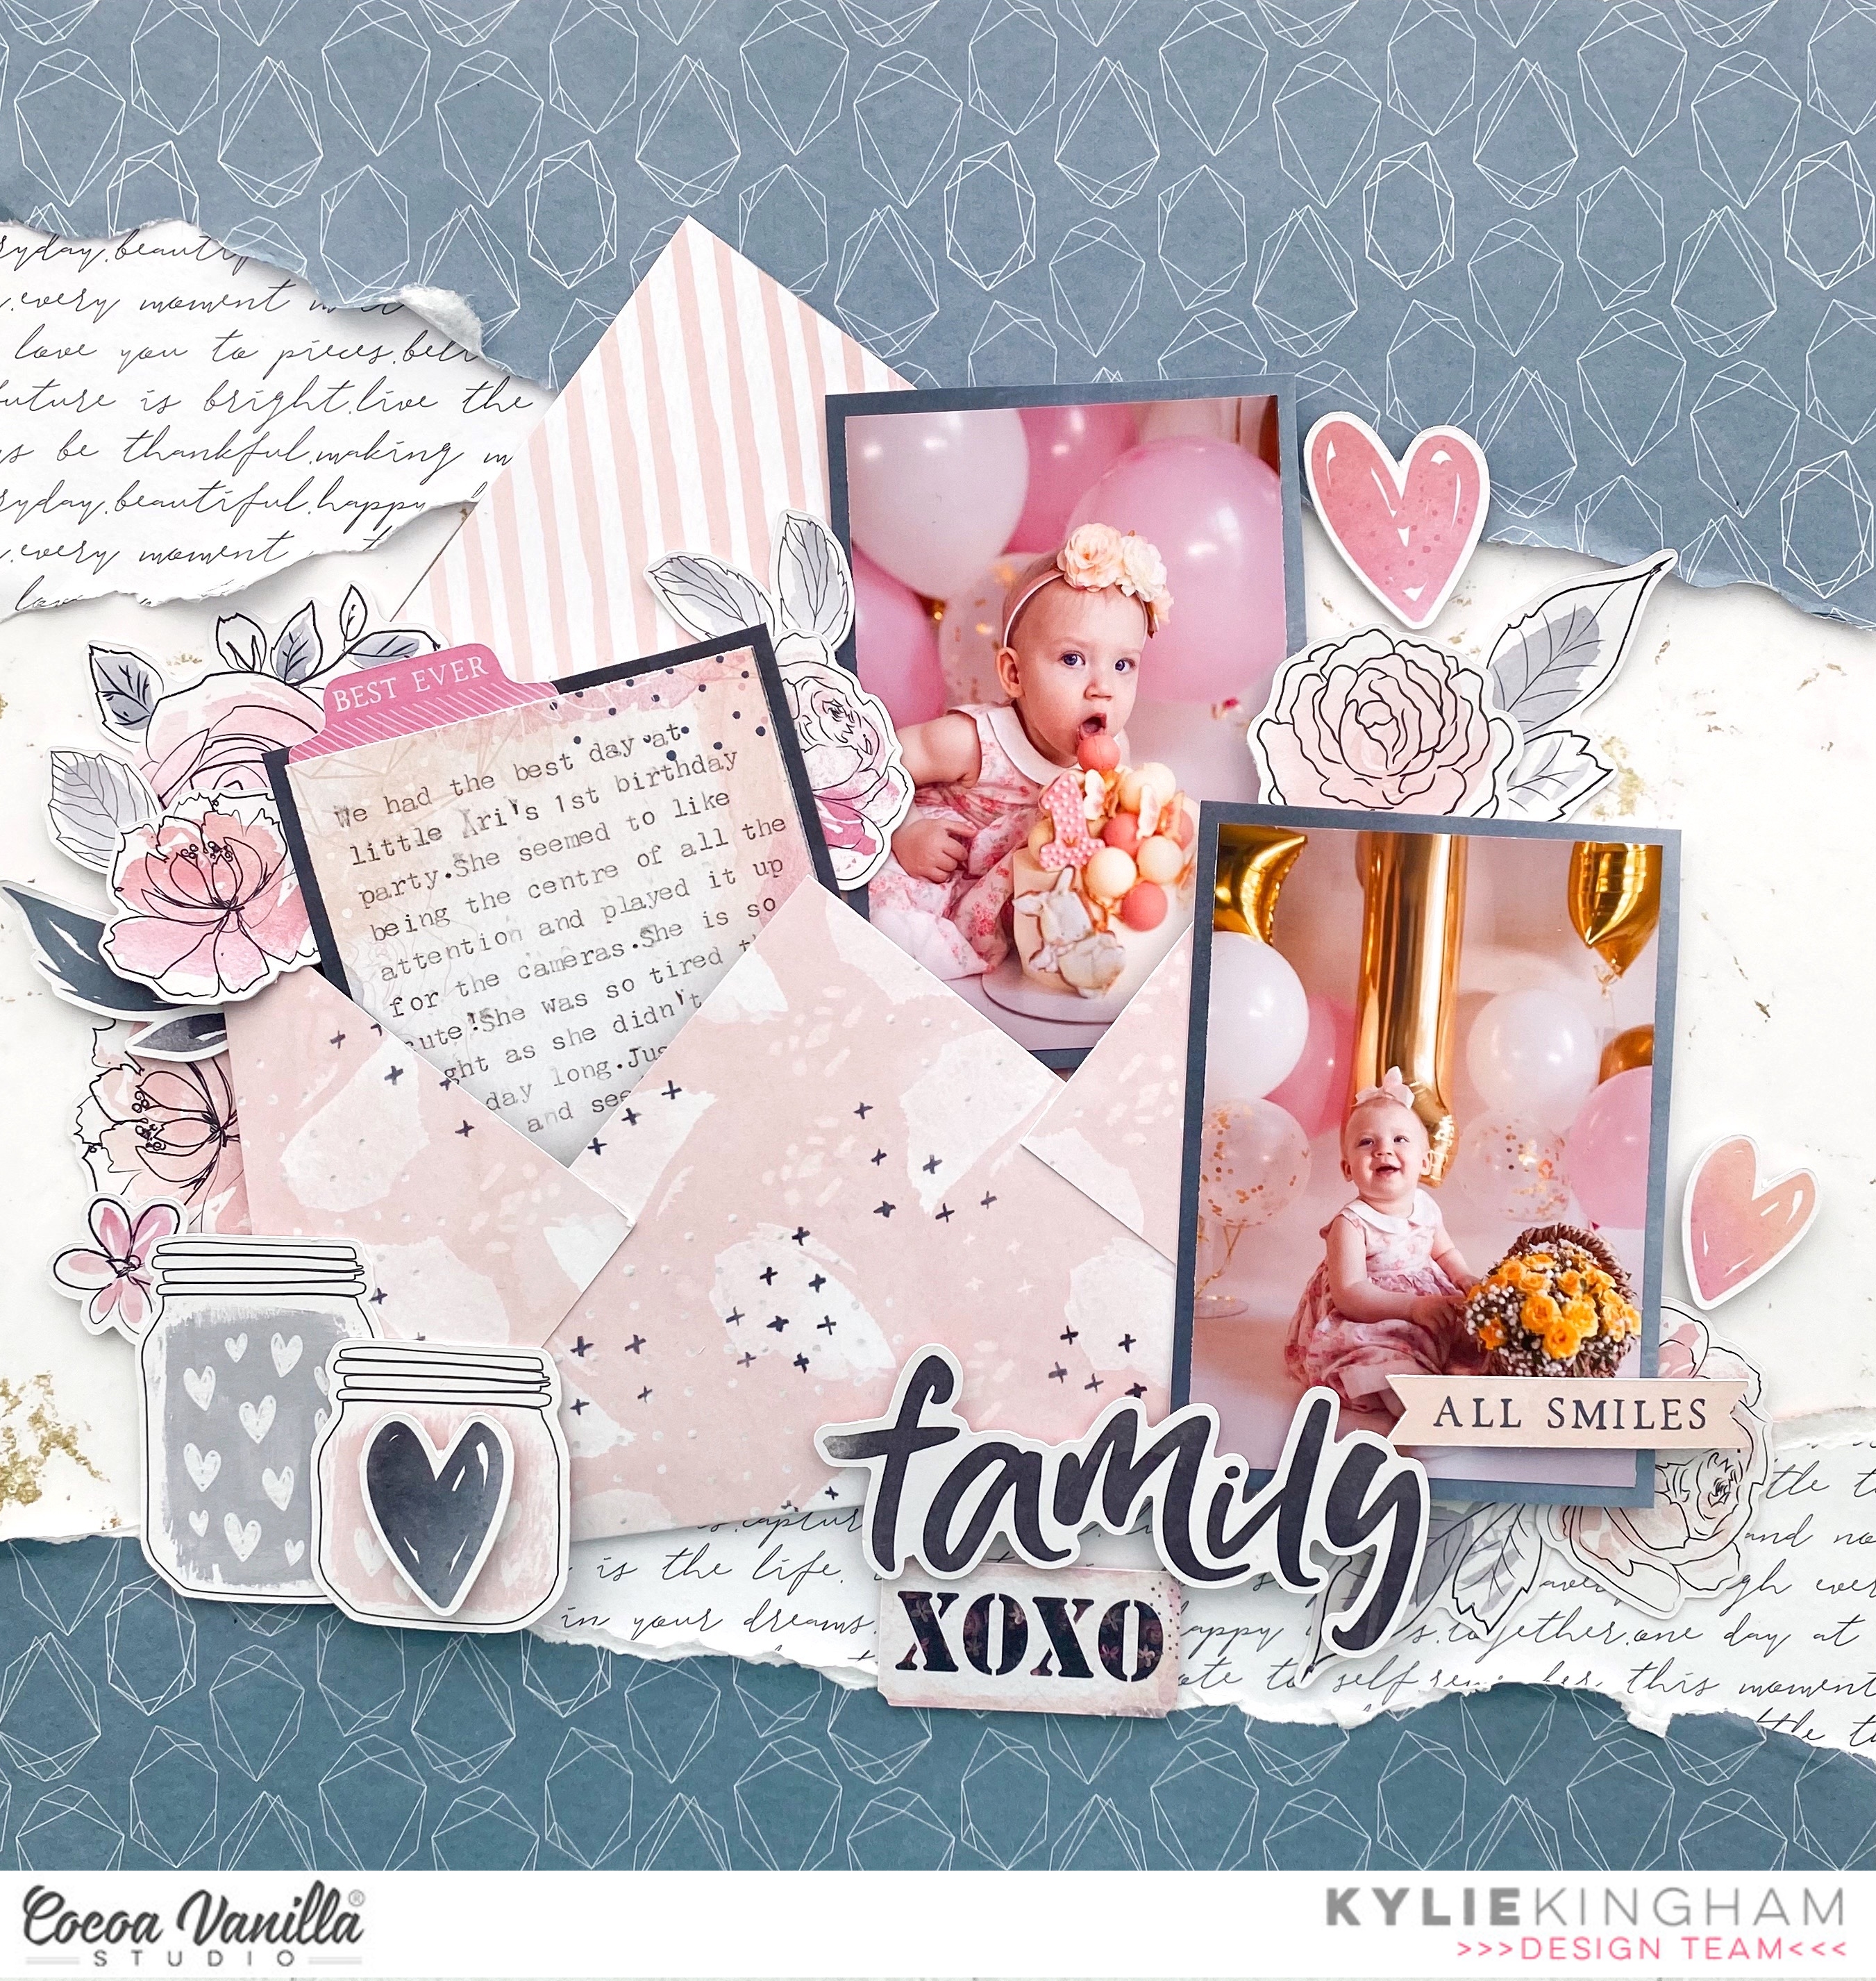
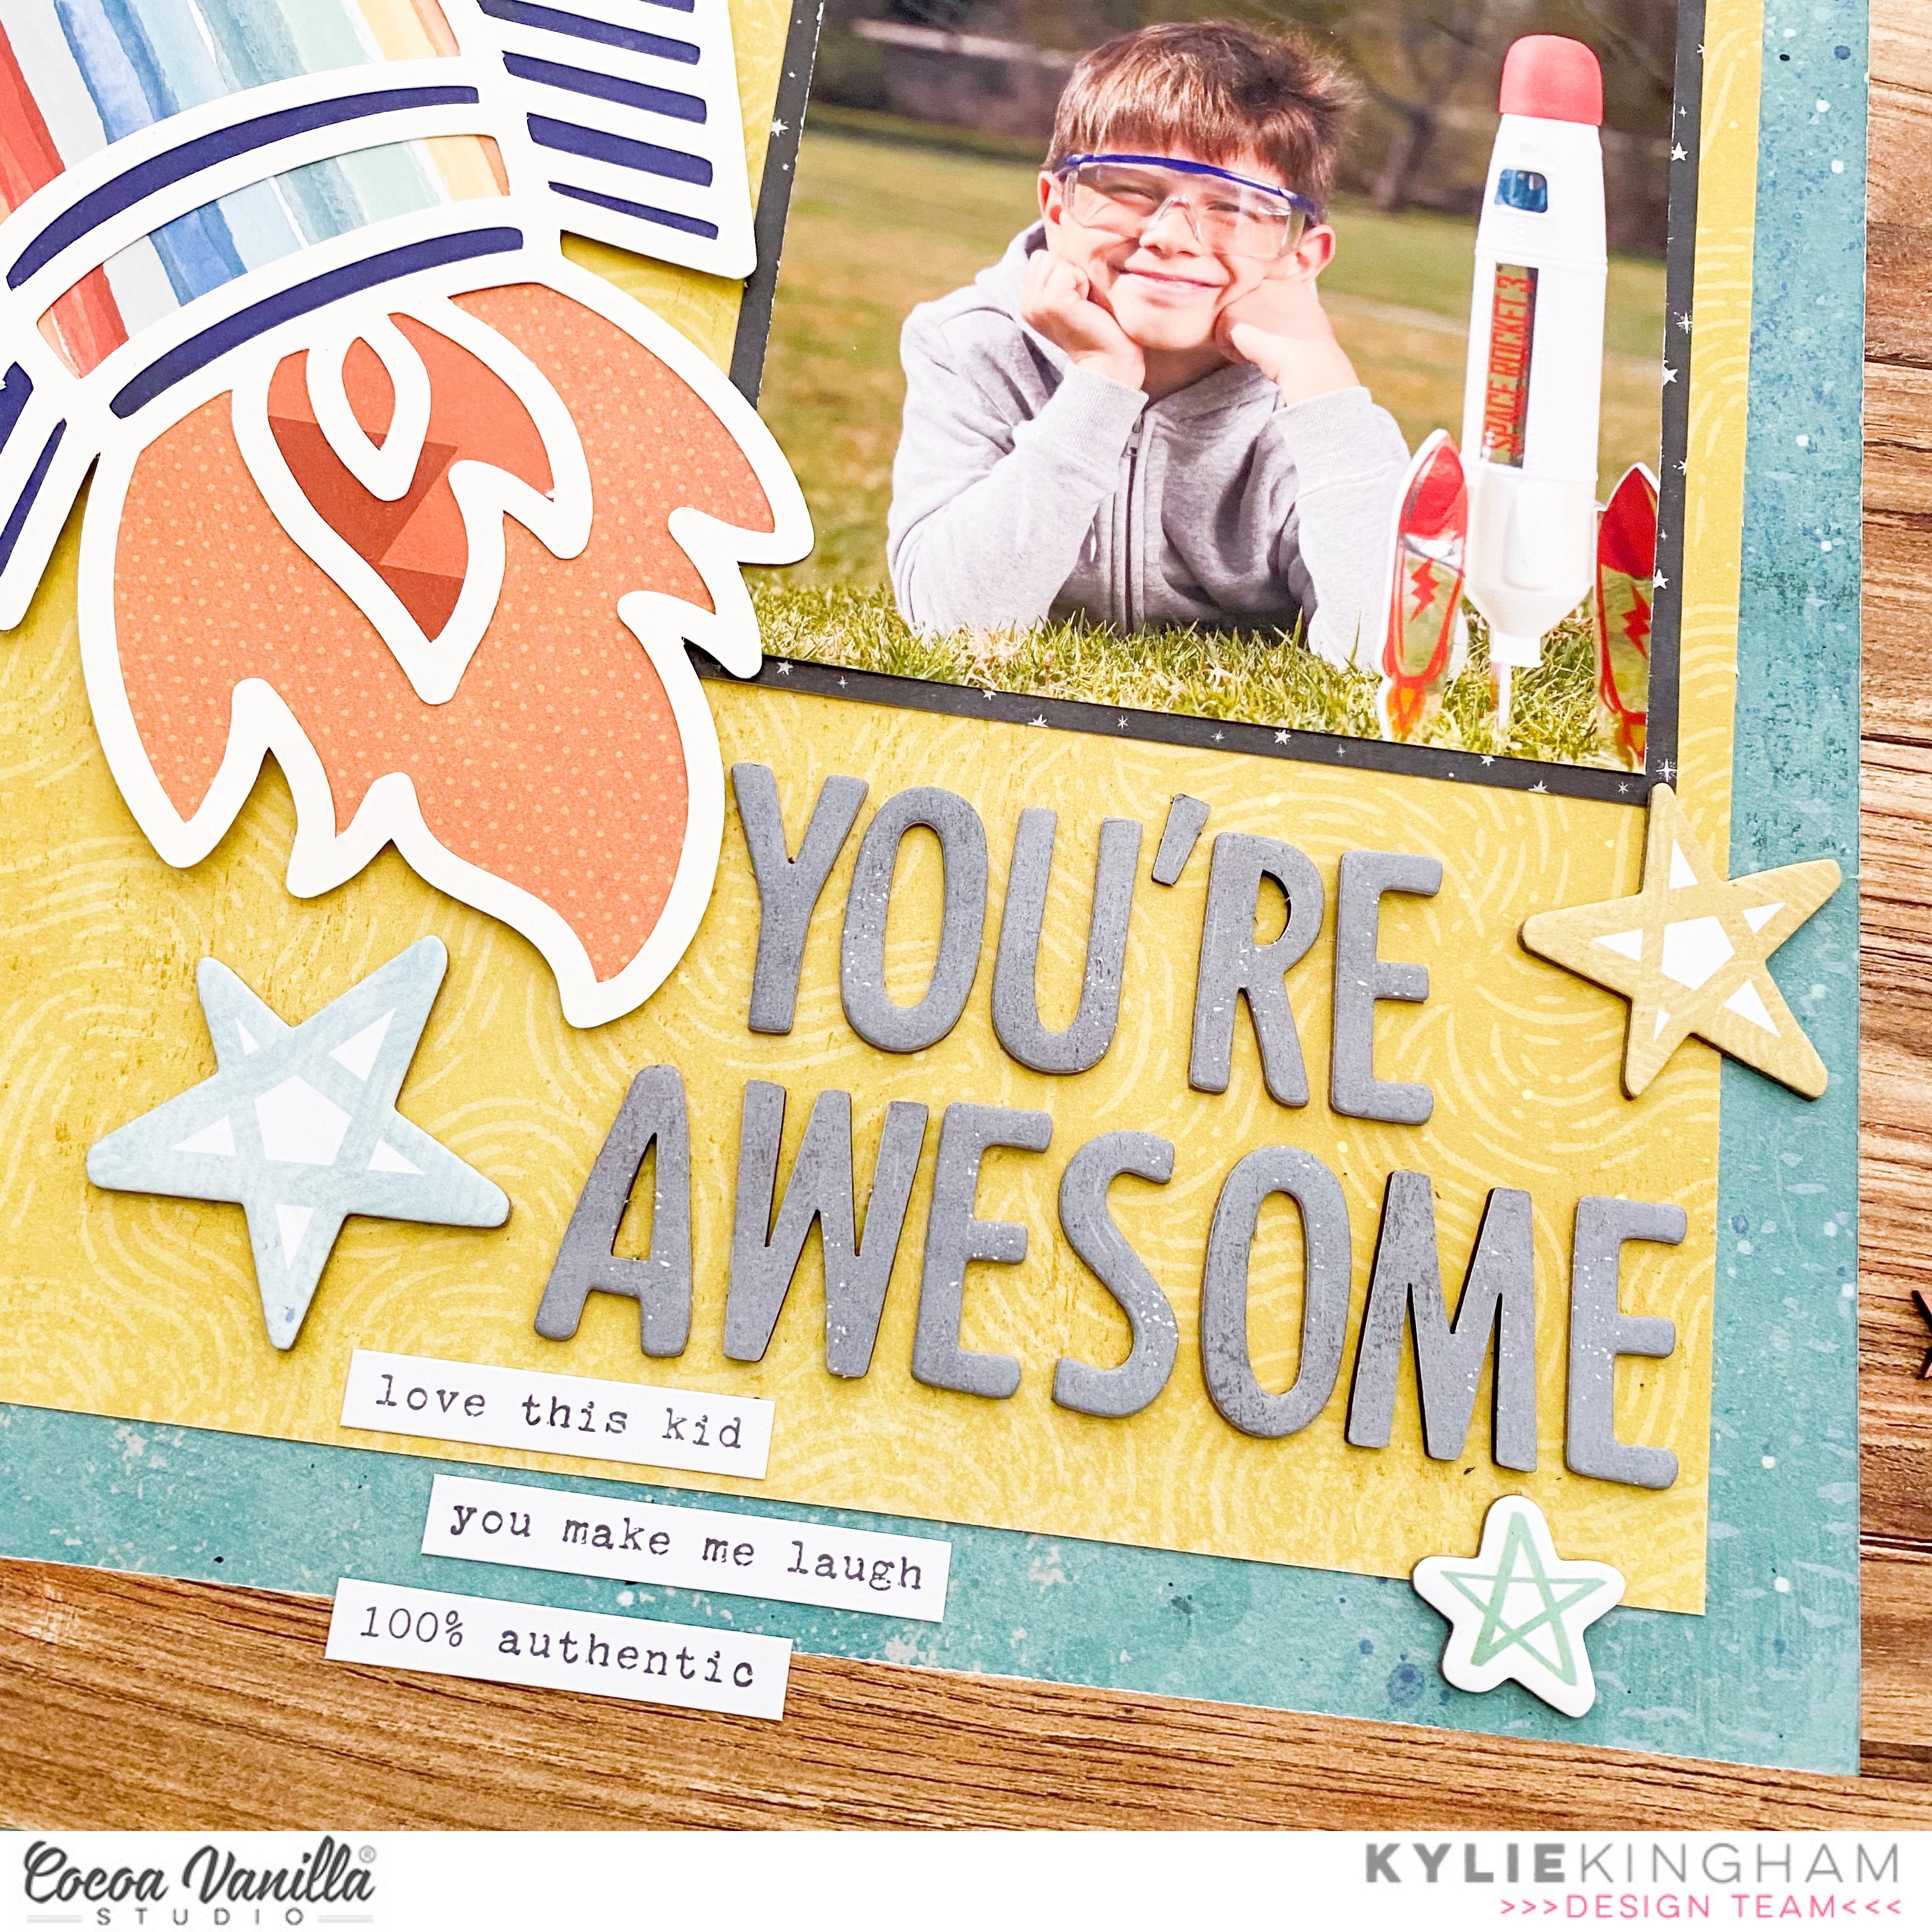
The A5 paper stack is always my go-to when backing cut files. I prefer to use the smaller sheets rather than cut into my 12″x 12″ papers. Once I had backed my cute rocket, it was adhered to the background with foam adhesive squares.

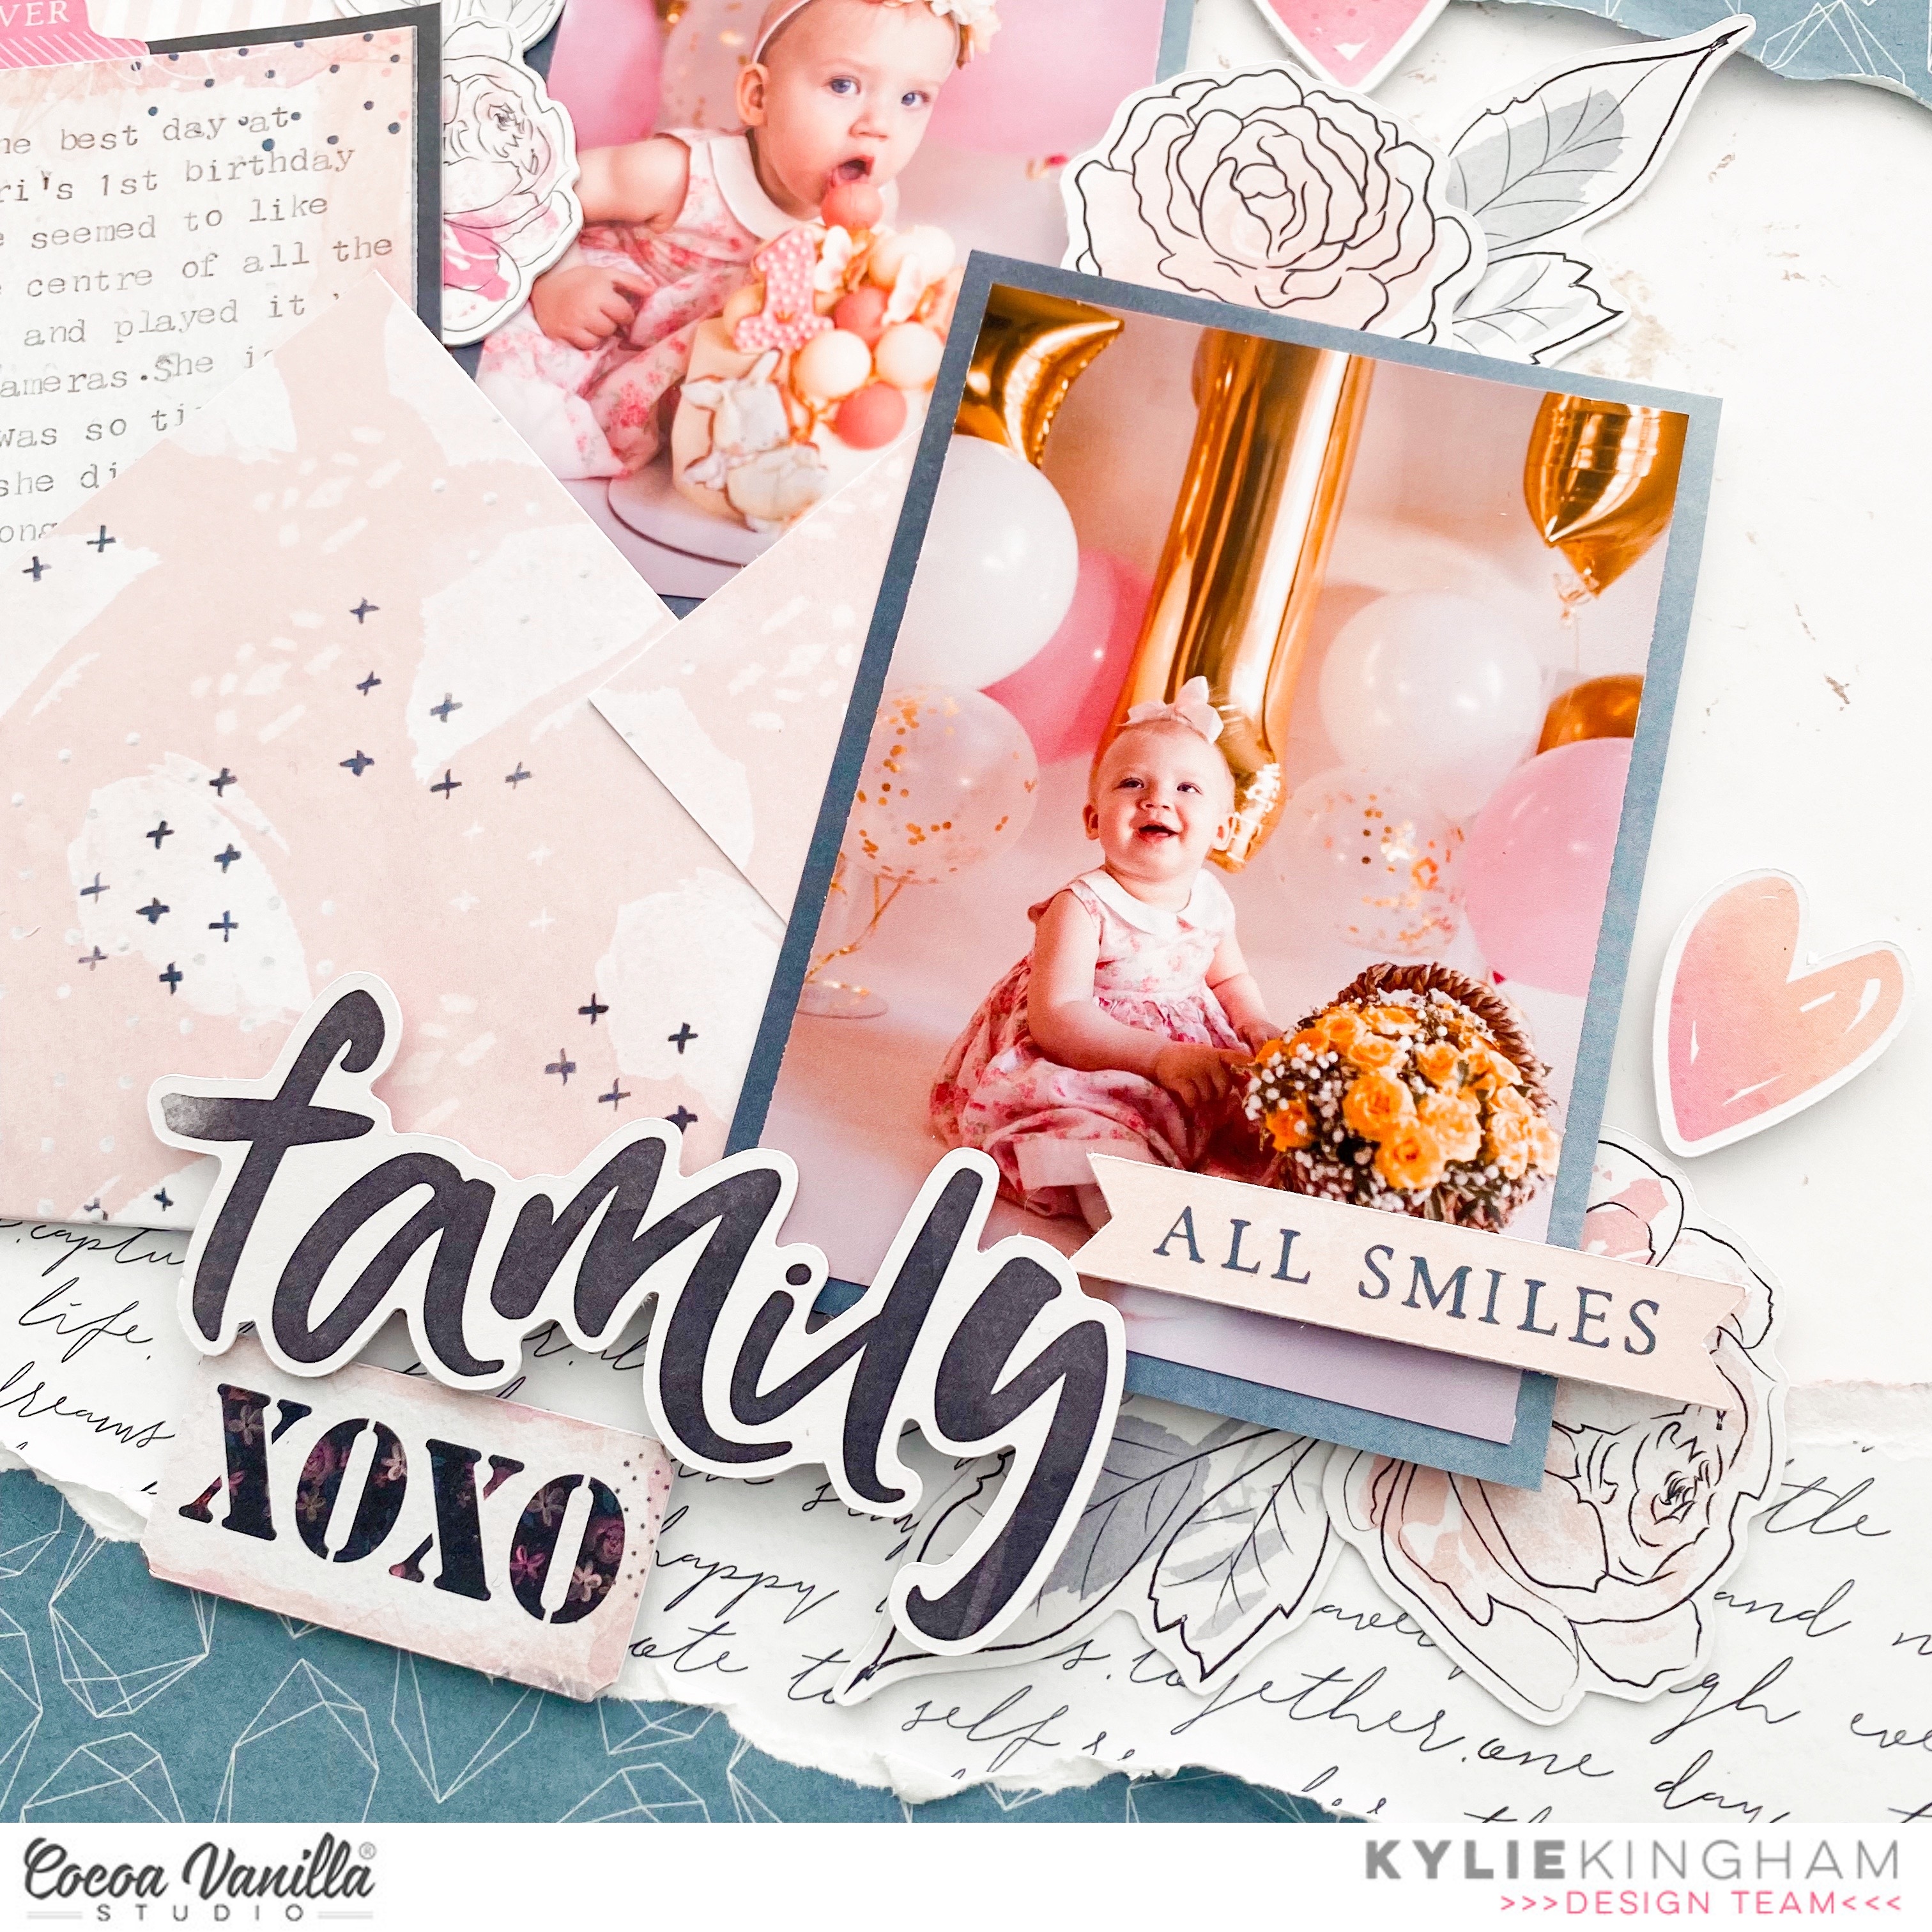
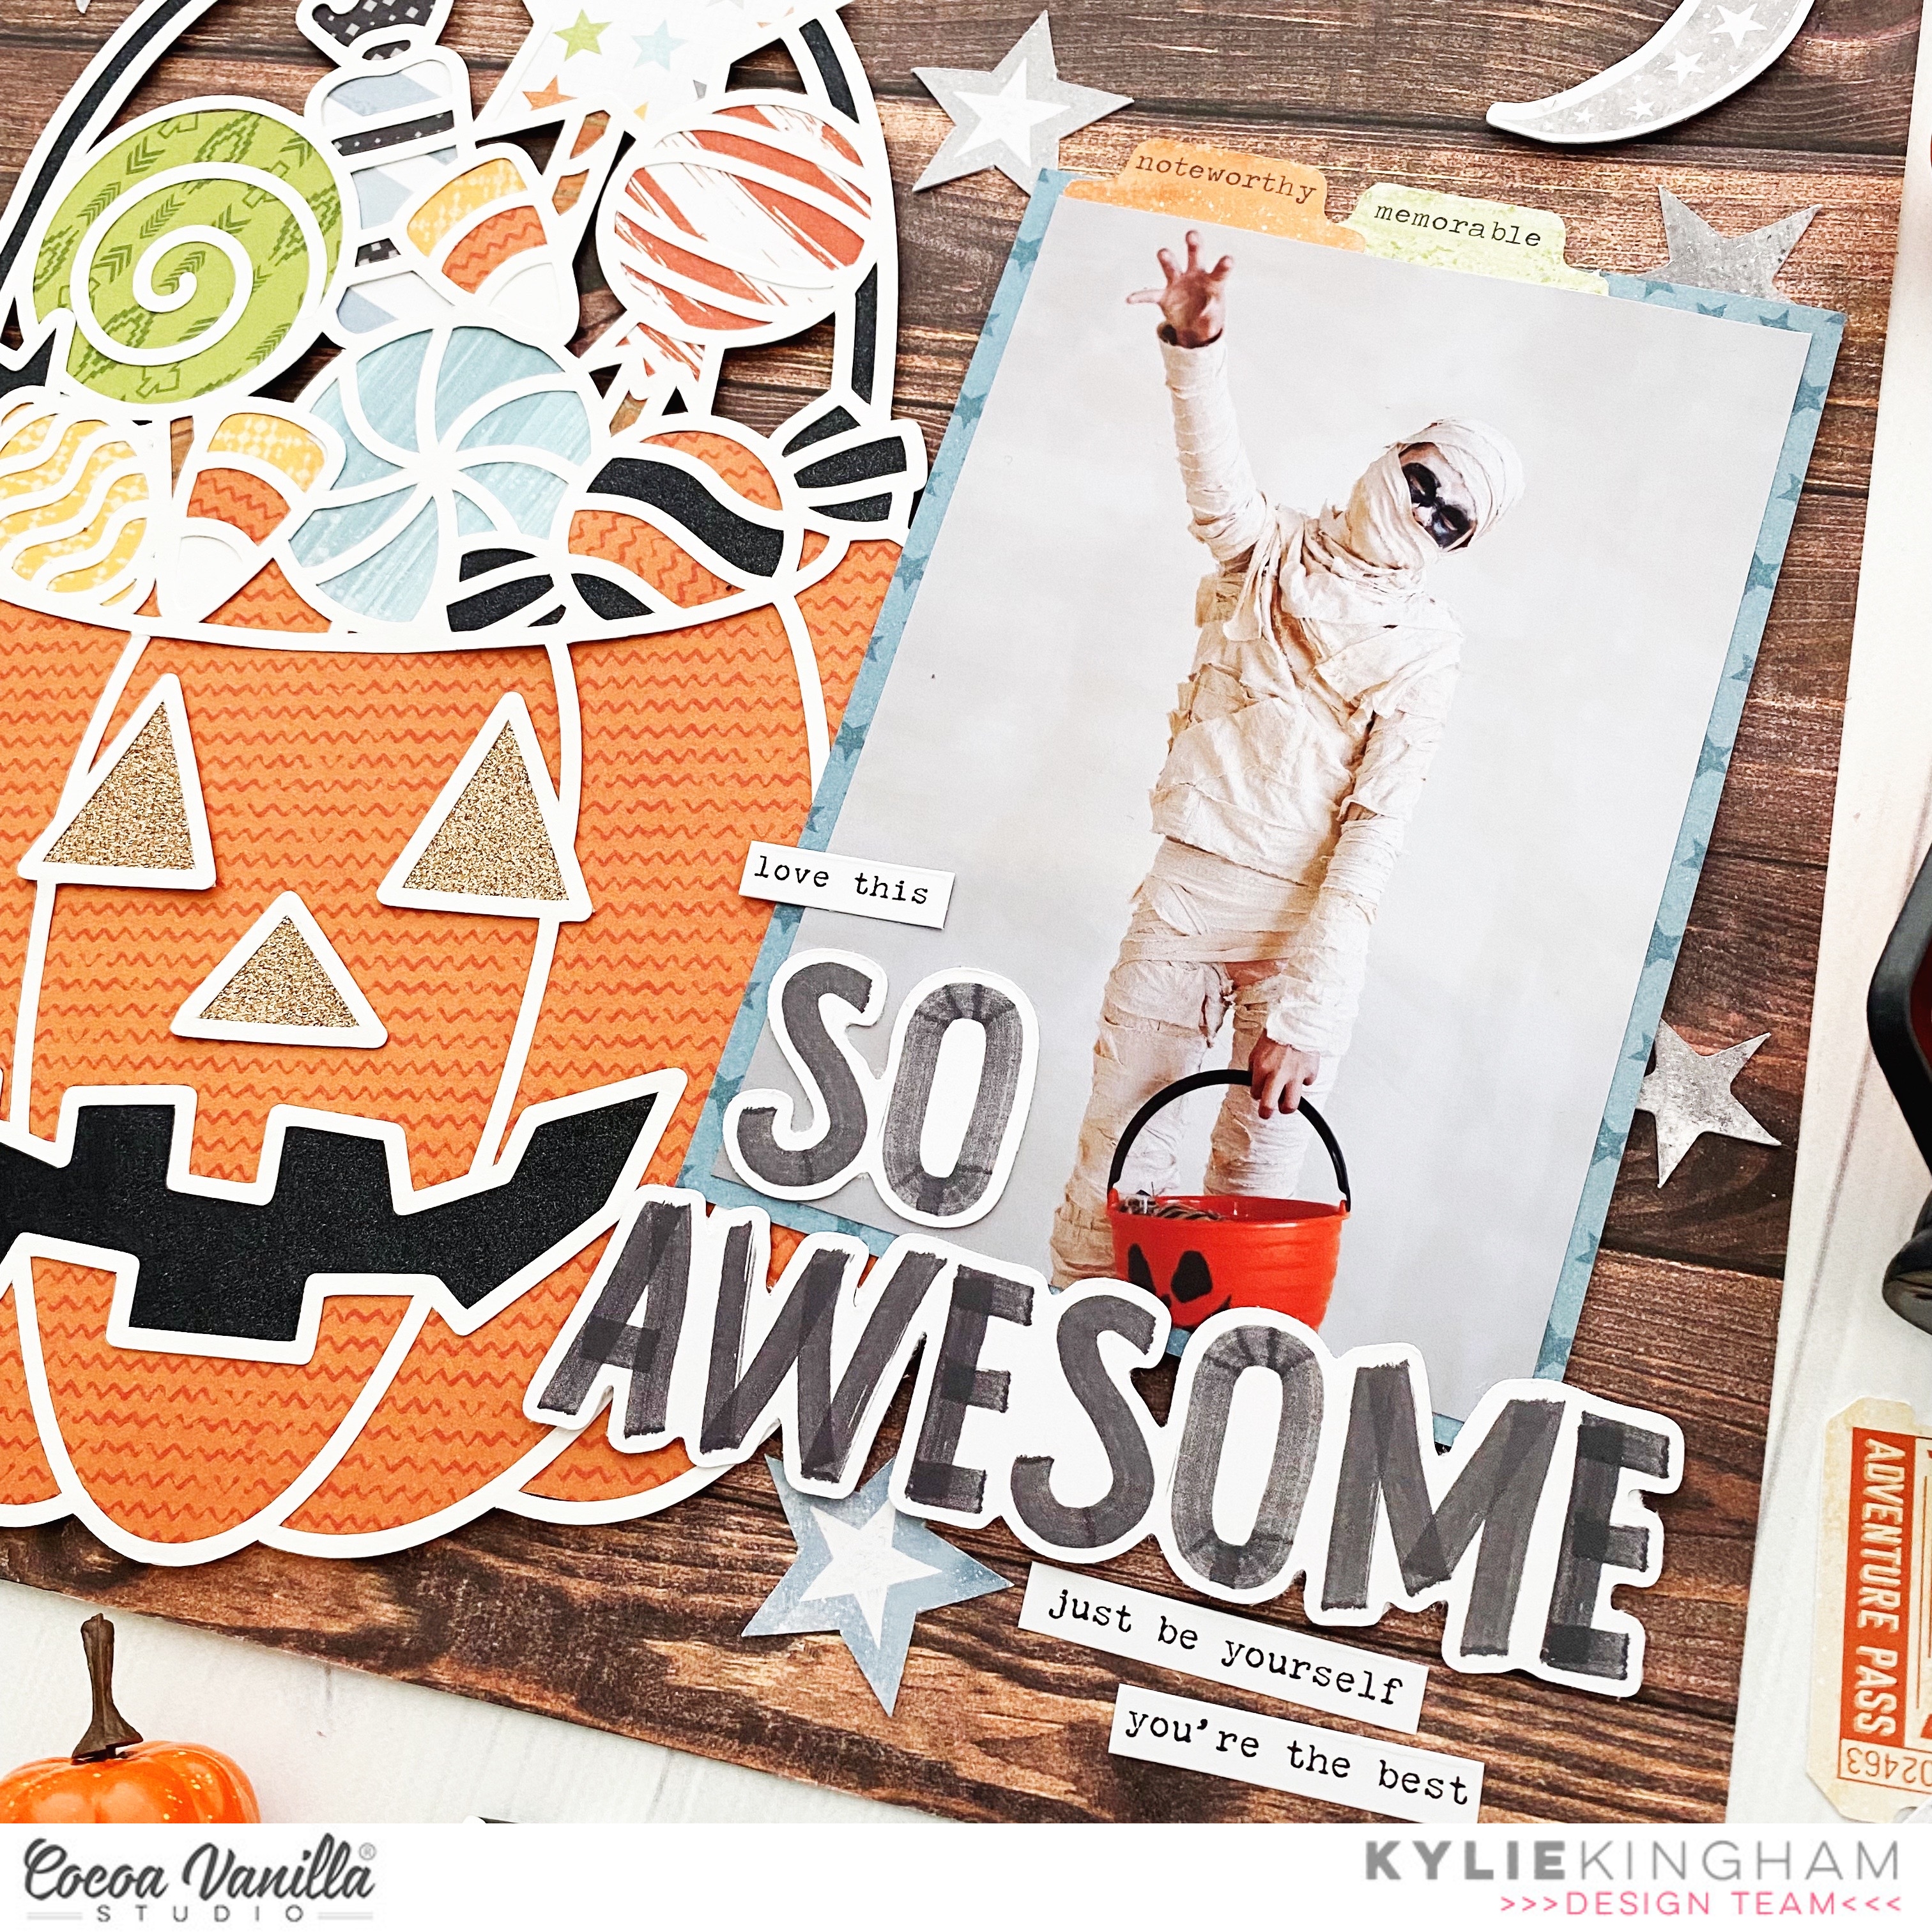
I cut a 4.25″x 4.25″ photo mat from a piece of paper from the A5 paper stack. My photo was trimmed down to 4″x 4″ before being adhered over the photo mat and onto my layout. I was particularly drawn to the chipboard stickers for this page and added the ‘YOU’RE AWESOME’ sticker title below my photo as well as a few stars for balance. To finish my page I added some sub-quote phrases from the sticker sheet too.

Thanks so much for stopping by the blog today and seeing my first layout created with the ‘NO LIMITS’ collection. I hope you liked it!

Until next time, Kylie.

Take Two with Cocoa Vanilla

Hello scrapping friends! It’s Kylie back with you today with a fun layout to share for Cocoa Vanilla. Do you like to intermix your collections when scrapbooking?? I know for some that would seem the ultimate sin, which is totally OK! I’d love to share with you all though how it can be fun to do so with some amazing results. So I have a little ‘Take Two’ theme for you today. I created this page combining both the DAYDREAM and JOYFUL collections. When I laid each collection out together, I really loved the mix of colours and patterns together. Even though one is a Christmas themed collection, it still works so well with everyday layouts. I really got sense of a ‘Boho’ vibe, which is what I ran with and included a lovely large flower cut file which was designed by Paige Evans.

A wide variety of different papers were used from both collections to back my cut file. Once that was completed I adhered it to the ‘AFLUTTER’ paper from DAYDREAM with foam adhesive squares. This gave it a nice dimension and texture on the page.Using the ‘STEPPING STONES’ paper also from DAYDREAM, I added a wide decorative edge against the straight side of the cut file.

My photo was cut slightly smaller than its original 6″x 4″ size before being matted and added to the left side of the cut file flower. I then began adhering some of the DAYDREAM floral die cuts until I was happy with the overall balance.To create my page title, I have combined a die cut from DAYDREAM with some of the JOYFUL- PUFFY GOLD TITLE STICKERS

Thanks so much for stopping by the blog today. I hope my layout has given you some inspiration to try combining some of your collections too!

Kylie.

Beautiful Moments | Cocoa Vanilla

Hey friends! Happy New Year to you all! It’s Kylie back with you today and I am sharing a new layout I created for Cocoa Vanilla, which I drew inspiration for from the January mood board which was designed by DT member Sophie. In case you haven’t seen the mood board yet, here it is:

Drawing inspiration from a mood board is a wonderful way to create, especially if you are having a little ‘scrappers block’ with ideas. (We’ve all been there!) There are many ways to interpret a mood board, it could be the theme, the colours or patterns or perhaps a particular element. For me when I saw the mood board I immediately thought Winter, (obviously), but what stood out to me were the snowflake cookies. I also loved the blue floral print on the dress. Here is a look at my design and you will be able to see how I have taken these two particular elements to complete my layout.

I decided to use the lovely ‘MIDNIGHT’ collection because of the lovely blue tones included in the papers as well as floral elements. I used a ‘Snowflake’ border and ‘Snowflakes’ cut file designed by Paige Evans in the top corner of my page. The border cut file was cut from white cardstock and I used a variety of coloured papers to cut the individual snowflakes. These were adhered randomly over the top of the border with foam tape, creating a layered, dimensional effect.

I trimmed my photo down to a smaller size from 4″x 6″. It was then adhered with foam squares amongst the snowflakes. I decided to add some hearts and smaller floral die cuts as well, these blended beautifully!

A large title was created from the title die cut pack, which was then adhered with more foam squares below my photo. I also created a smaller sub-title phrase from the sticker sheet which gave a nice overall balance.

I hope you have enjoyed seen my layout, created with inspiration from the January mood board. I hope you will create something too!

Until next time,

Kylie.

Fa La La | Cocoa Vanilla

December is here and the festive season is in full swing! It’s Kylie with you today and I have another layout to share featuring the new ‘Joyful’ collection by Cocoa Vanilla, to hopefully give a little holiday scrapbooking inspiration. I absolutely love every single paper design so I wanted to challenge myself to try and use nearly every single one in a layout. Thanks to the Tree Border cut file designed by Paige Evans, I think I was able to come pretty close!

Once I had cut out the 3 tree borders with my Cameo, I was able to back them with papers from the A5 paper pack. I like using this paper pack for cut files as it saves my 12 x 12 papers. I used brown cardstock from my craft stash for the tree trunks and adhered them to my background paper with foam adhesive squares.

With so much colour happening in my background I didn’t feel the need to ‘over-embellish’ my layout. My photo was trimmed to measure 5″x 3.75″ and adhered to a photo mat measuring 5.25″ x 4″.Once it was adhered into place I added a few cute die cuts and a title from the die cut pack.

Thanks for stopping by today! I hope you enjoyed seeing my latest page design.

Take care,

Kylie

Magical Memories | Cocoa Vanilla.

Hi friends! It’s Kylie back today with another layout to share featuring the new ‘JOYFUL’ collection from Cocoa Vanilla. I’m really loving the colour palette of this range which features traditional Christmas tones yet muted for a modern appeal. I centred this page around a lovely cut file of Christmas Lights which has been designed by Paige Evans.

Once my cut file had been cut out, I used the A5 paper stack to back each individual bulb. This didn’t take too long and I loved the colourful effect once it was completed. The ‘DECK THE HALLS’ paper was used as my background and I adhered the light bulbs with foam adhesive squares so that it sat up a little adding dimension.

A 6″x 4″ sized photo was used on my layout and I neatly tucked it under some of the light bulbs. It was a great nesting point where I could then anchor some cute embellishments and chipboard stickers. The ‘Magical Moments’ title was created from the gold alpha stickers and positioned above my photo which seemed to be the best place for balance.

To finish my layout I added some of both the chipboard and cardstock sticker phrases below my photo. I also added some of the gold chipboard stars throughout my page.

Thanks for stopping by the blog today. I hope it gives you a little inspiration for your own Christmas scrapbooking.

Until next time,

Kylie.

Joyful | Cocoa Vanilla

Hello everyone. It’s Kylie back with you today to share a brand new layout I have created. I am a little bit excited as it is the first layout I have made with the new ‘Joyful’ collection by Cocoa Vanilla. My children and I have always loved watching Christmas movies with ‘Elf’ being one of our favourites. So today’s layout features a cute pair of Elf legs in tribute to our favourite tradition and movie.

Creating my Elf legs was easy and you can give it a try too! I cut two pieces of ‘HOLLY DAYS’ paper to measure 5″x 2″. For the feet I cut two pieces of ‘MAKING SPIRITS BRIGHT’ paper to measure 3.5″x 2″. Finally, I cut some little cuffs from the ‘TIS THE SEASON’ paper to measure 2″ wide, and I fussy cut along one of the zig zag lines. All that was left to do then was shape the feet. I used a corner punch to round them out and trimmed out a piece from the top to make the look more authentically ‘Elf’. To finish I added one of the gold stars to the toes.

Both the ‘Advent’ and ‘Feeling Festive’ papers were used for the background paper, with a border strip added from ‘Tis The Season’ and ‘Deck The Halls’ papers. My Elf was adhered to the top of the page and I used some foam adhesive squares to add the cuffs to give it more dimension.

My photos were trimmed to a smaller 3″x 4″ size to be adhered across the lower side of my layout. I used some of the cute die cuts and chipboard stickers  to add balance to their position and add more colour.

I so love the inclusion of the puffy gold title stickers in the ‘Joyful’ collection. I used them to create a large title to suit my page and adhered them next to my Elf legs in the upper portion of my layout.

Thanks so much for stopping by the blog today. I hope you give my little ‘Elf’ theme a try for yourself.

Until next time,

Kylie.

Family Layout | Cocoa Vanilla

Hello friends! It’s Kylie with you today with a brand new layout to share for Cocoa Vanilla. The theme on the blog today was ‘Creative Journaling’ so I am going to share a fun way I have incorporated a journal card to a layout.For my 12 x 12 page I have used one of my very favourite past collections, ‘MIDNIGHT’.

Some torn strips of paper were added to my background page with double sided tape to give some nice texture.I’m documenting some cutesy first birthday photos and thought it would be fun to have an envelope on my page. This was created using my We R Memory Keepers, All In One tool and I used measurements to fit a 6 x 4 card. However if you don’t have this tool you could easily make your own envelope by carefully opening out a paper envelope, tracing it before cutting it out. So using it as a template. Once I had made my envelope I then made a lining for it in co-ordinating paper and adhered it to my background page.

From the ‘MIXED BLESSING’ paper I trimmed a 3 x 4 card and I like to use my typewriter to add my journaling. It just seems to have an aesthetic I love plus I really don’t like my handwriting! Once completed I then added it over a piece of ‘INKY DEPTHS’ paper so it had a nice contrasting border. I used this same paper to mat both of my 3 x 4 photos too. My journal card was added to the envelope with repositionable tape, that way it can be removed to read and put back in place easily.

To finish my page, all that was left to do was to add some flowers…….LOTS of flowers, as well as a large title from the die cut pack.

I hope you have enjoyed seeing how I have included some creative journaling in my layout today and that it gives you a little inspiration for your own creating! Until next time,

Kylie.

Spooky Pumpkin!

Hey friends! Today I am sharing the first layout I have created using the 20 days of Halloween cut files by Paige Evans. You can purchase them HERE. I have used the gorgeous Pumpkin cut file and teamed it with the Bungalow Lane collection, also designed by Paige.

Yep…. I really filled the page with this one! I absolutely love it! I’ve used some gold and black glitter cardstock to back the facial features. Once I had finished backing the rest of the Pumpkin with Bungalow Lane papers, it was adhered to my background with foam adhesive squares. This just gives an added nice dimension to the completed page.

Some floral die cuts were adhered around the top of the Pumpkin, this added a lot more colour and texture as well.

My photo was printed to a 3 x 4 inch size and I distressed the edges a little before adhering into place. All that was left to do was add a jumbo title with the gorgeous Bungalow Lane alpha stickers. I really love the end result of this page and the colour combinations. Don’t forget to check out Paige’s cut files for yourselves! Until next time,

Kylie.

SPOOK-TACULAR | COCOA VANILLA

Hello friends! It’s Kylie with you today and I have a fun new layout I have created to share that I created for Cocoa Vanilla. Even though we don’t really recognise Halloween here at home, I had some photos of some Halloween fun at school I wanted to scrapbook. The main focus of my page is a cute cut file which has been designed by Paige Evans. The “LEGENDARY’ collection was my choice for this page as the colour scheme was perfect for what I had in mind.

The ‘OUTDOORS TYPE’ paper was chosen for my background. I love the depth of colour and the woodgrain look it has. Once I had cut out my cut file, I began the process of backing each section piece by piece. Rose Gold and Black glitter cardstock from my stash were used on the facial features.For dimension I adhered the cut file to my page using foam adhesive squares.

For a little added texture on my background I tore into the top of my page and added some of the ‘EPIC TALES’ paper in behind.

My photo was trimmed to 5.75″x 3.75″ and backed with a 6″x 4″ piece of paper. It too was adhered with foam adhesive squares. This also allowed me to tuck some of the star die cuts in underneath both the photo and the cut file. I created a title to correspond with the pages theme from the large title die cut pack and also added some of the typed phrase stickers below.

I really hope you have enjoyed seeing my ‘SPOOK-TACULAR’ themed page today on the blog. I have also filmed a short process video.

Perhaps it gives you inspiration for your own scrapbooking layouts. Until next time,

Kylie .

Family Together | Paige Evans Cut Files

Hello friends! I have a new layout to share with you today featuring the beautiful ‘Bungalow Lane’ collection by Paige Evans. I have teamed it with one of Paige’s exclusive FALL cut files from her ‘20 Days of Fall/Autumn’ cut files bundle. I’m using the Fall Borders for my layout and I wanted them to be a feature in my page design as a background element.

Once I had cut and backed each border I adhered them to my background page. I made sure they did not line up evenly in their placement to allow a more ‘free’ flow in design. Each were adhered with foam adhesive squares so that they sat up from the background, adding extra dimension to my page. A variety of papers were used to back each border so that it added lots of colour. Using the alpha stickers from the ‘Bungalow Lane’ collection, I created an embellishment cluster to the top right corner of my page, tucking in some of the floral die cuts.

My photos were printed to a 3″x 4″ size and backed with some white tissue paper. Once in place I added more of the floral die cuts as well as some stickers too. I folded the edges of the leaves a little to create dimension .

Thanks so much for stopping by today. I hope you have enjoyed seeing my latest layout. Until next time,

Kylie.