Valentine Treat Boxes | We R Memory Keepers.

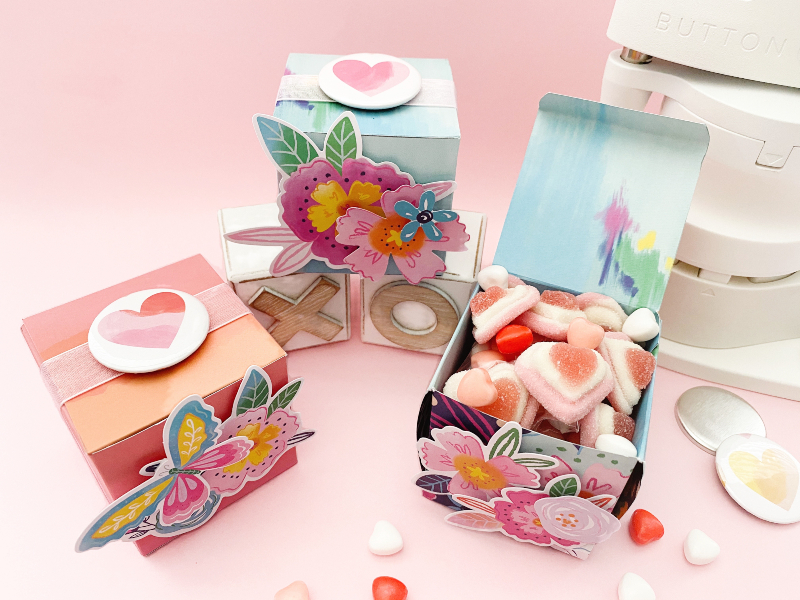
Hi lovely friends! It’s Kylie back on the blog with you today with a fun ‘Valentine’ project to share with you all. I have such a sweet tooth and love nothing more than the occasional…(*ahem…) piece of candy or chocolate. With Valentines Day approaching, I thought it would be fun to create some ‘sweet treat’ boxes embellished with some buttons made with the Button Press by We R Memory Keepers.

Before I created the buttons, I set about making the boxes themselves. There are lots of free templates available online for gift boxes or they are really easy to construct using your trim and score board.

Once completed my boxes were a very cute 5cm or 2″inches square in sizing. I used strong double sided tape to adhere them together, so that they won’t pull apart with the weight of the candy.
I chose the medium size buttons for my treat boxes, and cut each heart out using the cutting die first. The die itself is very sharp and does punch through the paper effectively, however a helpful tip when using thicker card stock is to punch down a few times, to ensure it cuts through.

A piece of the Mylar was placed over the cut paper design before it was pressed onto the button. This gives a lovely glossy, protective layer to the completed button. If you prefer a matte finish though you can leave this option off. I love just how easy this press is to use. The lever action of the handle presses the buttons without a lot of effort at all.

Once each button had been pressed I was able to fill each box with some heart shaped candy….( I may of eaten one or two….or eleventy billion). Some organza ribbon I had in my craft stash was placed around each box and using a strong double sided foam adhesive dot, I added a button centred on the top.

To complete each box I layered some beautiful floral die cuts to the front of each one, using foam adhesive dots again to give the appearance of dimension. All that is left to do now is send them to someone you love!

Thanks so much for stopping by the blog today. I hope you have enjoyed seeing my Valentine project created with the fun Button Press.

Until next time, Kylie.

Storyteller | American Crafts.

Hello lovely friends! It’s Kylie with you on the blog today, sharing some scrapbooking tips I used to create my latest 12 x 12 layout, featuring the ‘Storyteller’ collection by Vicki Boutin for American Crafts. When I am creating layouts, one thing I love to do is include dimension and texture within the design. These can be great elements to use if you also like to frame and hang your layouts on display.

Let’s talk fussy cutting! It’s one of those techniques you will either love or hate. For me personally, I love it and can actually find it quite relaxing to sit and snip away at paper! My best advise for fussy cutting is to take your time and to use small, fine pointed scissors for a more accurate finish. For this particular layout, I fussy cut all of the foliage and flowers. To create dimension to each piece, I gently curled up the edges of each flower and folder each leaf. It may seem like a small detail at the time, but once all the elements are in place you can see the effect it gives.

I selected the ‘MARIPOSA’ paper as my background and adhered a 8″x 8″ square of white card stock to the centre. Once all of my elements were fussy cut I began adhering them around the outside of this square, using it as a guide to cover the paper seam. In order to have the appearance of ‘rise and fall’ with the leaves, I used foam adhesive dots to some and not others. This helps to create a nice dimension.

With all of my flowers and foliage in place, I usually like to take a step back and view my page from a distance. This helps me to check that I have a nice even balance. More often than not I will tuck a few extra pieces in here and there to obtain a neat even finish. My photos have been printed smaller to a 3″x 4″ size and yes! I have printed the same photo twice! This is just a little ‘artsy’ method I use but you could always use different photos, placed in full view for this page design. I’ve added some of my favourite die cuts in behind my photos as a backing.

With everything in place I just loved the pop of colour from the leaves against the white centre. To keep my page balanced, I have added a small cluster of embellishments to the opposite corner to my photos which completed my page nicely.

Thanks so much for stopping by today. I hope the few tips I have shared will inspire you a little with your own scrapbooking. Some more tips I have always tried to remember is it’s always good to think outside the square with your scrapbooking and to remember there are no rules and no wrongs with your creativity.

Until next time!

Kylie.

Happy Memories | Simple Stories.

Hello friends! It’s Kylie back with you today with a new layout I wanted to share. For today’s design I had a fun set of photos of my daughter in her Giraffe onesie. I knew the ‘HELLO TODAY’ collection by Simple Stories would be perfect for this layout, thanks to the fun bright colours and cute, various icons.

This layout was all about creating lots of different overlapping papers and contrasting colours. The ‘JANUARY’ and ‘SEPTEMBER’ papers were perfect as a background. They really reminded me of the Giraffe print on my daughter’s onesie. I trimmed the JANUARY paper to 5.5 inches wide and adhered it over the ‘SEPTEMBER’ paper. Next I cut a 9.75” square of the ‘MARCH’ paper and adhered it centred on the background.

My photos were printed at various sizes for effect and they too were adhered to the background overlapping each other. I cut a fishtail banner from the ‘JUNE’ paper which was added in behind the photos as well as a rectangle of ‘FEBRUARY’ paper. When I was happy with the positioning of my papers and photos, I began adding several elements from the BITS & PIECES pack as well as the chipboard stickers.

I love adding a big title to a layout. The ‘FOAM STICKERS’ were perfect for creating a title to suit and I adhered it to the top right side of my page.

Once completed I loved the burst of fun colours, patterns and textures of my page. This layout design would also be perfect for adding journaling to, however I added some extra stickers etc instead.

Thanks so much for stopping by today! I hope my layout has provided you with a little inspiration for your own scrapbooking.

Kylie.

Happy Heart | Cocoa Vanilla.

Hey friends! It’s Kylie back with you today with a new layout I created using the stunning ‘Daydream’ collection by Cocoa Vanilla Studio. I really love layering various papers to create my backgrounds. Sometimes I use intricate patterns and sometimes I keep it quite simple, like for today’s layout. I went with the beautiful ‘SUN SHOWER’ paper for my main background page, as it is so bright and happy!

To begin, I added some strips of the STEPPING STONES and ALL AFLUTTER papers to the right side of my page. One measured 10cm x 23cm the other 5cm x 28cm. Using my silhouette I cut a circle from the SWEET SERENITY paper and adhered it over the other strips to the left side of the page.

To add some nice balance to my page I added some strips of papers horizontally across the bottom of my layout. For texture I used a craft border punch from my stash on one which added a lovely detail. Both of my photos were backed with the DAISY DAYS paper and adhered to the lower right of the circle using foam adhesive squares. That way I was able to tuck embellishments underneath for effect.

When I embellish a layout I do tend to work in opposites, so I added a second cluster of die cuts opposite to my photos, again using foam adhesive squares for some to give more dimension. I also constructed a title from the large DIE CUT TITLES.

To complete my page I added several heart and insect die cuts around my layout design as well as a small sub title created from the typed phrases on the sticker sheet.

Thanks so much for stopping by today. I hope you have enjoyed seeing my latest page design!

Kylie.